Farmhouse Fall Crafts DIY: Rustic Charm for Your Home
There’s something magical about fall the crisp air, the golden light, and the urge to make home feel extra cozy. It’s that time of year when simple handmade touches make the biggest difference. These farmhouse fall crafts capture everything we love about the season: warmth, texture, and a hint of nostalgia.
Each DIY project here is designed to bring a little farmhouse charm into your home from burlap pumpkins and flannel coasters to rustic wreaths and wooden bead garlands. You don’t need to be an expert crafter; just gather your materials, pour a warm drink, and let your creativity take the lead.
Every piece tells its own story a nod to slowing down, reusing what we have, and surrounding ourselves with things made by hand and heart.

This website contains affiliate links. As an Amazon Associate, I earn from qualifying purchases. Please read our disclaimer.
Farmhouse Fall Crafts DIY
Burlap & Lace Fall Wreath

Nothing says farmhouse fall quite like a handcrafted burlap and lace wreath. This charming piece blends rustic textures with soft, romantic details the kind of decoration that looks straight off a cozy country porch. Whether you hang it on your front door or over your mantel, it adds instant autumn warmth.
This wreath is beginner-friendly but looks beautifully detailed. The combination of burlap, lace, and dried florals brings that perfect mix of old-fashioned charm and farmhouse simplicity.
How to Make It
- Prepare the Base: Use a grapevine or wire wreath form as your base. If you’re using wire, wrap a layer of burlap ribbon (affiliate) around the frame first secure it every few inches with hot glue or floral wire.
- Create the Burlap Loops: Cut long strips of burlap ribbon (about 2–3 inches wide). Starting on one side of the wreath form, pinch a section of burlap and pull it through a gap in the wire form to create a loop. Continue this process, alternating direction and fluffing the loops as you go. For a grapevine base, simply glue or weave the loops into the vines.
- Add Lace Accents: Cut shorter pieces of lace ribbon (affiliate) or delicate fabric and weave them between the burlap loops. Keep it light just enough to soften the texture and add contrast. White or cream lace works best for that vintage farmhouse feel.
- Attach the Florals: Tuck in a mix of faux fall florals like mini sunflowers, dried hydrangeas, or eucalyptus stems. Use hot glue or floral wire to secure them in clusters, focusing on one side or the lower half for a modern asymmetrical design.
- Add a Finishing Bow: Tie a large bow using burlap and lace ribbons together. Attach it with floral wire at the bottom or side of the wreath. If you’d like, add a small wooden sign that says “Welcome,” “Gather,” or “Thankful.”
- Hang and Style: Loop jute twine through the top and hang it on your door, mirror, or even above a farmhouse console table.
Shop the Look
- Burlap ribbon rolls
- Lace ribbon or fabric strips
- Grapevine or wire wreath form
- Faux or dried fall florals
- Hot glue gun (affiliate) and floral wire
- Jute twine for hanging
- Optional: small wooden welcome sign
Dos & Don’ts
- Do layer textures burlap, lace, and florals create depth.
- Don’t overfill the wreath let the natural materials breathe.
- Do use asymmetry for a modern farmhouse touch.
- Don’t use glossy ribbon; matte finishes feel more authentic.
Burlap Pumpkin Centerpieces

Bring that harvest-table warmth with hand-tied burlap pumpkins. Wrap soft burlap around foam or fabric-stuffed forms, cinching with jute twine and finishing with a wooden stem. The frayed edges add rustic charm, while grouping them in different sizes keeps your display balanced and full.
These cozy burlap pumpkins bring farmhouse warmth to any table. They’re soft, neutral, and beautifully textured the kind of handmade accent that looks straight out of a fall magazine spread.
How to Make Them
- Cut the Burlap: Measure a circle of burlap (about 16–18 inches across for medium pumpkins). The rougher the edge, the more authentic the look no need for perfection.
- Form the Base: Place a foam pumpkin, pillow stuffing, or fabric scraps in the center of your burlap circle. Gather the burlap up and around, tucking the edges neatly into the top center. Adjust the folds until the pumpkin looks rounded and full.
- Secure the Shape: Tie jute twine tightly around the top, then wrap vertically around the pumpkin several times to form natural grooves. Pull gently to define soft sections and knot securely underneath.
- Add the Stem: Insert a small wooden stick, cinnamon stick, or piece of driftwood into the center as the stem. Secure with hot glue and finish with a raffia bow or leaf accent for texture.
- Style It: Group several pumpkins of varying sizes on a linen runner, wooden tray, or sideboard. Add a few faux leaves or acorns for a complete fall vignette.
Shop the Look
- Burlap fabric rolls
- Foam craft pumpkins
- Jute twine
- Wooden craft stems or cinnamon sticks (affiliate)
- Raffia ribbon
Dos & Don’ts
- Do keep folds loose and natural.
- Don’t over-tighten the twine it can distort the shape.
- Do vary pumpkin sizes for a layered look.
- Don’t use synthetic burlap real texture makes the difference.
Farmhouse Pumpkin Crates

Turn a basic wooden crate into a fall vignette shelf. Sand and whitewash it for a distressed look, then fill it with mini pumpkins, candles, and plaid throws. Layer varying textures linen, burlap, wood to create visual depth and a cozy, collected feel that fits right into any farmhouse corner.
This piece works beautifully indoors or on a covered porch. It’s versatile enough to hold your favorite fall accents and easy enough to finish in an afternoon perfect for a weekend decorating refresh.
How to Make It
- Prepare the Crate: Choose a small or medium wooden crate. Lightly sand to remove rough edges and splinters.
- Whitewash for a Farmhouse Finish: Mix white acrylic paint with water (1:1 ratio) to create a thin wash. Brush it over the crate, then wipe gently with a cloth to let the wood grain show through. Let it dry completely.
- Style Your Layers: Line the bottom with a soft fabric like linen, burlap, or a plaid napkin. Layer in small pumpkins, pillar candles in glass jars, pinecones, or even a folded plaid throw.
- Add Height and Balance: Use small books, risers, or stacked wood slices inside the crate to create varied levels. This adds interest and helps each element stand out.
- Finish the Look: Lean a small sign that says “Gather” or “Autumn Blessings” inside, or tie a bow of jute twine around one handle for a finishing farmhouse touch.
Shop the Look
- Wooden craft crates
- White acrylic paint
- Paintbrush and sandpaper
- Linen or burlap fabric
- Mini pumpkins and pinecones
- Candles or fairy lights
- Jute twine or small fall signage
Dos & Don’ts
- Do layer soft and rough textures for contrast.
- Don’t overload the crate leave a little breathing room.
- Do play with height using risers or stacked books.
- Don’t use bright white paint creamy tones feel more rustic.
Rustic Mason Jar Candle Holders

Create a cozy glow that feels straight out of a farmhouse evening. These rustic mason jar candle holders combine the warmth of flickering candlelight with simple country charm. Wrapped in burlap, twine, and a touch of lace or fall foliage, they’re the perfect way to add soft light to your mantel, table, or entryway.
These jars are an easy weekend DIY that delivers instant cozy vibes. With just a few materials, you can turn ordinary jars into timeless fall decor that looks handcrafted yet polished.
How to Make Them
- Wrap the Jar: Cut a strip of burlap wide enough to cover the middle section of the jar. Wrap it snugly around and secure the ends at the back with hot glue. For extra farmhouse charm, layer lace or plaid ribbon on top of the burlap.
- Add Twine Detail: Wrap jute twine several times around the top or bottom of the jar, tying it off in a small bow or knot. You can also thread on a wooden bead or tiny fall charm for texture.
- Insert Candle or Light: Place a tea light or small votive candle inside the jar. For a safer option, use battery-operated LED tea lights (affiliate) or fairy lights they give the same cozy glow without the heat.
- Embellish with Nature: Tuck in a few small faux leaves, mini pinecones, or cinnamon sticks under the twine. These little touches bring warmth and depth to your design.
- Style It: Group 3–5 jars of varying heights on a wooden tray, cutting board, or reclaimed plank. Surround them with dried leaves or eucalyptus sprigs for a complete fall centerpiece.
Shop the Look
- Mason jars (pint or quart size)
- Burlap ribbon or strips
- Lace or plaid ribbon
- Jute twine
- LED tea lights or fairy lights
- Faux leaves or small pinecones
Dos & Don’ts
- Do mix materials like lace and burlap for texture contrast.
- Don’t wrap too tightly allow fabric to sit naturally.
- Do use varied jar sizes for visual interest.
- Don’t use open flames unattended LED lights are safer.
Wood Slice Pumpkin Signs

Bring a touch of handmade harvest charm to your home with these adorable wood slice pumpkin signs. They’re rustic, cheerful, and easy to customize the perfect accent for your porch, mantel, or kitchen shelf. Using small wood slices, paint, and a little creativity, you’ll have a pumpkin patch that lasts all season long.
These wooden pumpkins have all the cozy character of fall without the mess of carving or rotting. Each one is unique, with its natural grain and imperfections adding to that farmhouse authenticity we love.
How to Make Them
- Prep the Slices: Choose wood slices that are flat and roughly 4–6 inches in diameter. Sand any rough edges lightly to keep them smooth and splinter-free.
- Paint the Base: Using acrylic craft paint, cover each slice with your chosen pumpkin shades think warm orange, creamy white, or soft terracotta. Leave a thin border of natural wood for a rustic framed look.
- Add Pumpkin Details: Once dry, use a smaller brush to paint vertical curved lines for pumpkin ridges. A little shading in a slightly darker tone gives them a natural 3D effect.
- Attach the Stem: Hot glue a small twig, cinnamon stick, or wood dowel piece to the top as a stem. Add a jute bow, raffia tie, or faux leaf for a cute finishing touch.
- Style It: Display several pumpkins in a wooden crate or lean them on a shelf next to candles and foliage. You can even stencil words like “Harvest,” “Gather,” or “Thankful” on one for added farmhouse flair.
Shop the Look
- Natural wood slices (affiliate)
- Acrylic craft paint (orange, white, tan, green)
- Paintbrushes
- Small twigs or cinnamon sticks
- Hot glue gun
- Jute or raffia ribbon
Dos & Don’ts
- Do mix different pumpkin colors for variety.
- Don’t overpaint let the wood grain show through for texture.
- Do layer your pumpkins for depth when displaying.
- Don’t use slices that are too thin thicker ones stand better.
Plaid Flannel Coasters

Add a cozy, homespun touch to your fall coffee table with plaid flannel coasters. These soft, rustic coasters combine the timeless charm of plaid flannel with the practicality of everyday use. They’re easy to sew (or even glue, if you’re going no-sew!) and make thoughtful handmade gifts for friends, neighbors, or anyone who loves that farmhouse feel.
Nothing says “fall mornings” quite like a hot mug resting on a soft plaid coaster. Mix different patterns and colors for a patchwork look, or stick to warm neutrals for a modern rustic vibe. Either way, they’re a quick, budget-friendly DIY that adds instant warmth to your home.
How to Make Them
- Cut Your Fabric: Choose flannel fabric in classic plaid patterns red, tan, gray, or cream. Cut 4-inch squares using sharp fabric scissors or a rotary cutter (affiliate). You’ll need two squares for each coaster (one for the front, one for the back).
- Add a Backing (Optional): For more structure, cut felt squares of the same size to use as a middle layer. This gives your coasters extra thickness and helps them hold their shape.
- Assemble the Layers: Stack the flannel pieces with the patterned sides facing each other, placing the felt layer (if using) beneath them. Pin the edges to keep them aligned.
- Sew (or Glue) the Edges: Sew around the edges with a ¼-inch seam, leaving a 1-inch opening. Turn the coaster right side out, then stitch or glue the opening closed. For a no-sew option, use fabric glue along the edges and press firmly until dry.
- Add Finishing Details: For a rustic farmhouse touch, top-stitch around the entire coaster about ⅛ inch from the edge, or tie small jute bows around stacked sets for gifting.
Shop the Look
- Plaid flannel fabric (assorted colors)
- Felt sheets (optional backing)
- Fabric scissors or rotary cutter
- Sewing machine (affiliate) or fabric glue
- Jute twine for tying sets
Dos & Don’ts
- Do prewash and iron your flannel before cutting it prevents shrinkage.
- Don’t use lightweight cotton; thicker flannel gives the best texture.
- Do mix different plaid patterns for a cozy farmhouse patchwork set.
- Don’t skip top-stitching it makes them last longer and look polished.
These coasters easy to make for gifts, to sell or for your home!
Tin Can Harvest Centerpieces
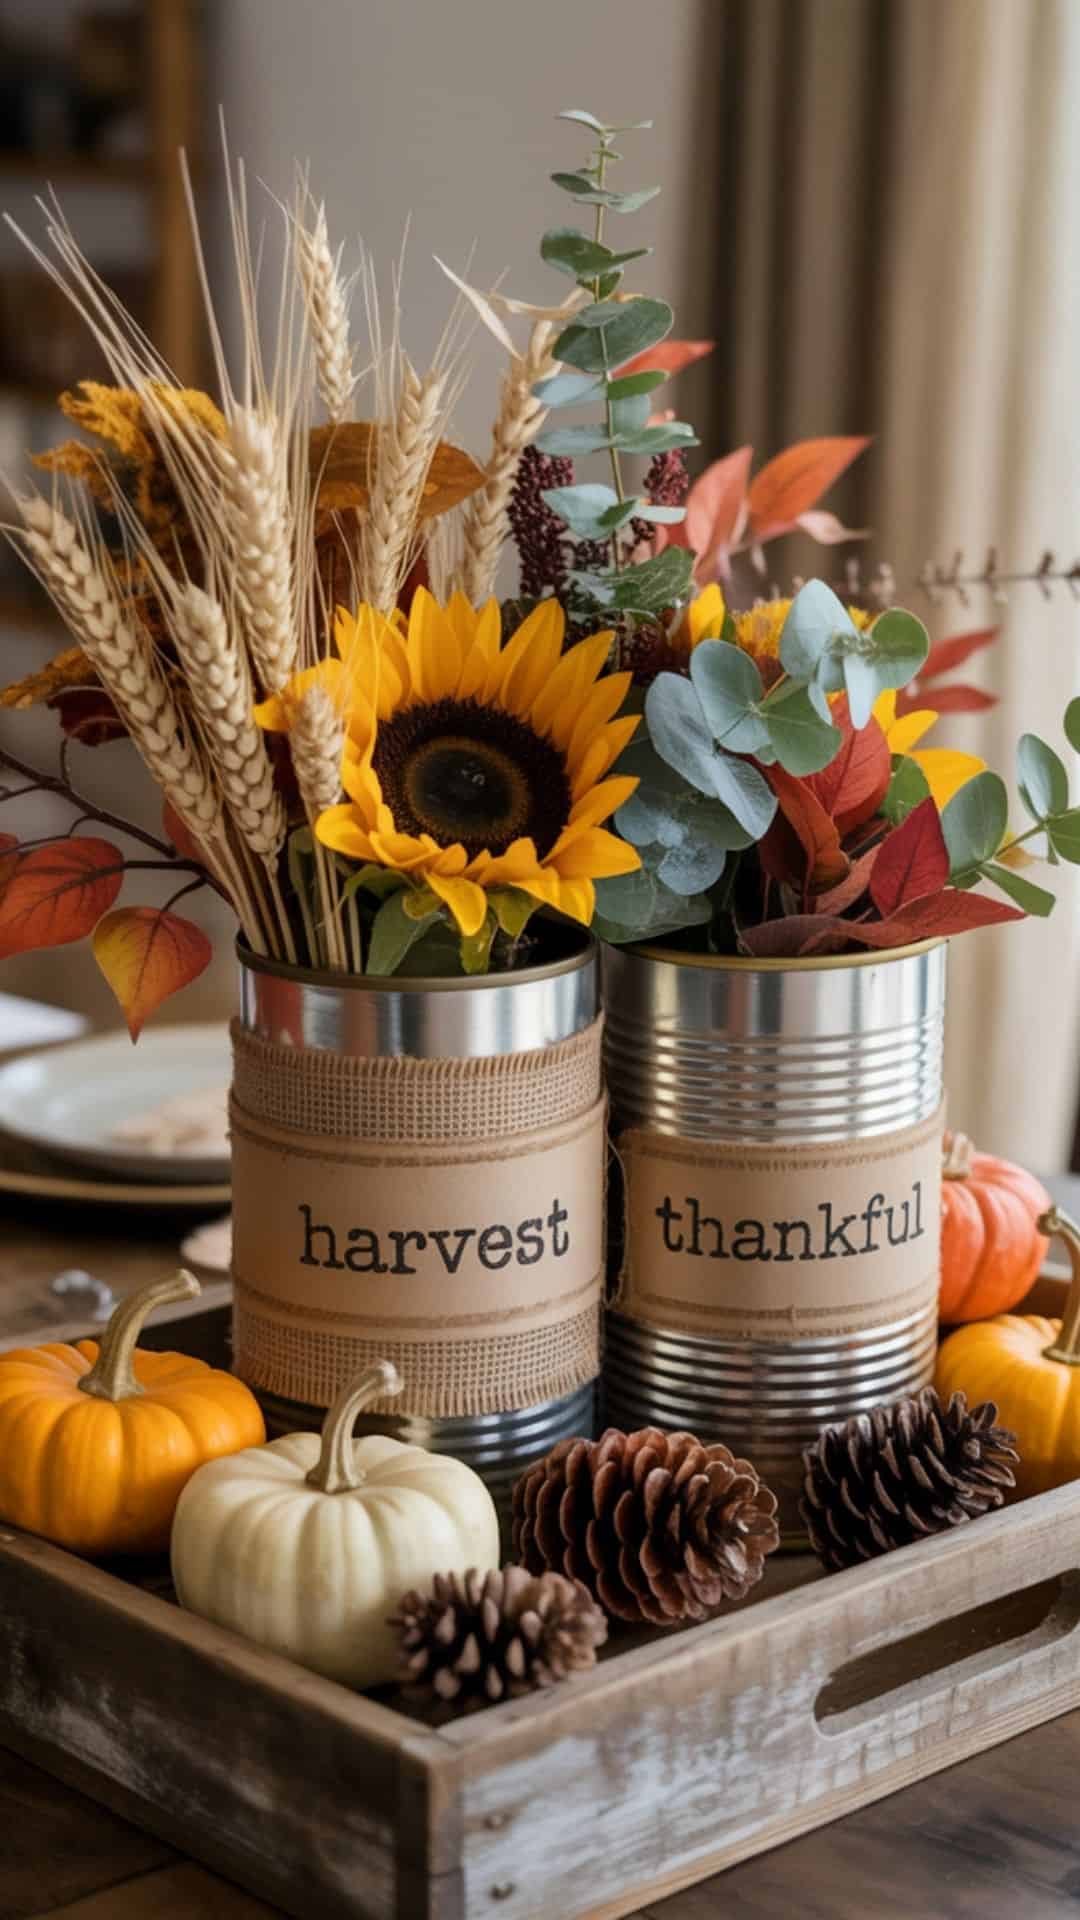
Turn everyday tin cans into charming harvest centerpieces that celebrate the simplicity of farmhouse living. This craft gives old cans a second life wrapped in rustic textures, filled with fall foliage, and glowing with seasonal warmth. Whether you display them on your dining table, entryway, or windowsill, these centerpieces add instant harvest beauty without breaking the budget.
This project is the perfect blend of recycling and rustic decor. Each can becomes a mini vessel of autumn charm, and once you start making them, you’ll want a whole cluster for your home.
How to Make Them
- Clean and Prep the Cans: Gather tin cans in different sizes soup, coffee, or vegetable cans all work. Remove labels, rinse, and dry thoroughly. If any edges are sharp, sand them lightly or cover with washi tape for safety.
- Add Texture with Burlap or Jute: Cut strips of burlap or jute ribbon to fit around each can. Wrap snugly and secure the ends with hot glue. For variety, alternate between burlap, lace, and twine to give each can its own character.
- Stencil or Label (Optional): For a personalized farmhouse touch, stencil words like “Harvest,” “Blessed,” or “Thankful” on the front of each can using white or black acrylic paint (affiliate). Lightly distress the letters with sandpaper once dry for a vintage feel.
- Fill with Fall Florals: Place a bit of floral foam or pebbles at the bottom of each can for stability. Arrange dried wheat stalks, faux sunflowers, eucalyptus, or autumn leaves. For smaller cans, consider dried lavender or baby’s breath for a softer contrast.
- Arrange Your Display: Group 3–5 cans together on a wooden tray, crate, or slice of reclaimed wood. Scatter mini pumpkins, pinecones, or acorns around the base for a full, layered centerpiece that looks straight from a farmhouse table setting.
Shop the Look
- Empty tin cans (various sizes)
- Burlap or jute ribbon rolls
- Hot glue gun
- Acrylic paint and stencils
- Faux or dried fall florals
- Floral foam or filler stones
- Small pumpkins or pinecones for styling
Dos & Don’ts
- Do vary can sizes for a collected, natural look.
- Don’t use flimsy cans sturdier ones hold florals better.
- Do mix materials like burlap, lace, and twine for texture.
- Don’t overfill let a little negative space show between elements.
Wooden Bead Garland with Leaves

Add a touch of natural elegance to your fall decor with a wooden bead garland with leaves. This timeless craft brings together warm wood tones, soft neutral twine, and pops of autumn color from felt or faux leaves. Drape it across your mantel, wrap it around vases, or layer it over a fall tablescape it’s one of those versatile pieces that instantly makes any space feel cozy and finished.
This garland is simple to make yet looks professionally styled. The mix of smooth wooden beads (affiliate) and rustic leaves captures that balance of farmhouse simplicity and fall beauty an ideal weekend project that’ll last for years.
How to Make It
- Gather Materials: Choose round unfinished wooden beads in varying sizes (½” to 1″). You’ll also need sturdy jute twine or cotton cord, scissors, and felt or faux leaves for accents.
- String the Beads: Cut a piece of twine about 5 feet long (or longer depending on your space). Tie a knot at one end and tape the other end for easy threading. String beads in a repeating pattern small, medium, large leaving small gaps every few inches for the leaves.
- Attach the Leaves: Use felt leaves cut from fall-colored sheets (rust, mustard, sage, and cream) or store-bought faux leaves. Thread the stem ends through the twine gaps or glue them between beads so they drape naturally. Alternate leaf colors to keep it balanced and organic-looking.
- Add Tassels or Charms (Optional): For a farmhouse finishing touch, add jute tassels or small wooden tags with words like “Blessed” or “Thankful.” To make tassels, wrap jute around your hand 20–25 times, tie near one end, and cut the loops. Trim evenly.
- Style It: Drape your garland over a mantel, along a dining table runner, or across open shelving. It also looks beautiful wrapped around a centerpiece tray or hung vertically beside a wreath.
Shop the Look
- Unfinished wooden beads (various sizes)
- Jute twine or cotton cord
- Felt or faux fall leaves
- Hot glue gun
- Scissors
- Optional: wooden tags or charms for accents
Dos & Don’ts
- Do mix bead sizes for a layered, professional look.
- Don’t use glossy painted beads keep them natural or matte.
- Do stick to 3–4 cohesive leaf colors for a calm palette.
- Don’t over-decorate; simplicity is key to farmhouse style.
Farmhouse Fabric Pumpkins

If you love soft, cozy textures and farmhouse charm, these farmhouse fabric pumpkins will steal your heart. They’re the perfect blend of homespun comfort and rustic elegance adorable as a table centerpiece, shelf accent, or tucked into a tiered tray. Made from fabric scraps, twine, and cinnamon sticks, each pumpkin turns out slightly unique which makes them even more charming.
These pumpkins are simple to sew (or glue, if you prefer no-sew) and can be made in any size. Neutral fabrics like ticking stripe, muslin, or flannel fit beautifully with farmhouse decor but don’t be afraid to add a pop of muted color for contrast.
How to Make Them
- Cut the Fabric: Choose your favorite fabric plaid, ticking stripe, burlap, or muslin. Cut a rectangle roughly twice as long as it is tall (e.g., 10″ x 5″ for a medium pumpkin). The wider the rectangle, the plumper your pumpkin will be.
- Sew or Glue the Sides: Fold the fabric in half with the right sides together. Sew or hot glue along the short edge to create a tube. Turn it right side out so the seam is hidden inside.
- Form the Base: Using a needle and thread (or twine), gather and cinch the bottom edge of the tube. Pull tightly to close the hole, knot securely, and flatten slightly to form the pumpkin’s base.
- Stuff and Shape: Fill your fabric tube with pillow stuffing, cotton batting, or even fabric scraps. Don’t overfill you want a soft, squishy texture that shapes easily. Once filled, gather the top edge and pull tight, leaving a small opening for the stem.
- Add the Grooves: Use jute twine or thick thread to wrap around the pumpkin several times vertically, pulling gently to create those natural pumpkin “sections.” Tie off securely at the bottom.
- Add the Stem: Insert a cinnamon stick, small twig, or short wooden dowel into the top center. Secure with hot glue and add finishing touches like raffia bows, felt leaves, or tiny tags that say “Grateful” or “Blessed.”
- Style It: Arrange several pumpkins in a basket, tray, or along a mantel. Mix sizes and fabrics for a cozy, layered farmhouse display.
Shop the Look
- Fabric scraps (ticking stripe, muslin, plaid, burlap)
- Pillow stuffing or batting
- Jute twine or thick thread
- Cinnamon sticks or twigs
- Hot glue gun or needle and thread
- Raffia or felt leaves for accents
Dos & Don’ts
- Do vary fabric textures for a collected look.
- Don’t overfill soft pumpkins shape better.
- Do tie twine loosely to form soft grooves.
- Don’t skip the stem it’s the detail that makes them irresistible.
Distressed Chalkboard Sign

Add a touch of rustic farmhouse charm to your walls or entryway table with a distressed chalkboard sign. This DIY combines vintage character with personal creativity perfect for writing cozy fall quotes, menus, or greetings like “Welcome to Our Pumpkin Patch.” With a few simple materials, you can transform a plain frame into a timeless decor piece that looks handpicked from an antique market.
This project is all about layering textures matte chalk paint, sanded edges, and a soft hand-lettered message that ties your fall decor together. Whether hung above your mantel or propped on your kitchen counter, it adds that “lived-in farmhouse” feeling every home needs for autumn.
How to Make It
- Choose Your Frame: Start with an old wooden picture frame, thrifted sign, or even a dollar-store frame. Remove any glass or artwork inside so you’re left with just the wooden frame and backing.
- Paint the Frame: Apply one coat of chalk paint in your preferred farmhouse color white, cream, gray, or sage are perfect choices. Once dry, lightly sand the edges and corners to expose a bit of wood underneath for a naturally aged, distressed look.
- Create the Chalkboard Surface: If your sign has a solid backing, paint it with black chalkboard paint using a foam brush. Apply two coats, letting each one dry completely. If not, cut a piece of plywood or MDF board to fit your frame and paint that instead.
- Assemble the Sign: Once all parts are dry, reattach the backing into the frame. If you’d like a more permanent sign, stencil a fall saying like “Gather,” “Thankful,” or “Pumpkin Spice Season.” For a reusable version, leave it blank for handwritten messages.
- Add Finishing Touches: Wrap jute twine around one corner or tie a mini burlap bow to the top. You can also glue on a few faux leaves or tiny pinecones for extra seasonal flair.
- Display It: Prop it on your mantel, lean it against a kitchen backsplash, or hang it by a loop of jute rope. It looks great layered behind other decor pieces like candles or vases.
Shop the Look
- Wooden picture frame
- Chalk paint (white, cream, gray, or sage)
- Black chalkboard paint
- Foam paintbrush
- Sandpaper
- Stencils or chalk marker pens
- Jute twine, faux leaves, or burlap ribbon
Dos & Don’ts
- Do distress the frame lightly for authentic farmhouse charm.
- Don’t skip sanding it’s what gives the aged texture.
- Do use chalk markers for cleaner lettering.
- Don’t overload decorations; let the quote stand out.
Rustic Corn Husk Candle Rings
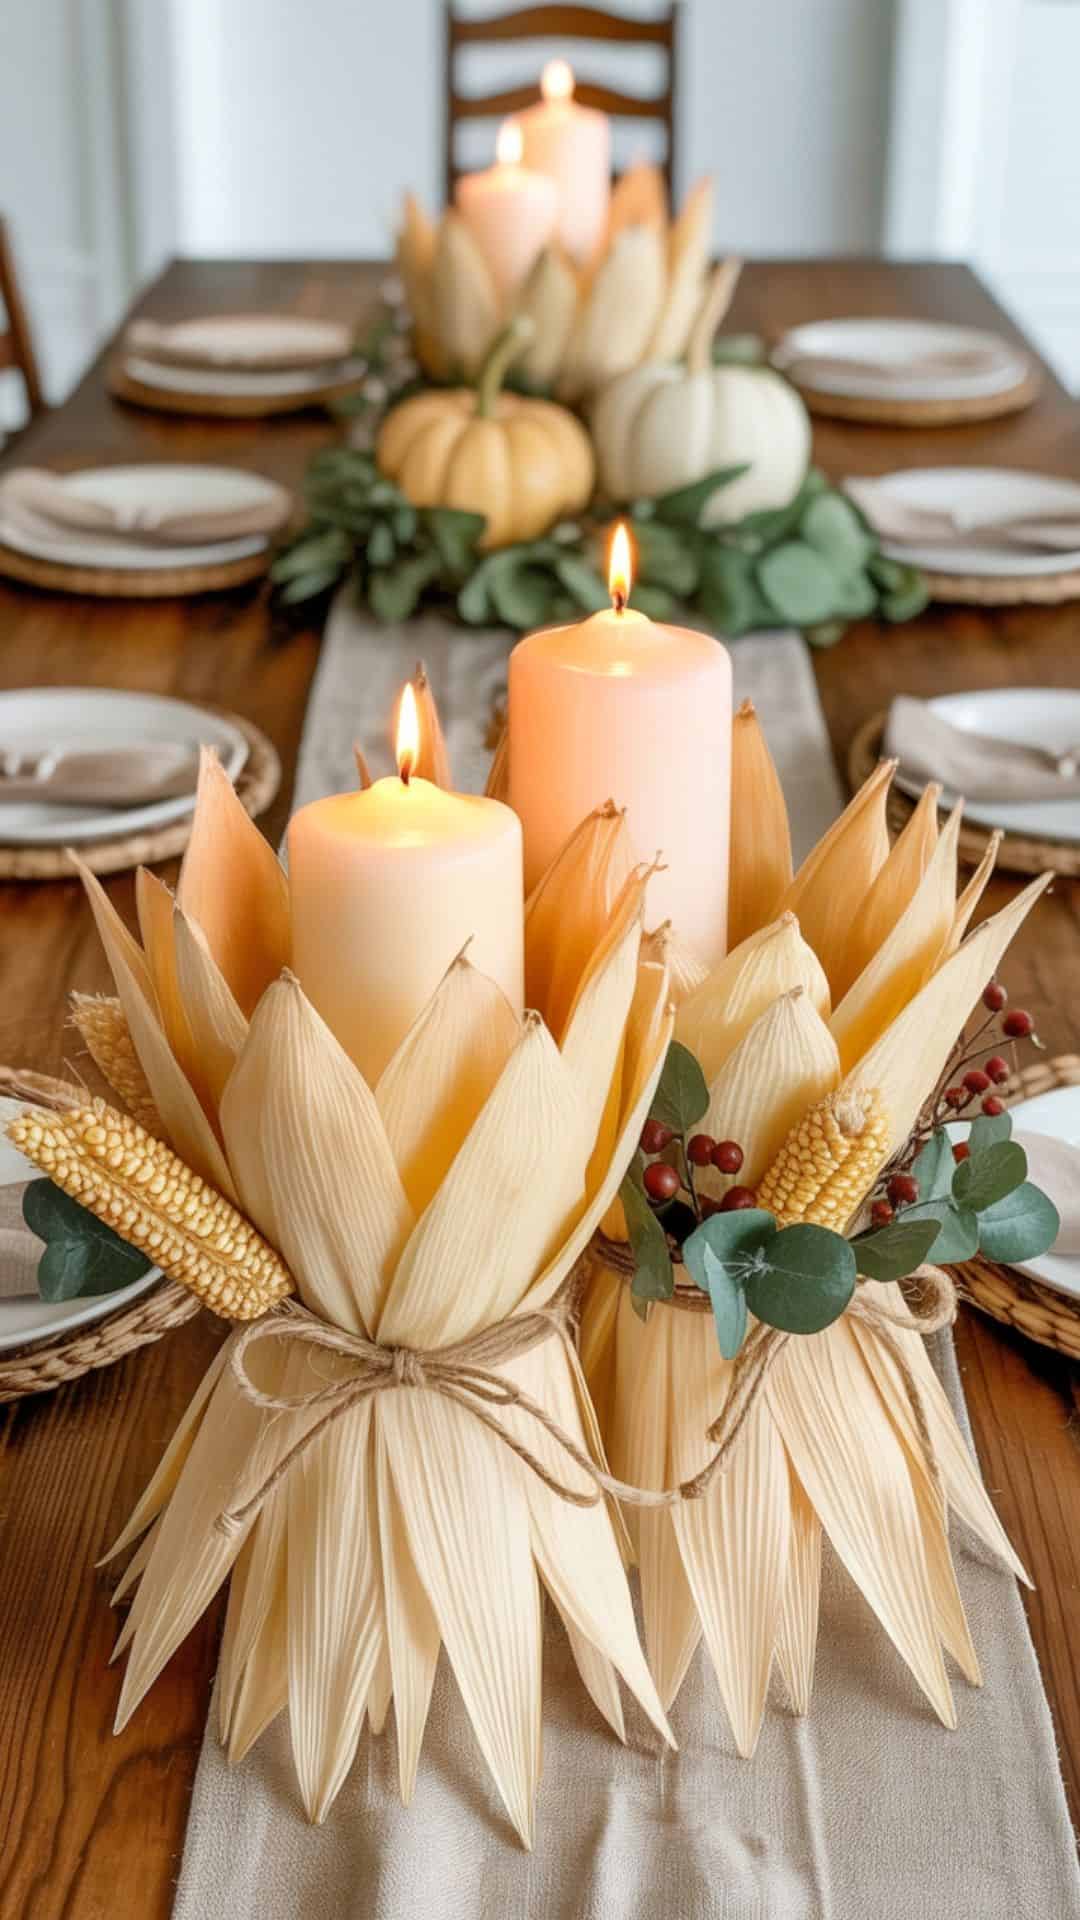
Bring a soft harvest glow to your table or mantel with rustic corn husk candle rings. These charming little accents capture the heart of fall decorating natural, textural, and perfectly imperfect. Made with dried corn husks, jute twine, and simple candle bases, they’re the kind of craft that feels both handmade and timeless straight from a cozy farmhouse kitchen.
These candle rings are an easy way to bring warmth and movement into your fall displays. The husks’ gentle ruffles catch the candlelight beautifully, making even a simple pillar candle look styled and special.
How to Make Them
- Prepare the Husks: Use clean, dry corn husks (you can buy them in the international foods aisle or reuse ones from fresh corn). If they feel stiff, soak them in warm water for 10–15 minutes to soften. Pat dry with a towel before shaping.
- Cut and Layer: Cut each husk into strips about 1½–2 inches wide. For each candle ring, you’ll need 10–12 pieces. Overlap the husks slightly in a circular pattern, fanning them out like petals.
- Form the Ring: Wrap the base of your fanned-out husks with jute twine, securing them tightly into a ring shape that fits around your candle. If needed, hot glue the overlapping sections to help them hold their curve.
- Add Decorative Touches: Once the base is secure, embellish with small accents faux berries, wheat stalks, or a few sprigs of dried eucalyptus. Tie an extra length of jute around the ring and knot it into a rustic bow.
- Dry and Shape: Let the husks air-dry completely so they retain their shape. You can gently bend or curl the edges while damp for a more natural, organic look.
- Style It: Slip the finished ring around a pillar candle or glass votive holder. Group several on a table runner with pumpkins and greenery for a beautiful harvest-inspired centerpiece.
Shop the Look
- Dried corn husks
- Jute twine
- Hot glue gun
- Faux berries or dried florals
- Scissors
- Pillar or votive candles
Dos & Don’ts
- Do soak and soften the husks before shaping for flexibility.
- Don’t place candle flames too close use glass holders for safety.
- Do mix textures like wheat, raffia, and berries for dimension.
- Don’t leave them unsealed if used outdoors a clear matte spray helps preserve them.

Wrapping Up
When the air turns cool and the days get shorter, it’s the perfect time to create things that make your home feel warm again. These farmhouse fall crafts DIY aren’t just decorations they’re little reminders of simplicity, connection, and comfort.
Whether you display your burlap pumpkins on the dining table, hang your handmade wreath on the front door, or light candles surrounded by your corn husk rings, each one adds a gentle touch of love to your home.
So gather your supplies, turn on your favorite fall playlist, and make an afternoon of it. Your space and your spirit will thank you.