Christmas Crafts to Sell: DIY Handmade Ideas That Make Money
‘Tis the season for cozy vibes, festive markets, and shoppers looking for meaningful handmade gifts which means it’s the best time of year to turn your creativity into real income.
Whether you sell on Etsy, Facebook Marketplace, Instagram, holiday boutiques, or your local Christmas market, the key is simple:
Choose crafts that are fast to make, inexpensive to produce, and beautifully giftable.
My guide rounds up the best Christmas crafts to sell, with ideas your customers will love, production shortcuts, packaging tips, pricing guidance, and detailed image prompts to help you promote your products online.
This website contains affiliate links. As an Amazon Associate, I earn from qualifying purchases. Please read our disclaimer.
Why Christmas Crafts Sell So Well
Consumers buy more handmade items during the holidays than any other time of year. Here’s why:
1. Everyone Needs Gifts
Teachers • coworkers • neighbors • family • Secret Santa • stocking stuffers
People want something thoughtful but still budget-friendly.
2. Holiday Décor Is a Huge Impulse Buy
Customers buy:
- ornaments
- mini wreaths
- gnomes
- candles
- wall art
- tabletop décor
Often without planning to they’re inspired on the spot.
3. Handmade Items FEEL Special
A handmade craft feels warmer and more personal than a mass-produced item.
4. Shoppers Love Supporting Local & Small
Christmas markets, pop-ups, and Etsy are flooded with customers purposely seeking handmade goods.
5. Bundles Sell Even Better
People love ready-made gift sets sugar scrub bundles, ornament sets, candle duos, winter spa sets, etc.
DIY Christmas Crafts That Make Money
Wood Slice Snowman Ornaments

There’s something undeniably charming about turning simple wood slices into cozy little snowmen. Their hand-painted faces, soft felt scarves, and dusting of faux snow give them that sweet, homespun feel shoppers can’t resist. These ornaments look like something you’d discover at a winter market booth warm, heartful, and made with love.
Why They Sell
Rustic-farmhouse holiday décor never goes out of style, and wood ornaments feel personal in a way store-bought pieces simply don’t. These are the perfect under-$15 gifts for teachers, coworkers, neighbors, and Secret Santas lightweight, adorable, and easy to bundle into gift sets.
Find the step by step guide for making DIY wood slice snowman ornaments!
Minimalist Christmas Beaded Bracelets

DIY minimalist Christmas beaded bracelets are one of those holiday crafts that look beautifully delicate yet take just minutes to make. With a simple mix of metallic beads, festive accents, and a touch of seasonal charm, these bracelets feel elegant, giftable, and perfect for stacking. They’re affordable, quick to batch, and always a hit for teachers, coworkers, teens, and anyone who loves dainty, wearable Christmas accessories.
Materials
- Stretch cord
- Gold or silver beads
- Red, white, or green accent beads
- Alphabet beads
- Small Christmas charms (stars, snowflakes, bells)
Why These Bracelets Sell
People LOVE simple, stackable jewelry especially when it includes seasonal colors or holiday words.
Get the step by step guide for making these DIY minimalist Christmas beaded bracelets!
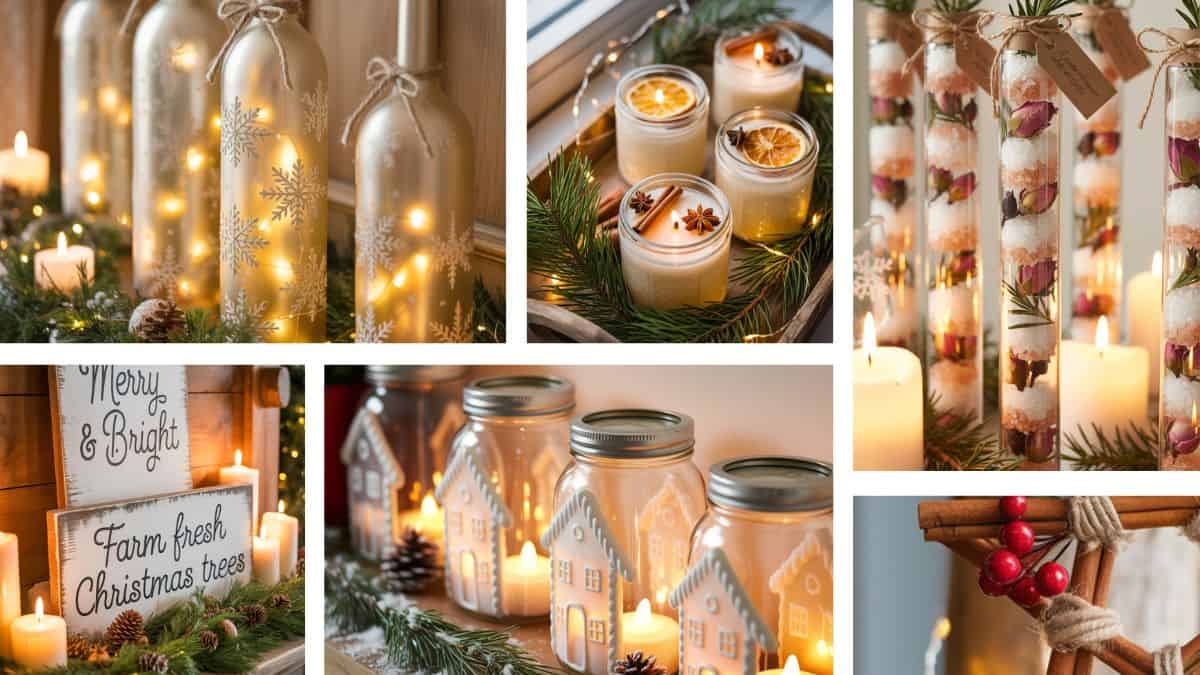
Wine Bottle Light Decor (Fairy Light Bottles)
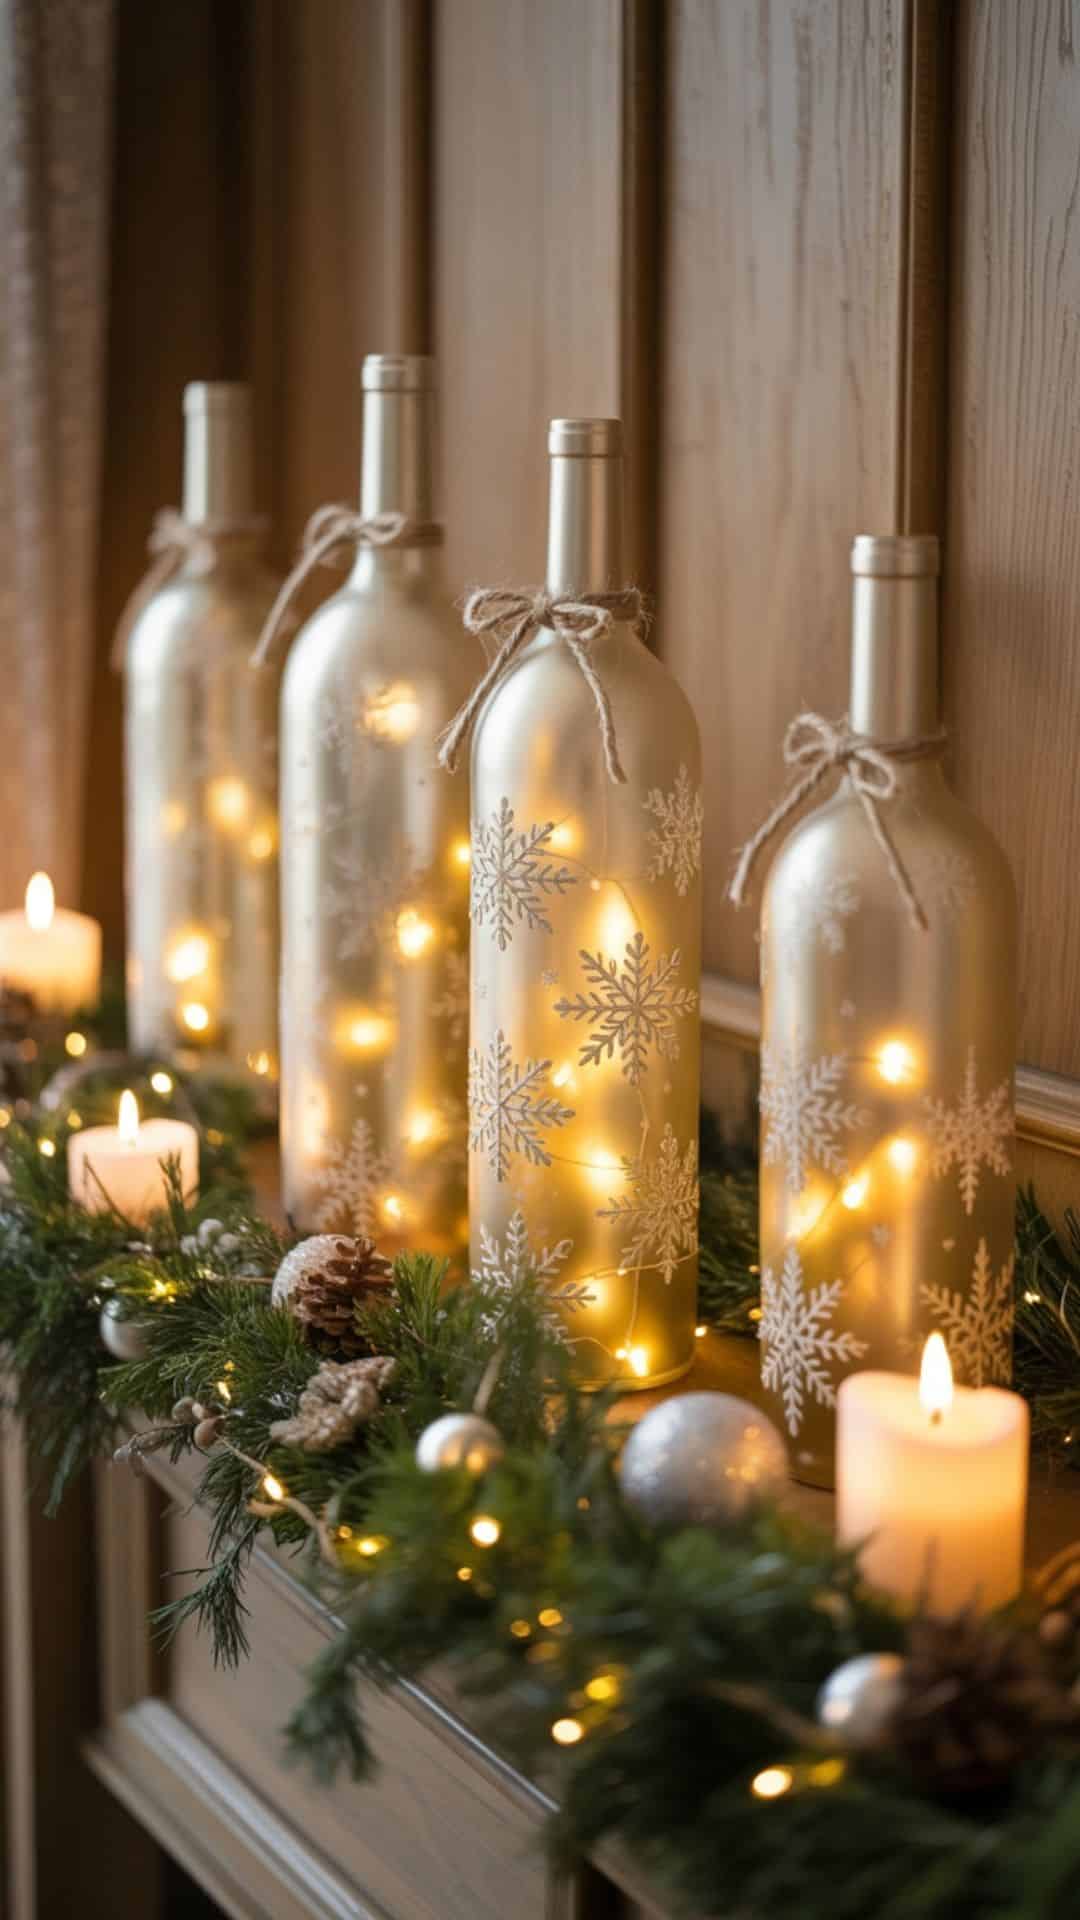
DIY wine bottle lights are one of those magical holiday projects that look far more expensive than they are. With just a frosted bottle and a strand of fairy lights, you can create glowing décor that feels cozy, elegant, and perfect for gifting. They’re fast to make, stunning on mantels, and always a hit at Christmas markets.
Materials Needed
- Empty wine bottles
- Goo remover (for sticky label residue)
- Frosted glass spray paint or white spray paint
- Battery-operated fairy lights (bottle string lights preferred)
- Twine or ribbon
- Optional: stencils such as snowflakes, stars, or Christmas trees
Why These Wine Bottle Lights Sell
People love ready-made Christmas ambiance. These look like high-end holiday decor, but the materials are inexpensive huge profit margin.
Get the step by step guide for making DIY wine bottle lights!
Christmas Bath Salt Tubes
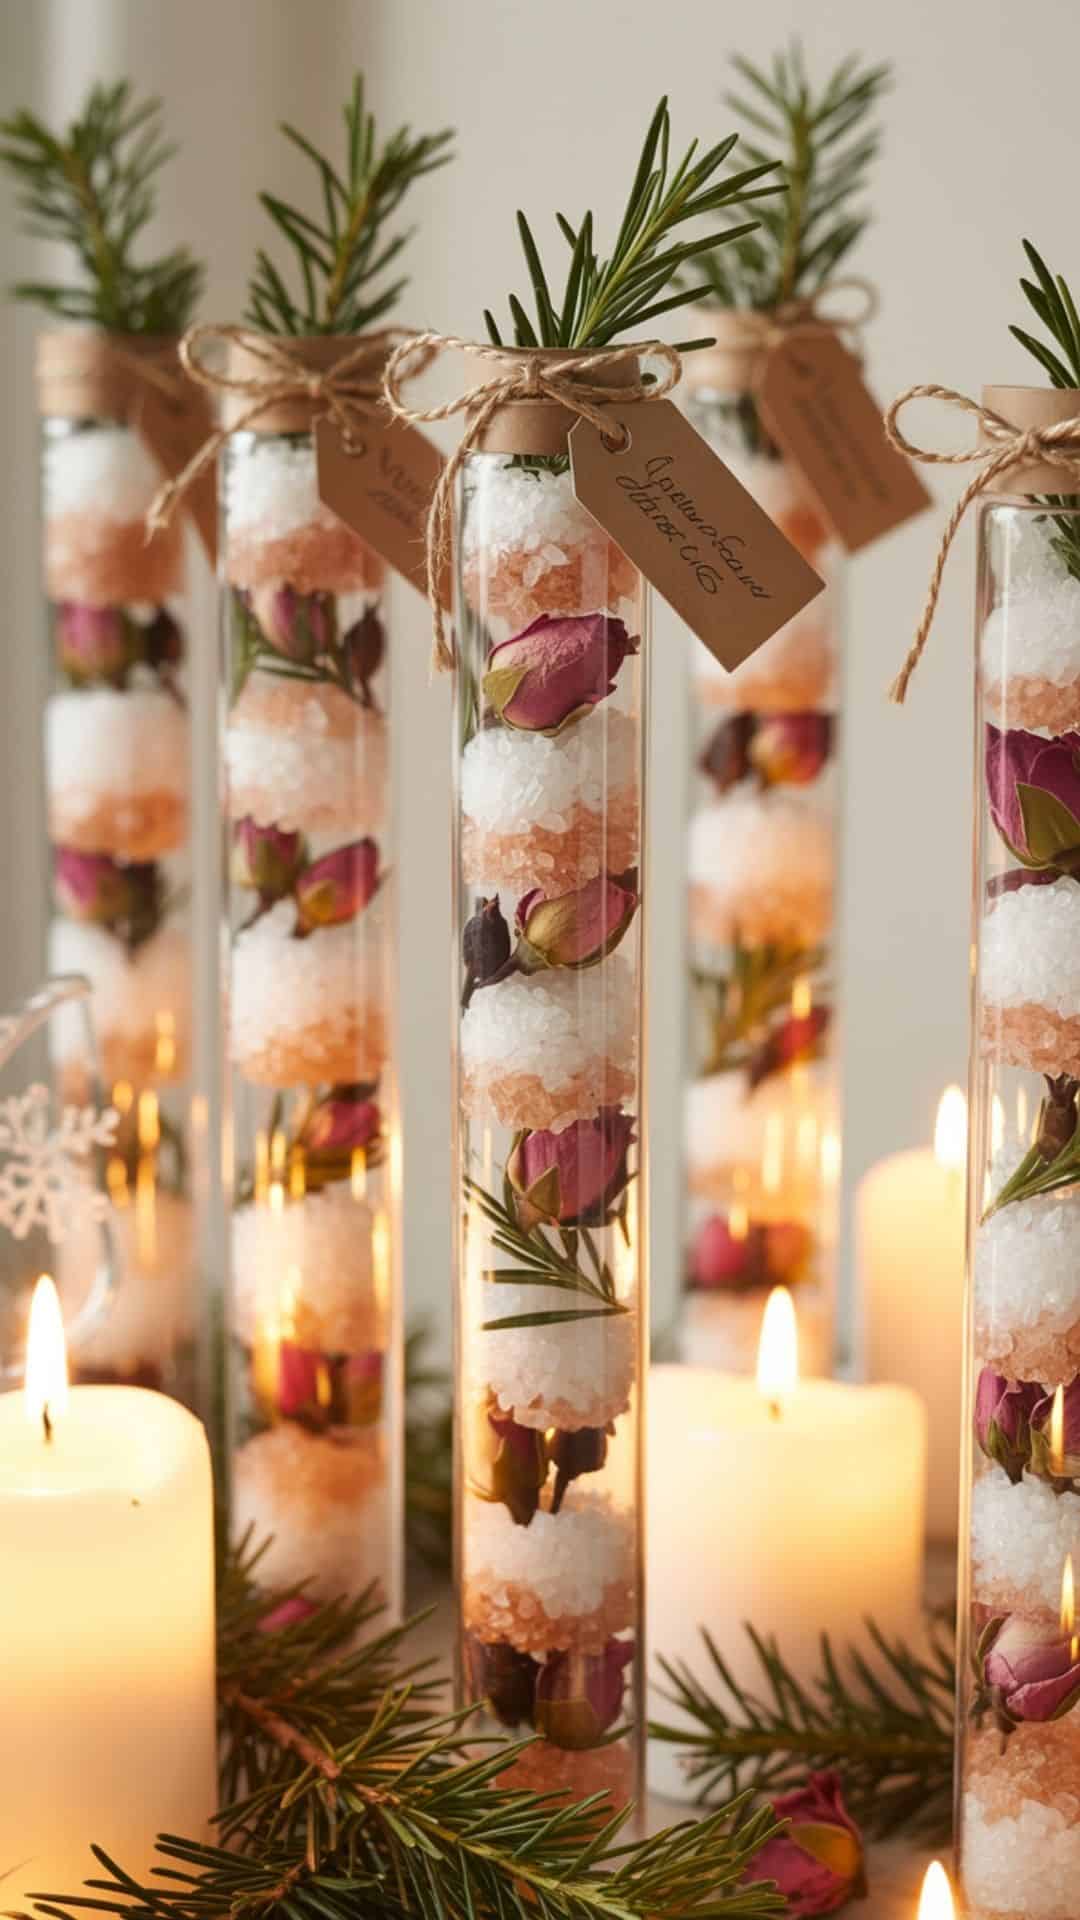
These luxurious, spa-style bath salts are incredibly cheap to make and look stunning when layered. They’re perfect stocking stuffers and gift basket fillers.
Materials Needed
- Tall plastic tubes or glass tubes with caps
- Epsom salt
- Pink Himalayan salt
- Dried rose petals or lavender
- Rosemary (optional)
- Essential oils (vanilla, peppermint, eucalyptus)
- Twine or gold string
- Holiday tags
Why These Bath Salts Sell
Spa-style gifts are extremely popular for women’s stockings, teacher gifts, and coworker exchanges. These look expensive but cost pennies to produce.
Find the step by step guide for making DIY Christmas bath salt tubes!
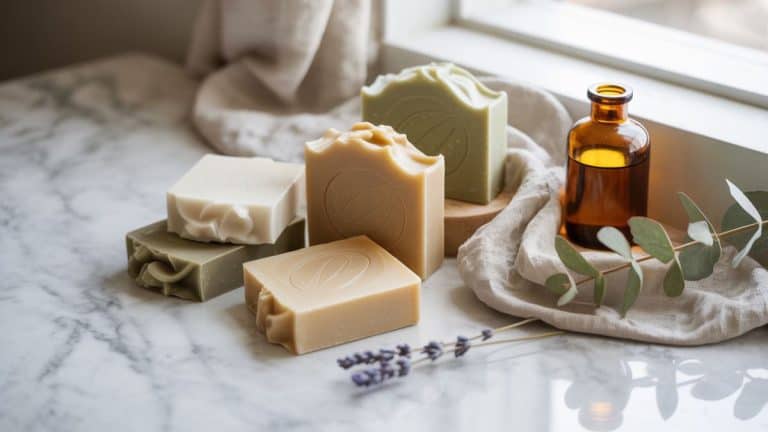
Elegant Christmas Soaps

Christmas soaps are luxury-level handmade gifts that look boutique-quality but are easy to batch quickly. With a few molds and melt-and-pour bases, you can create stunning soaps that look like they belong in a high-end spa or gift shop.
Materials Needed
- Melt-and-pour soap base (goat milk, shea butter (affiliate), or glycerin)
- Christmas fragrance oils (vanilla, pine, peppermint, cranberry, frankincense & myrrh)
- Mica colorants (white, sage green, gold)
- Christmas silicone molds (snowflakes, trees, stars, ornaments)
- Rubbing alcohol in a spray bottle
- Dried botanicals (rose petals, lavender buds, gold leaf optional)
- Packaging bags or shrink wrap
Why These Soaps Sell
Elegant soaps are a universal gift. Customers love:
- Spa-like presentation
- High-end aesthetic
- Affordable price
- Perfect stocking stuffers
- Easy gift add-ons
They sell extremely well at markets and online, especially in bundled sets.
Find the step by step guide for making boutique style elegant Christmas soaps to make and sell!
Scrabble Tile Ornaments
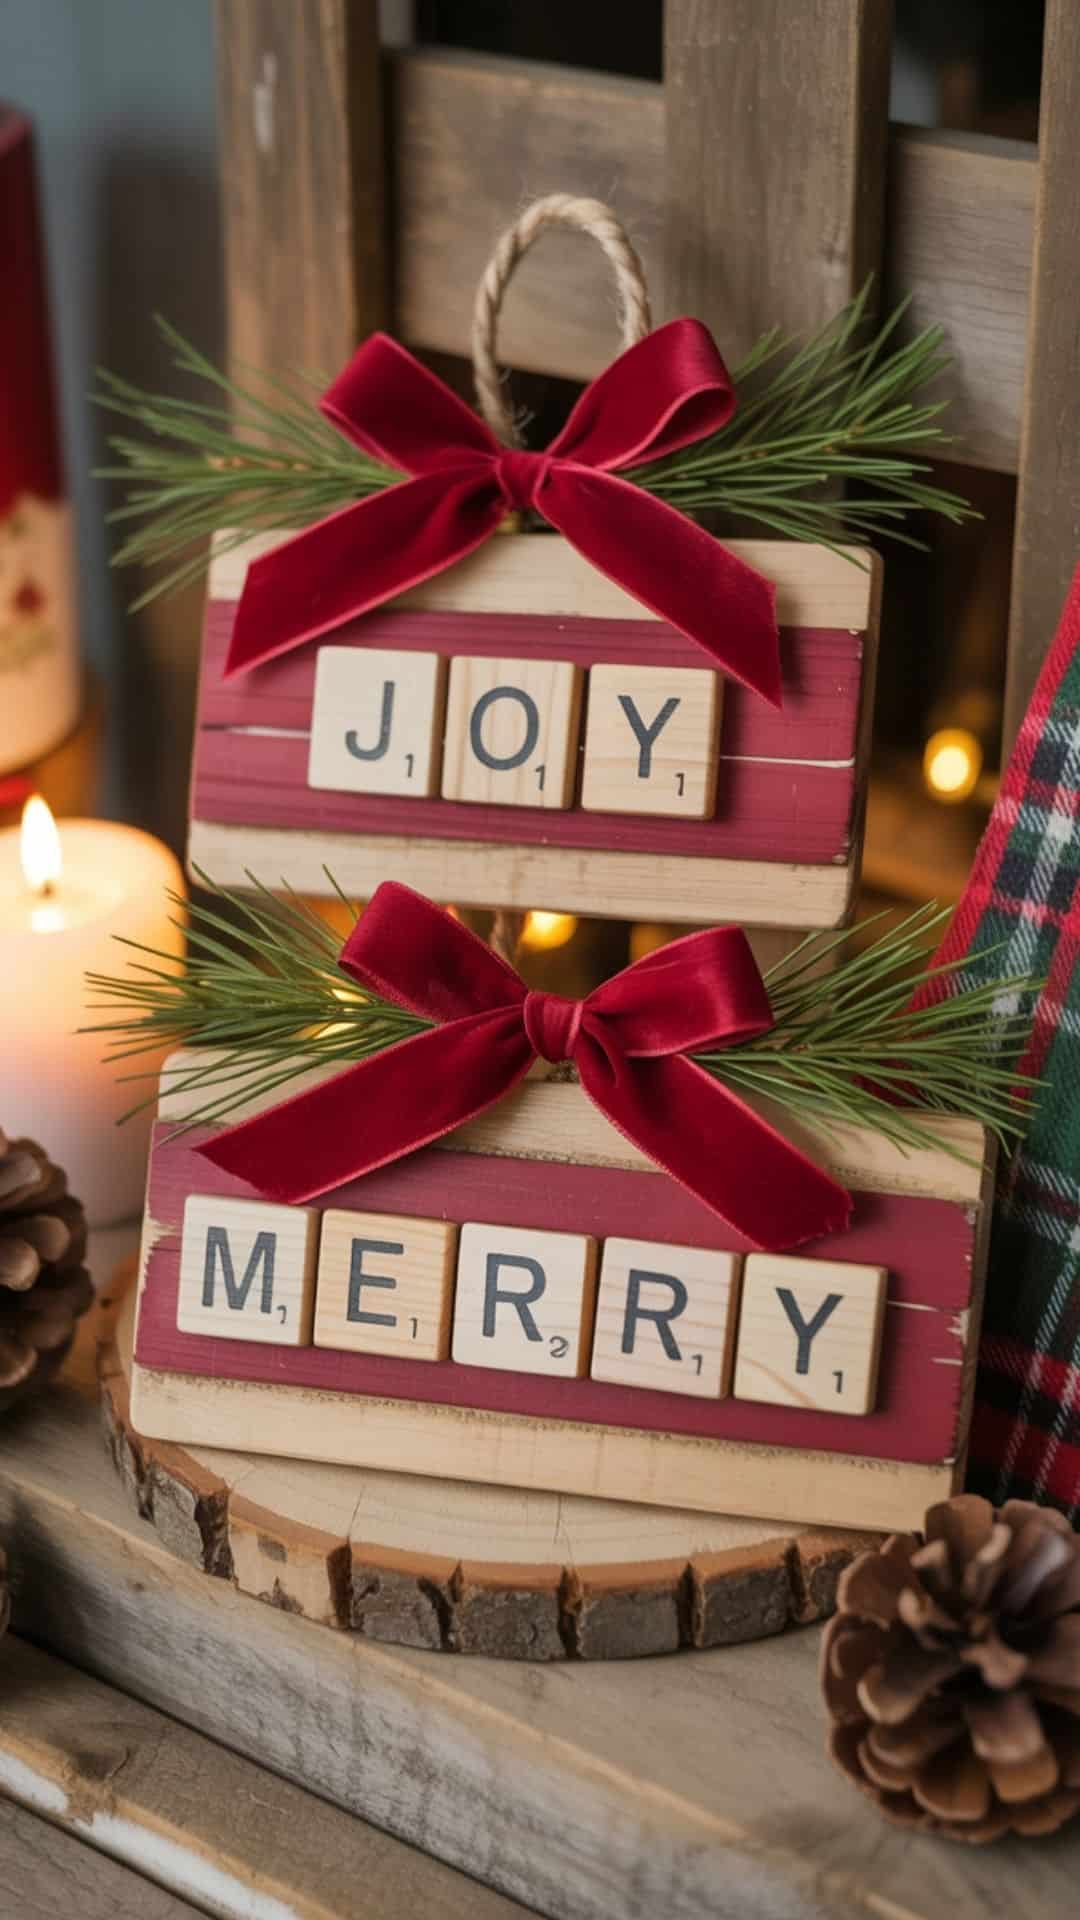
These personalized ornaments are so popular because shoppers LOVE name décor. They’re fun, sentimental, and easy to customize for families.
Materials Needed
- Scrabble-style tiles
- Small craft sticks or wood rectangles
- Hot glue
- Velvet Ribbon
- Greenery sprigs
- Mini bells
Why These Handmade Christmas Decorations Sell
Personalization = guaranteed sales. Shoppers buy these for entire families, office teams, and gift exchanges.
See the guide to make these DIY Scrabble tile Christmas ornaments that are perfect for selling or gifting!
Christmas Stove-Top Mug Candles

These are incredibly charming because they combine two things customers already love: Christmas mugs (affiliate) and candles. They’re instantly giftable and visually irresistible.
Materials Needed
- Christmas mugs (vintage or modern)
- Soy wax flakes
- Pre-tabbed candle wicks
- Fragrance oils (Christmas scents like cinnamon, pine, vanilla)
- Wick stickers
- Dried orange slices
- Cinnamon sticks
- Star anise (affiliate)
- Double boiler (affiliate)
Why This Sells
These have high gift appeal buyers love giving something cute, functional, and festive. Mug candles feel luxurious and personal, making them perfect for gift exchanges.
See the guide to make these Christmas Mug Candles that are perfect for selling or gifting!
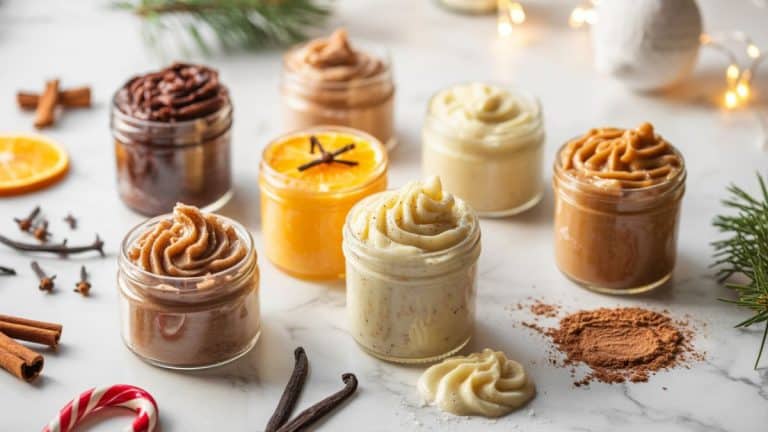
Peppermint Sugar Scrub Jars

Peppermint sugar scrubs are always top sellers in winter because they feel luxurious and festive. They’re perfect for spa gift baskets, coworker gifts, teacher appreciation, and holiday self-care.
Materials Needed
- White sugar
- Coconut oil
- Peppermint essential oil
- Red food coloring (optional)
- Jars
- Twine
- Tags
- 8 oz mason jars
- Coconut oil
- White sugar
- Peppermint oil
- Baker’s twine
Why This Scrub Sells
It looks luxurious, smells incredible, and is a consumable meaning happy customers return for more.
See the guide to make these Peppermint Sugar Scrub Jars that are perfect for selling or gifting!
Rustic Cinnamon Stick Bundles
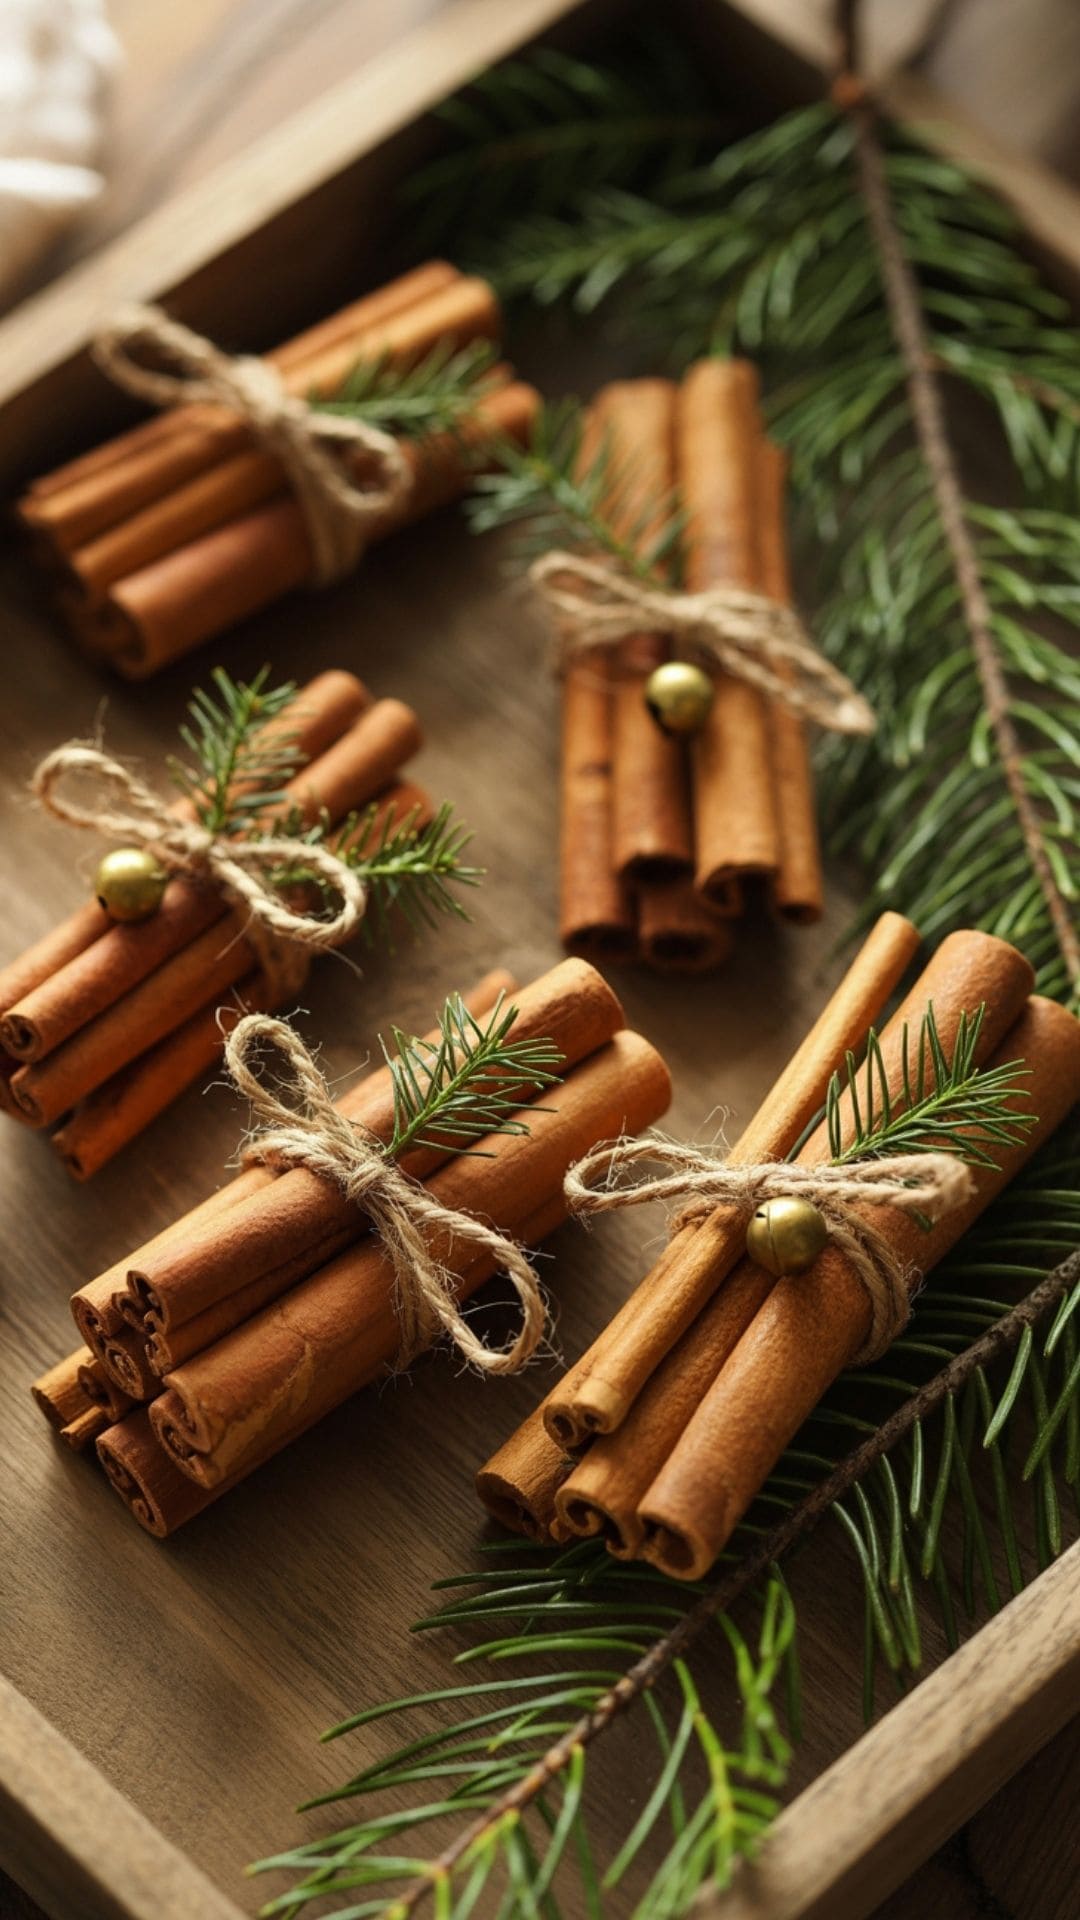
These simple but beautiful cinnamon bundles sell surprisingly well because they look festive, smell amazing, and work as tree ornaments, gifting add-ons, and holiday décor accents.
Materials Needed
Instructions
- Group 3–5 cinnamon sticks together.
- Tie tightly with twine.
- Hot glue a mini bell and a small greenery sprig on top.
- Add twine for hanging if you want them as ornaments.
Shopping List
Why This Sells
They’re incredibly cheap to make, smell fantastic, and offer shoppers a “boutique-style” decoration at a low price point.
Suggested Price Point
- Single bundle: $4–$6
- Set of 3: $12–$15
Batching Tip
Tie all bundles first, then add bells and greenery in one step to streamline assembly.
Packaging Idea
Place bundles in kraft bags with a “Handmade Holiday Scent Décor” sticker.
Variations
- Add dried orange slices (affiliate)
- Upgrade twine to velvet ribbon
- Make miniature tree ornaments
Pro Tip
Real cinnamon sticks vary in length sort by size before batching.
Mason Jar Hot Chocolate Kits
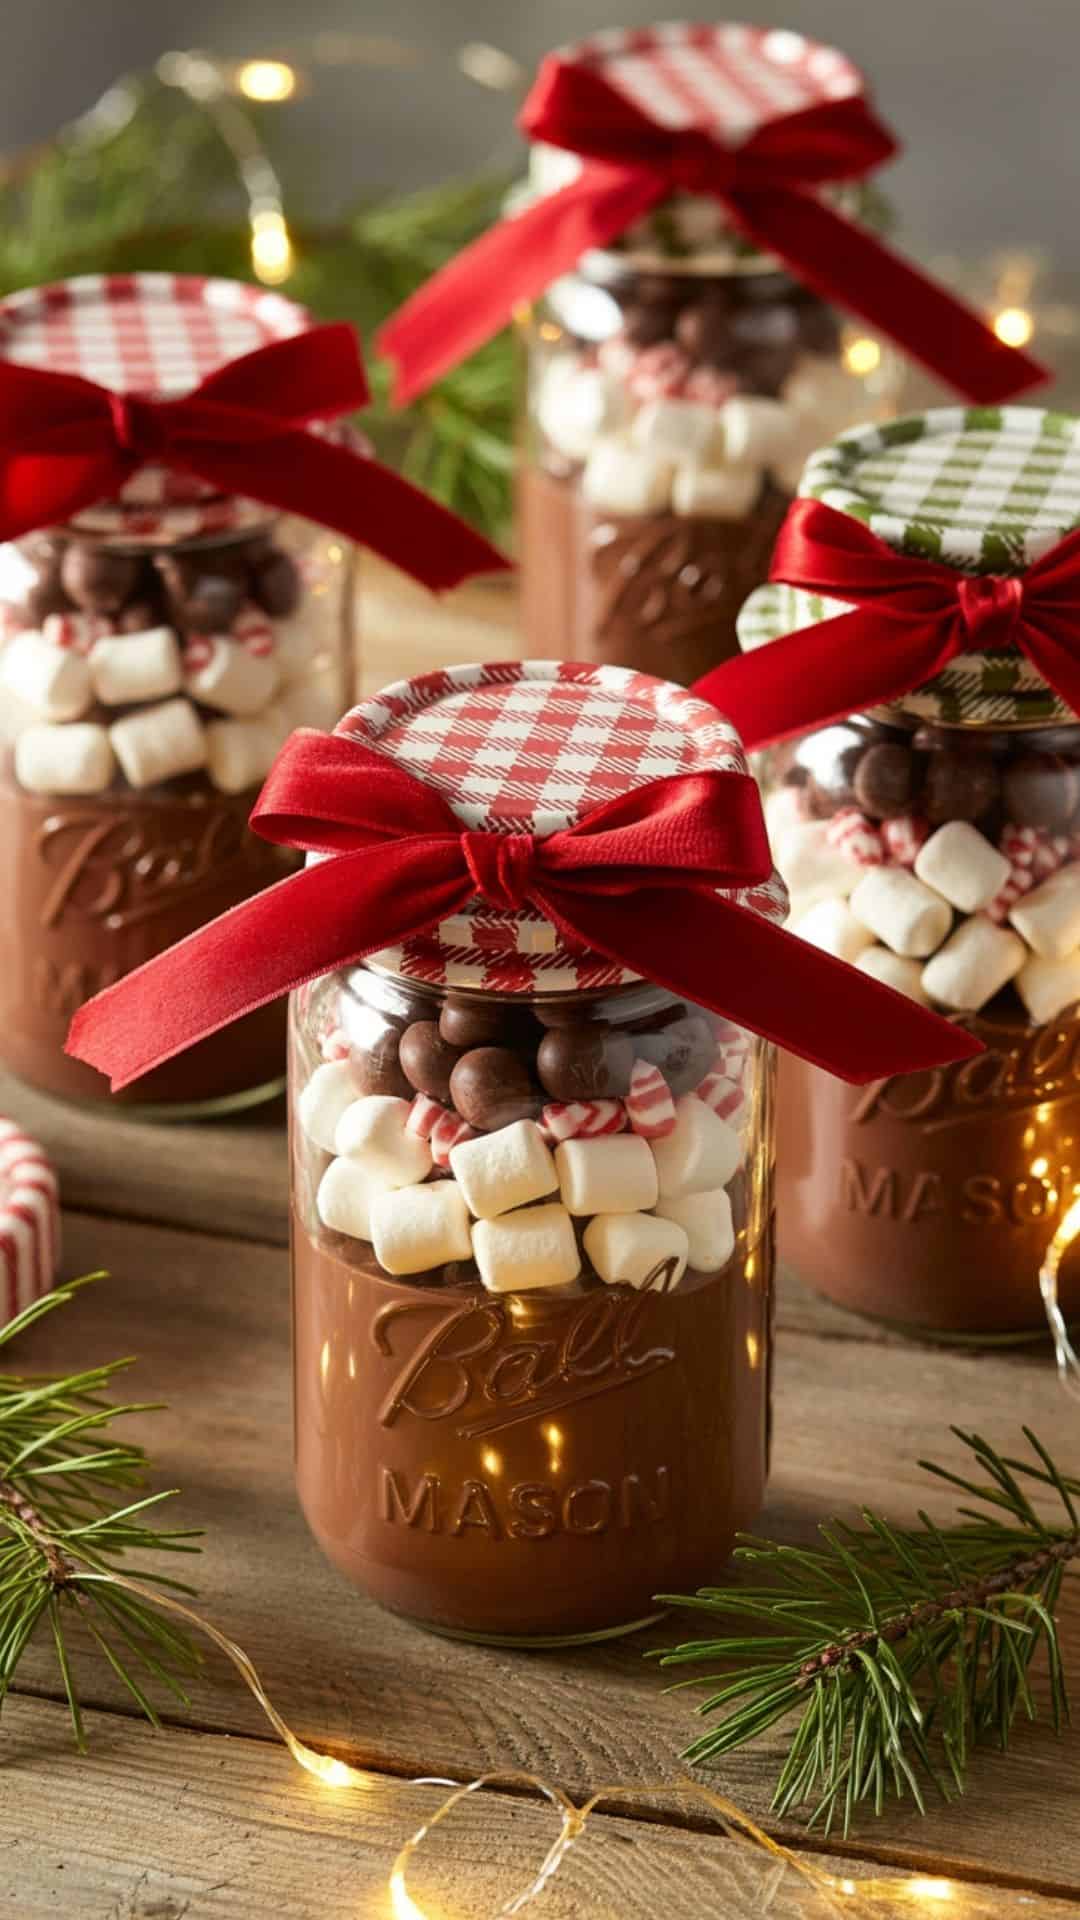
These gifts look luxurious but cost very little to make. Shoppers love buying them for teachers, coworkers, neighbors, and Secret Santa.
Materials Needed
- Mason jars
- Cocoa powder
- Mini marshmallows (affiliate)
- Crushed candy canes
- Chocolate chips
- Ribbon + tags
Instructions
- Add cocoa powder to the bottom of the jar.
- Layer chocolate chips.
- Add crushed candy canes.
- Top with mini marshmallows.
- Seal lid and tie ribbon.
- Attach a tag with instructions.
Shopping List
- 12 mason jars
- Bulk cocoa powder
- Chocolate chips
- Mini marshmallows
- Gift tags
Why This Sells
It’s a gorgeous, ready-to-gift item that looks expensive but isn’t. People stock up on multiples during Christmas.
Suggested Price Point
- Single jar: $10–$14
- Set of 2: $18–$22
Batching Tip
Use a funnel for clean layering and make 12 at a time.
Packaging Idea
Add a mini candy cane tied to the ribbon for visual impact.
Variations
- Add instant coffee for mocha kits
- Make “Peppermint Hot Chocolate” versions
- Use tall jars for premium sets
Pro Tip
Place marshmallows on top only right before selling so they stay soft.
Felt Gingerbread Ornaments

Felt ornaments are bestselling handmade items because they’re cute, lightweight, durable, and easy to personalize. Gingerbread shapes are especially popular with Christmas shoppers.
Materials Needed
- Brown felt
- White embroidery thread
- Needle
- Buttons or beads
- Ribbon
- Stuffing (optional)
Instructions
- Cut two gingerbread shapes from felt.
- Stitch around edges (blanket stitch) stuff lightly if desired.
- Add button eyes and embroidered details.
- Tie a small ribbon bow and glue or stitch it on.
- Add ribbon loop for hanging.
Shopping List
Why This Sells
They’re adorable, nostalgic, and perfect for families, bakers, teachers, and children’s rooms. They look boutique-quality with minimal materials.
- Single ornament: $6–$10
- Set of 4: $25–$35
Suggested Price Point
Batching Tip
Cut 10–15 gingerbread shapes at once using a template.
Packaging Idea
Place ornaments on a kraft card with faux stitching printed around the edges.
Variations
- Add names
- Use different color “icing”
- Make gingerbread girls with skirts
Pro Tip
Use stiff felt for cleaner edges and stronger ornament shape.
Dried Orange Garland
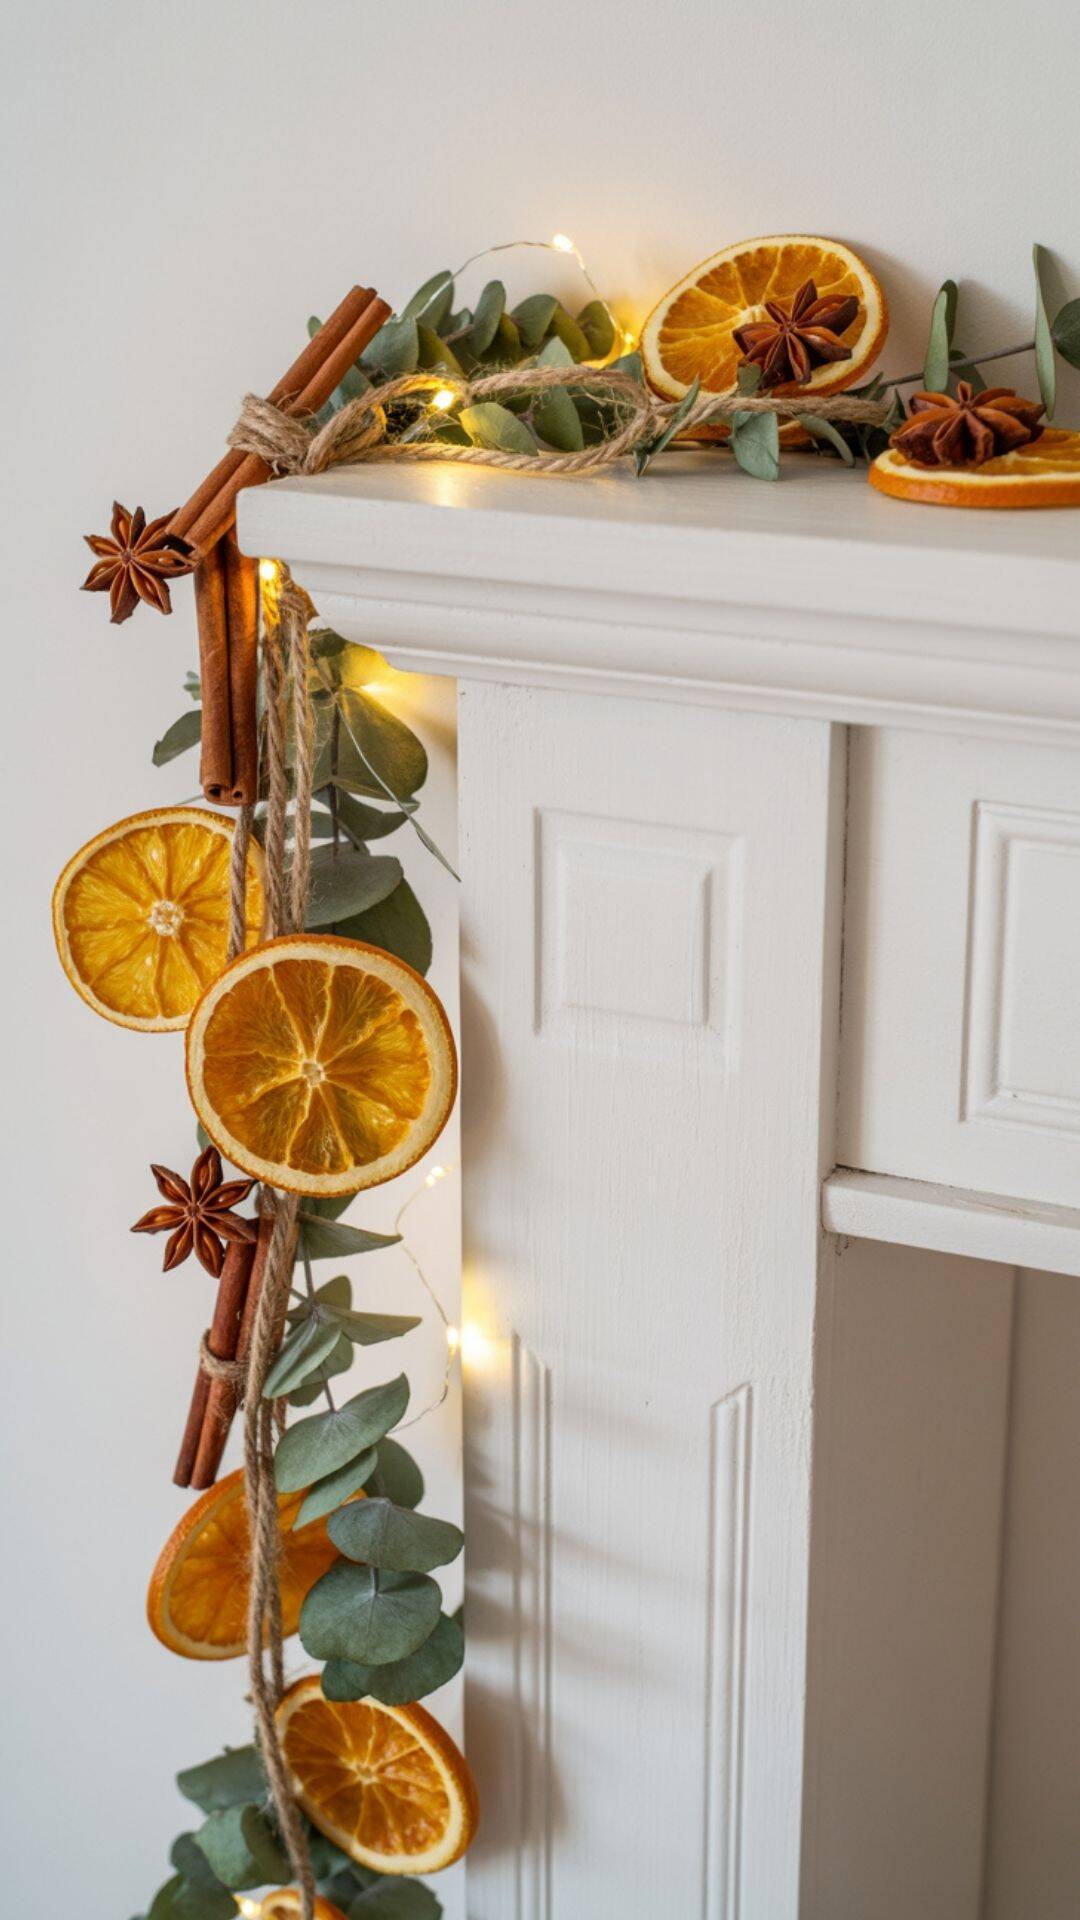
This classic natural Christmas decoration sells incredibly well because it feels nostalgic, smells amazing, and looks straight out of a farmhouse holiday magazine. It’s easy, low-cost, and perfect for eco-friendly shoppers.
Materials Needed
- Fresh oranges
- Sharp knife
- Baking sheet + parchment
- Twine
- Cinnamon sticks
- Star anise (optional)
- Yarn needle
Instructions
- Slice the Oranges – Cut oranges into thin, even slices.
- Dry the Slices – Bake at 200°F (95°C) for 3–4 hours, flipping occasionally.
- Cool Completely – Ensure slices are fully dry before assembling.
- String Together – Thread twine through each slice using a yarn needle.
- Add Accents – Tie cinnamon sticks or star anise between oranges.
- Finish Garland Length – Create 3 ft, 6 ft, or 9 ft lengths.
Shopping List
- 8–12 fresh oranges
- Ball of twine
- Cinnamon stick pack
- Star anise pack
Why This Sells
Natural Christmas décor is trending hard shoppers love sustainable, fragrant, beautiful pieces they can reuse every year. It photographs well and is perfect for farmhouse, cottage, or minimalist holiday decor lovers.
Suggested Price Point
- 3 ft garland: $12–$18
- 6 ft garland: $22–$30
- Premium garland with accents: $28–$40
Batching Tip
Slice and bake a full oven tray at once you can create 5–10 garlands per batch.
Packaging Idea
Coil garland neatly and place in a clear window box with a kraft label reading “Handcrafted Dried Orange Garland – Made with Real Fruit.”
Variations
- Add dried apples or lemons
- Use velvet ribbon instead of twine
- Mix in wooden beads
- Add mini pinecones
Pro Tip
Dry the oranges slowly at low heat this keeps the bright, beautiful color from turning brown.
Hot Cocoa on a Stick

These holiday treats look boutique-level but are incredibly inexpensive to make. They’re perfect for teachers, coworkers, stocking stuffers, and holiday gift boxes.
Materials Needed
- Chocolate chips
- Cocoa powder
- Mini marshmallows
- Crushed peppermint
- Silicone ice cube mold
- Wooden popsicle sticks
Instructions
- Melt Chocolate – Heat chocolate chips until smooth.
- Mix – Stir in cocoa powder for richness.
- Pour into Molds – Fill each mold cavity.
- Insert Stick – Add wooden sticks before chocolate sets.
- Decorate – Sprinkle peppermint or mini marshmallows.
- Unmold – Once set, pop out and package.
Shopping List
- 2–3 bags chocolate chips
- Popsicle sticks
- Silicone cube mold
- Mini marshmallows
- Crushed candy canes
Why This Sells
They’re cute, affordable, and look gourmet. They fit perfectly into gift baskets, treat boxes, teacher gifts, and market bundles.
Suggested Price Point
- Single stick: $3–$5
- Set of 4: $10–$14
- Premium peppermint version: $5–$6 each
Batching Tip
Use two molds at once one pot of melted chocolate makes 20–24 sticks.
Packaging Idea
Wrap each stick in a clear treat bag with a red ribbon and a tag that says:
“Stir into hot milk for instant holiday magic!”
Variations
- White chocolate raspberry
- Dark chocolate sea salt
- Gingerbread chocolate
- S’mores version with graham crumbs
Pro Tip
Tap the mold gently to release air bubbles for perfectly smooth sides.
More crafts to sell for cash: Gourmet hot chocolate on a stick recipes!
Burlap Christmas Trees
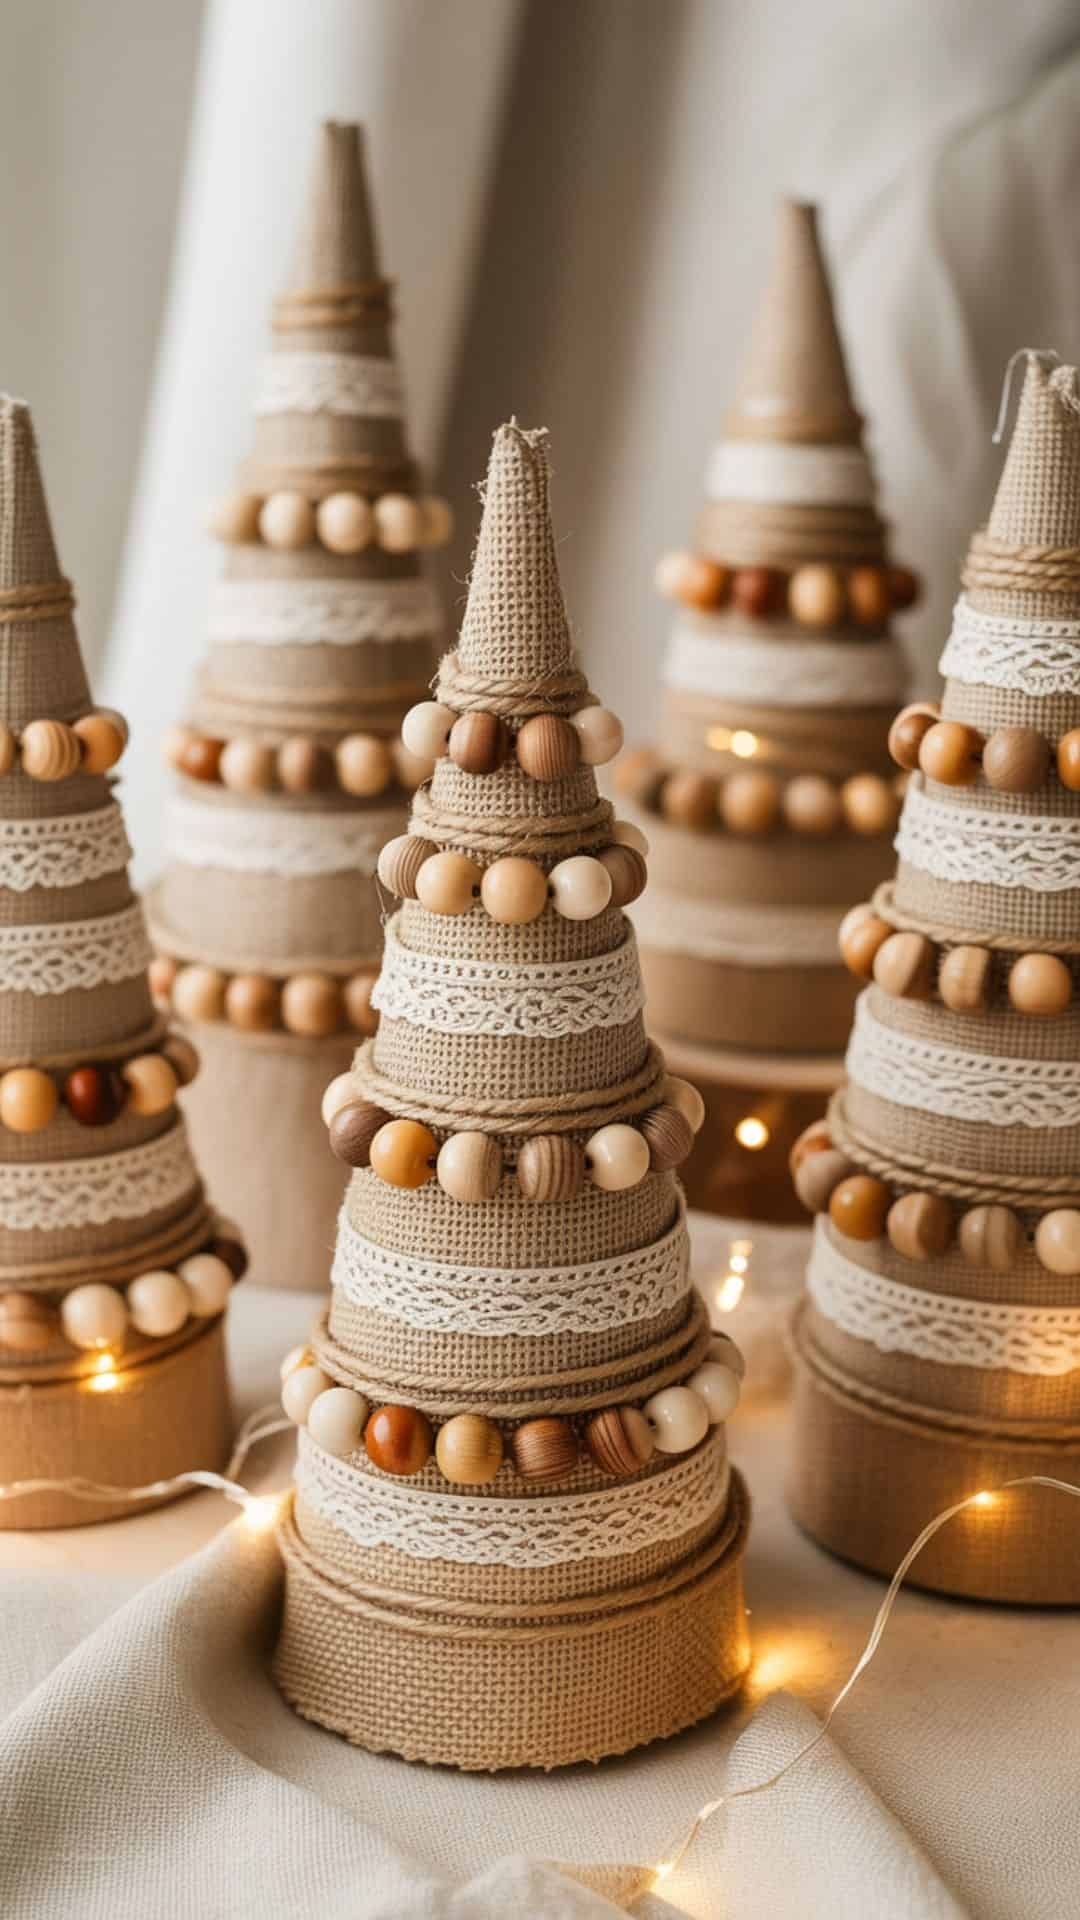
These charming tabletop decorations are perfect for farmhouse-style holiday décor lovers. They’re trendy, neutral enough for any home, and incredibly cheap to make.
Materials Needed
- Foam cones
- Burlap ribbon or sheets
- Hot glue
- Wooden beads
- Lace trim
- Mini bells (optional)
Instructions
- Wrap the Cone – Glue burlap starting from the base upward.
- Smooth Seams – Overlap layers slightly to hide edges.
- Add Trim – Wrap lace or twine around the tree.
- Decorate – Add beads, bells, or small bows.
- Finish – Add a wooden bead star to the top if desired.
Shopping List
- 6–10 foam cones
- Burlap ribbon
- Lace trim
- Wooden bead pack
- Hot glue
Why This Sells
Neutral décor sells extremely well because it matches any home style. These trees look boutique-level and make excellent hostess gifts.
Suggested Price Point
- Small trees: $10–$15
- Medium trees: $15–$22
- Large trees: $22–$30
- Set of 3: $35–$55
Batching Tip
Pre-cut burlap strips so you can wrap tree after tree without pausing.
Packaging Idea
Wrap in tissue and place in a kraft box with shredded paper for shipping-friendly protection.
Variations
- Use white burlap for a snowy look
- Add battery fairy lights for premium sets
- Use denim scraps for a rustic blue Christmas theme
Pro Tip
Spray lightly with fabric stiffener to help burlap hug the cone smoothly.
Christmas Potpourri Simmer Packs

These sell out fast at Christmas craft markets they smell incredible, look beautiful, and make perfect small gifts for teachers, neighbors, and Secret Santa.
Materials Needed
- Dried orange slices
- Whole cloves
- Cinnamon sticks
- Star anise
- Dried cranberries
- Rosemary sprigs
- Clear treat bags
- Ribbon
- Tags
Instructions
- Prepare Ingredients – Dry oranges in advance if needed.
- Fill Bags – Add 3–4 orange slices, 2–3 cinnamon sticks, cloves, star anise, and rosemary.
- Tie Bags – Use ribbon or twine.
- Add Instructions – “Simmer in water for a naturally fragrant Christmas home.”
Shopping List
- Dried fruit
- Whole spices
- Clear treat bags
- Ribbon
- Kraft tags
Why This Sells
People LOVE good-smelling giftables. Simmer packs feel luxurious but cost pennies to make.
Suggested Price Point
- Single pack: $6–$10
- 3-pack gift bundle: $15–$22
Batching Tip
Create an assembly line: one person adds oranges, one adds cinnamon sticks, one adds spices.
Packaging Idea
Use kraft labels printed with:
“Holiday Stove Simmer – Naturally Fragrant Home.”
Variations
- Add mini pinecones
- Create “Winter Forest” versions
- Sell themed packs (Cozy Cabin, Christmas Eve, Gingerbread House)
Pro Tip
Air-dry rosemary overnight so it doesn’t add moisture to the bag.
Mini Mason Jar Snow Globes

These mini snow globes are adorable, magical, and holiday-themed everything Christmas shoppers love. They’re incredibly giftable and perfectly sized for teacher gifts, desk décor, or stocking stuffers.
Materials Needed
- Small mason jars
- Mini bottle-brush Christmas trees
- Faux snow (plastic or glitter)
- Hot glue
- Ribbon or twine
- Small embellishments (bells, beads)
Instructions
- Glue the Tree – Attach the mini tree to the inside of the lid with hot glue.
- Add Snow – Add a spoonful of faux snow or glitter to the jar.
- Seal the Jar – Screw the lid on carefully so snow doesn’t spill.
- Decorate – Tie ribbon or twine around the jar neck.
- Optional – Add a mini tag with the year.
Shopping List
Why This Sells
These look boutique-level and “gift ready” straight off the table. They’re whimsical, nostalgic, and perfect for holiday décor lovers. Shoppers often buy multiples!
Suggested Price Point
- Single mini globe: $8–$12
- Set of 3: $20–$28
Batching Tip
Glue all trees first, then assemble jars assembly-line style you can complete 20+ globes in an hour.
Packaging Idea
Place each snow globe into a small kraft box filled with white crinkle paper to mimic snow.
Variations
- Add mini reindeer
- Use gold glitter for luxury versions
- Make themed color sets (red & green, snowy white, rustic barn)
Pro Tip
Use a tiny amount of snow too much will block the tree from view.
Fabric Scrap Christmas Trees

These trees are a crafter’s dream because they help use up fabric scraps and sell beautifully to farmhouse and vintage-style holiday décor lovers.
Materials Needed
- Fabric scraps (plaid, cotton, denim, burlap)
- Wooden sticks or dowels
- Wooden spools or small bases
- Buttons
- Hot glue
- Twine
Instructions
- Cut Fabric Shapes – Cut triangles of various sizes.
- Layer – Stack 3–4 triangles together for texture.
- Glue to Stick – Attach layered fabric onto the dowel.
- Create the Base – Glue stick into a wooden spool.
- Decorate – Add buttons, bows, or mini stars.
Shopping List
- Fabric remnants
- Wooden spools
- Dowels
- Buttons
- Hot glue
- Twine
Why This Sells
They look boutique-level and match neutral, vintage, farmhouse, and cottage Christmas trends. Perfect small décor for shelves, tiered trays, and gift baskets.
Suggested Price Point
- Small: $5–$8
- Medium: $10–$12
- Large: $15–$18
- Set of 3: $25–$35
Batching Tip
Cut all triangles in bulk 30–40 at a time then stack and assemble quickly.
Packaging Idea
Bundle sets together with a kraft tag reading “Handmade Holiday Trees.”
Variations
- Use denim for a rustic twist
- Add lace for shabby chic
- Use metallic fabrics for glam versions
Pro Tip
Mix textures (burlap + plaid + linen) it makes each tree look intentional and designer-quality.
Rustic Beaded Garland
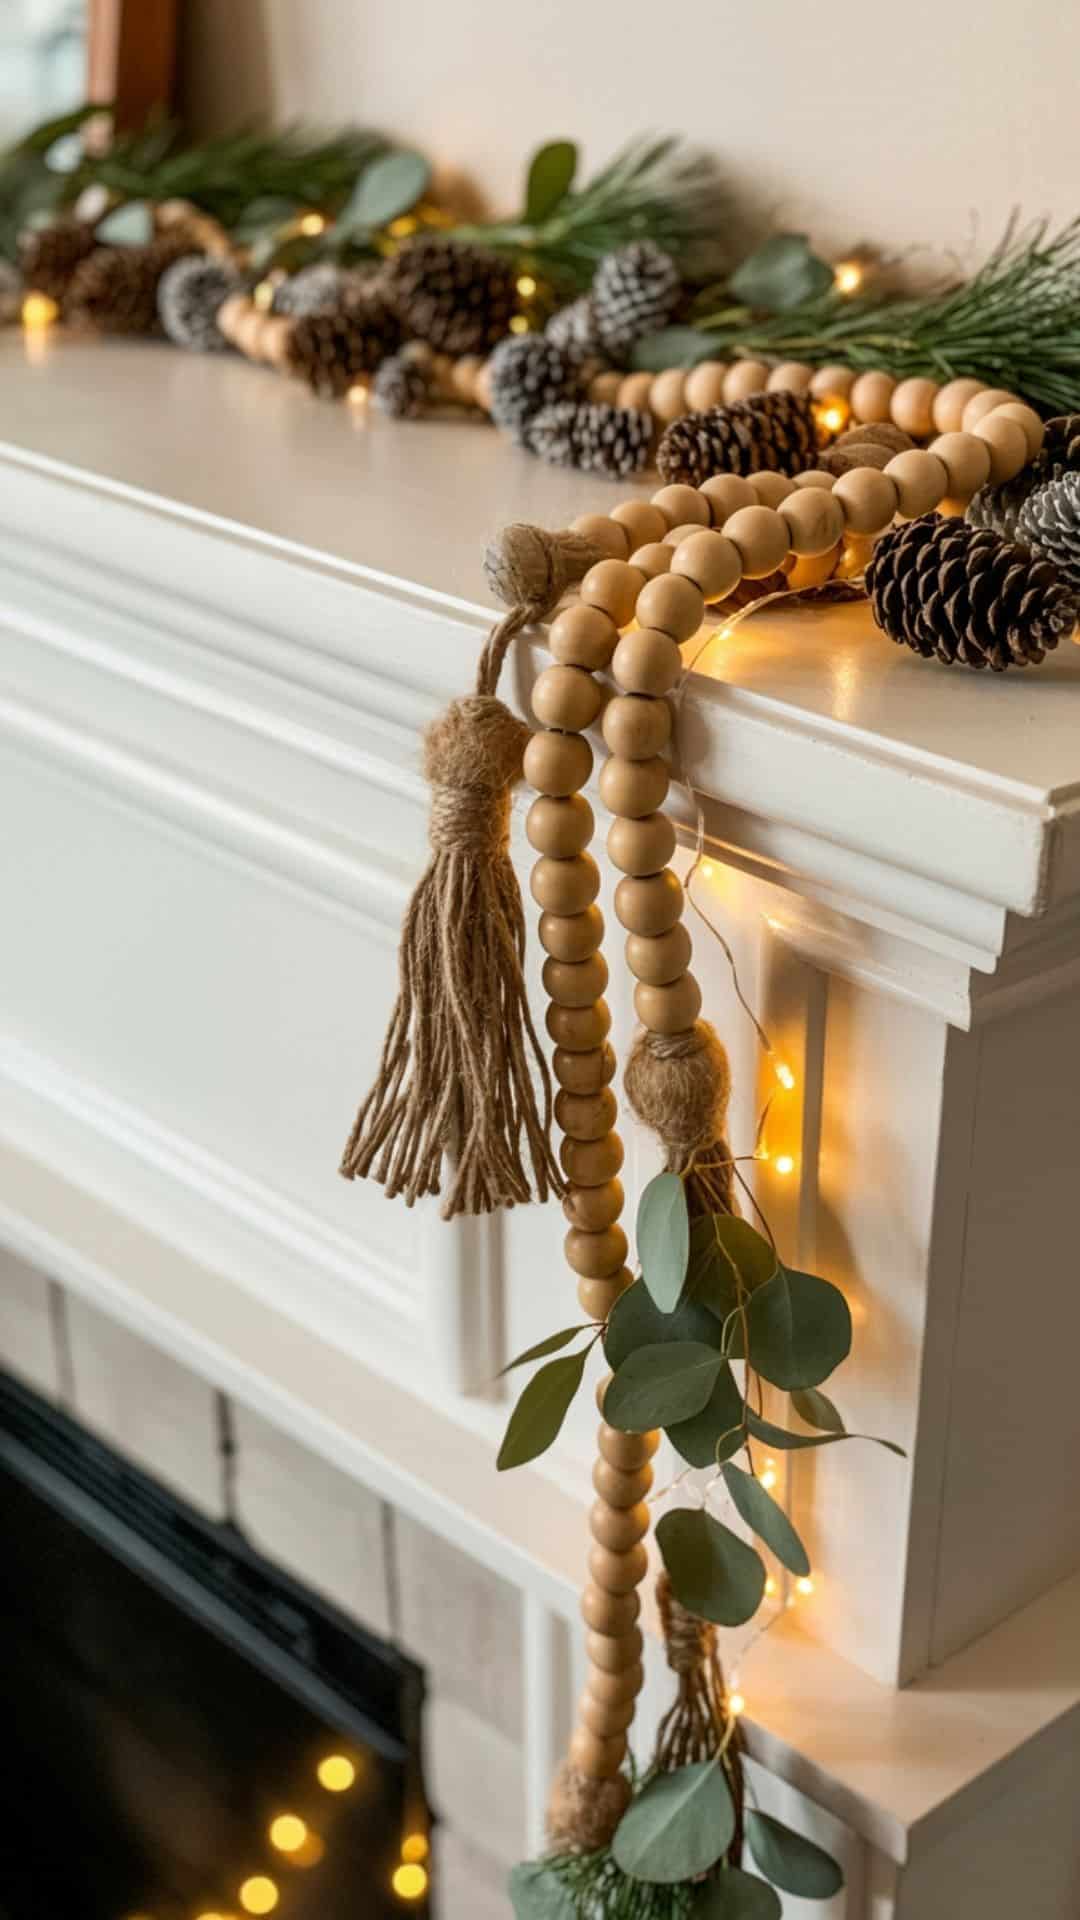
Wood bead garlands are incredibly trendy in modern and farmhouse homes. Christmas versions sell even better, whether used on mantels, trees, or tablescapes.
Materials Needed
- Wooden beads (various sizes)
- Twine or jute
- Hot glue
- Greenery picks
- Optional: white paint
Instructions
- String Beads – Alternate sizes for visual interest.
- Make Tassels – Wrap twine, tie off, trim ends.
- Attach Tassels – Add to both ends of the garland.
- Decorate – Glue greenery or bells near the ends.
- Optional – Paint beads white for a snowy look.
Shopping List
Why This Sells
Beaded garlands are extremely versatile and fit almost any décor style minimalist, boho, rustic, or farmhouse.
Suggested Price Point
- 3 ft garland: $12–$15
- 6 ft garland: $18–$25
- Premium garland with accents: $28–$35
Batching Tip
Sort beads by size before starting this doubles your speed.
Packaging Idea
Coil garland neatly and place in a clear window box with a printed label. For a bonus up sale you could add a string of LED lights in the package!
Variations
- Add plaid fabric strips
- Paint beads in Christmas colors
- Make mini garlands for tiered trays
Pro Tip
Tie the end knots extra tight bead garlands are often hung and tugged.
Snowflake String Art
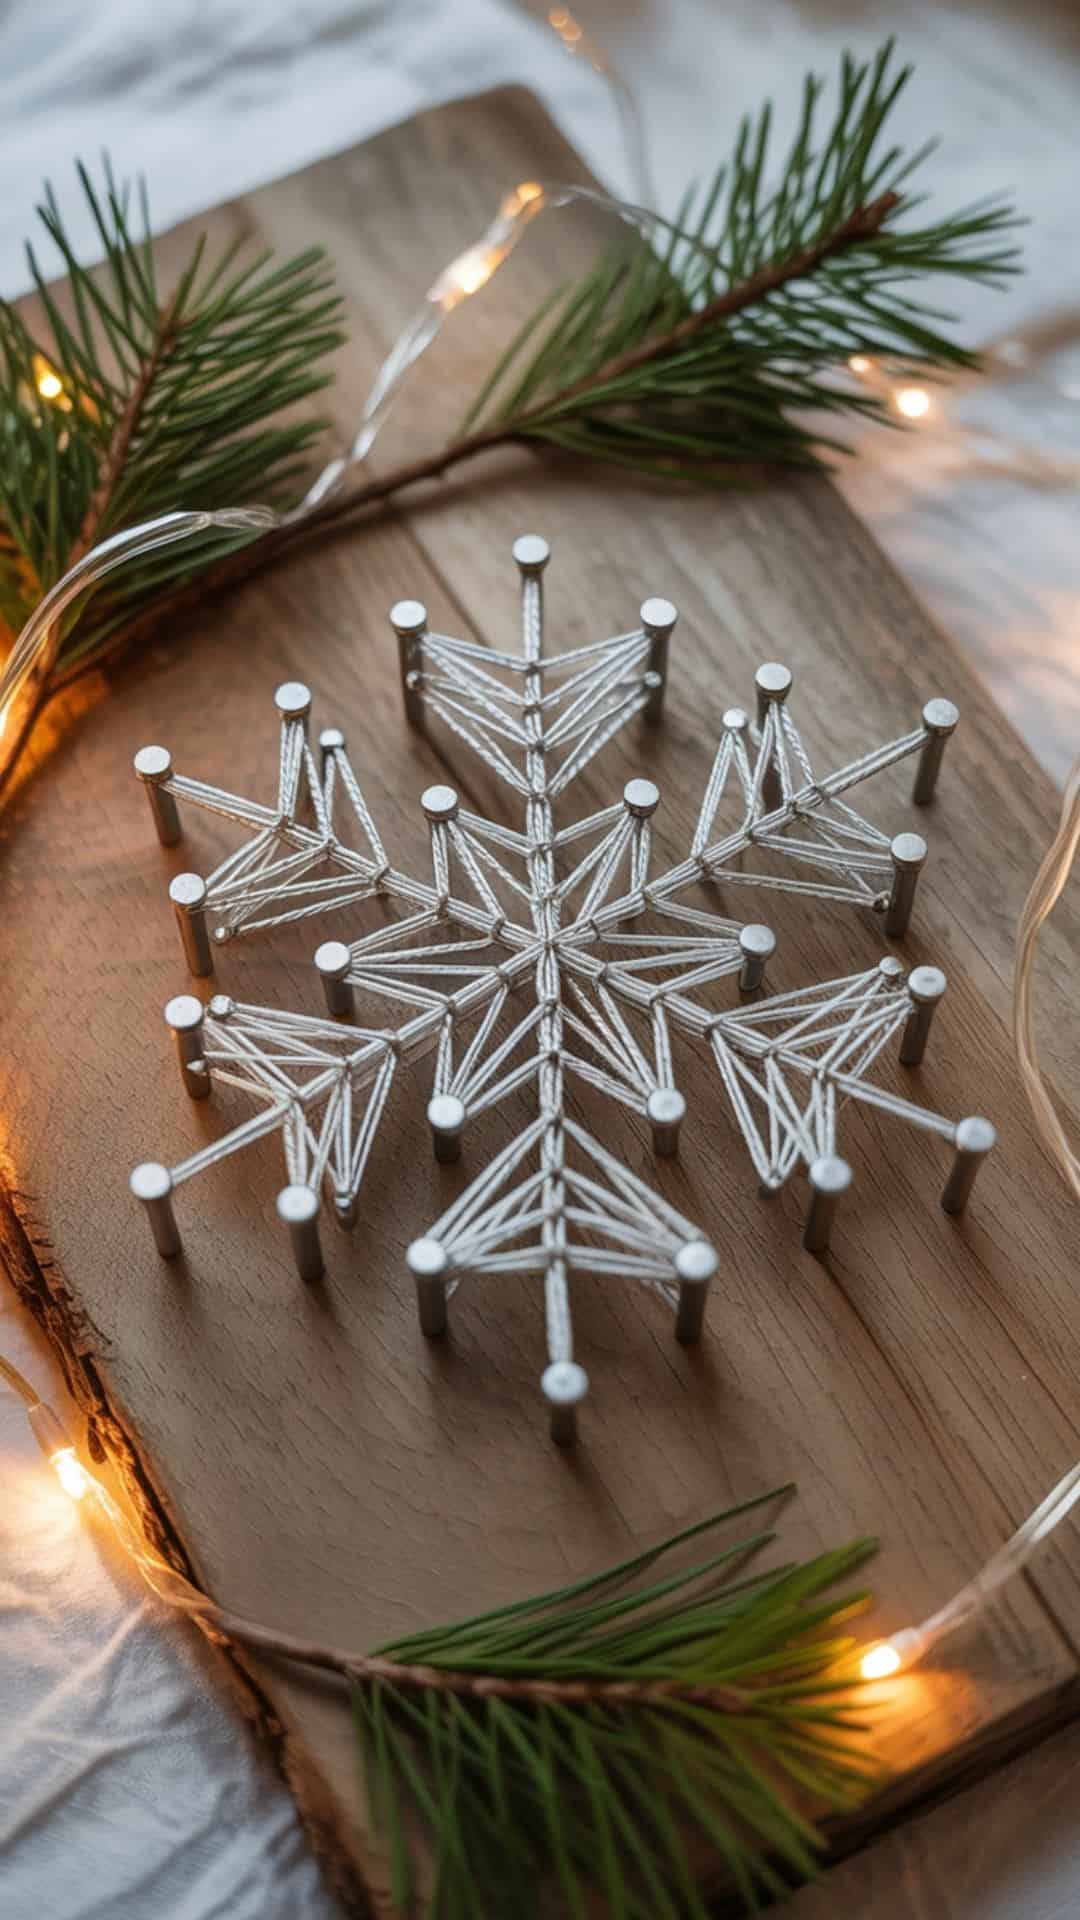
String art always grabs attention at craft fairs and online shops. Snowflake designs are elegant, wintery, and chic perfect for modern Christmas décor.
Materials Needed
- Wooden boards
- Small nails
- White string or embroidery thread
- Hammer
- Snowflake template
Instructions
- Print Template – Tape to the wooden board.
- Hammer Nails – Following the lines of the snowflake.
- Remove Paper – Carefully tear away template.
- String Pattern – Wrap string around nails to form the design.
- Finish – Tie off ends and add optional faux snow.
Shopping List
- Pre-cut wood boards
- Pack of small nails
- White string
- Snowflake templates
Why This Sells
String art looks far more expensive than it is to make. It’s unique, giftable, and works for winter décor not just Christmas.
Suggested Price Point
- Small board: $15–$20
- Medium board: $25–$35
- Large board: $35–$55
Batching Tip
Hammer all nails first across multiple boards the stringing part is the fastest.
Packaging Idea
Wrap in kraft paper and tie with twine rustic and elegant.
Variations
- Use blue string for winter themes
- Add fairy lights for premium versions
- Create sets of 3 minis
Pro Tip
Use a spacer (like a comb or ruler) to keep nail spacing consistent.
Soy Wax Jar Candles (Christmas Scents)
Soy candles are functional, giftable, and smell like pure Christmas when you use the right scents. They’re one of the easiest holiday crafts to make in batches, and they photograph beautifully perfect for Etsy, Instagram, and Christmas markets.
Materials Needed
- Soy wax flakes
- Pre-tabbed candle wicks
- Heat-resistant jars (mason jars, amber jars, or tins)
- Fragrance oils (peppermint, cinnamon, pine, vanilla)
- Wick stickers or hot glue
- Double boiler (or heat-safe bowl over saucepan)
- Digital thermometer (helpful but optional)
- Wooden skewers or wick holders
- Optional: dried orange slices, cinnamon sticks, star anise for décor
Why These Homemade Christmas Candles Sell
Candles are evergreen sellers and explode in popularity at Christmas. They’re practical, cozy, and instantly giftable. Shoppers buy them for their home, for teachers, coworkers, Secret Santa, and hostess gifts.
See the guide to make these Christmas scent soy wax candles that are perfect for selling or gifting!
Farmhouse Christmas Wood Signs

Word signs are one of the most reliable sellers at any craft fair. At Christmas, phrases like “Joy,” “Noel,” and “Believe” become instant bestsellers especially in a modern farmhouse style.
Materials Needed
- Wooden boards (various sizes)
- Sandpaper
- White, black, or neutral chalk paint
- Paintbrushes or foam brushes
- Stencils or vinyl letter templates
- Pencil and ruler (for spacing)
- Clear sealer (optional)
Instructions
- Prep the Wood
- Sand the wood boards to remove rough edges and splinters.
- Wipe away dust with a dry cloth.
- Paint the Base
- Apply 1–2 coats of chalk paint (white, cream, or gray).
- Allow to dry completely between coats.
- Lightly sand edges for a distressed farmhouse look if you like.
- Layout Your Design
- Decide on phrases like “Merry & Bright,” “Joy to the World,” or “Farm Fresh Christmas Trees.”
- Use a ruler to lightly mark guidelines with pencil so letters are straight and centered.
- Stencil or Lettering
- Apply stencil letters with a small, almost-dry brush (dab off excess paint first to prevent bleeding).
- Alternatively, use vinyl letters or hand-letter with a paint pen for a more organic look.
- Detailing & Distressing
- Once lettering is dry, lightly sand corners or edges to give a worn farmhouse feel.
- Add simple painted stars, snowflakes, or tree silhouettes.
- Seal the Sign (Optional)
- Apply a clear matte sealer to protect the paint if the sign may be handled frequently.
- Add Hanging Hardware
- Attach sawtooth hangers, D-rings, or jute rope depending on the style.
Shopping List
- Pre-cut wood boards
- Chalk paint (white, black, gray)
- Letter stencils or vinyl letters
- Sandpaper
- Hanging hardware
Why This Sells
Signs are décor workhorses. They instantly fill wall space, mantels, and shelves, and they photograph well which matters for social media marketing. Customers love statement pieces they can pull out every Christmas.
Suggested Price Point
- Small sign (8″ x 8″): $15–$20
- Medium sign (10″ x 18″): $25–$35
- Large sign (12″ x 24″+): $40–$65
Batching Tip
Choose 3–4 designs and make multiple copies of each. Batch your steps: paint all boards, then letter all, then attach hardware.
Packaging Idea
Tie twine around each sign with a sprig of faux pine and a kraft tag that reads “Hand-Painted Farmhouse Christmas Sign.” For shipping, use padded corners and cardboard sleeves.
Variations
- Black background with white lettering for a chalkboard look.
- Use metallic gold or copper for more modern signs.
- Offer custom surname signs: “The Thompson Family Christmas.”
Pro Tip
When stenciling, less paint is more. Dab off most of the paint onto a paper towel first a nearly dry brush gives crisp letters that don’t bleed.
Christmas Mug & Hot Cocoa Gift Sets

These are simple, adorable, and look like something you’d find in a boutique gift shop. They’re quick to assemble and perfect for people who want “ready-to-give” gifts for coworkers, neighbors, or teachers.
Materials Needed
- Christmas-themed mugs
- Hot chocolate packets or homemade mix
- Mini marshmallows (individually bagged)
- Candy canes or chocolate stir sticks
- Clear cellophane bags (affiliate)
- Ribbon and tags
- Optional: small chocolates or cookies
Instructions
- Prepare the Mug Fillings
- Place a pack of hot cocoa or a small jar of homemade mix in the mug.
- Add a small bag of mini marshmallows.
- Slide in a candy cane or chocolate stir stick.
- Add Extra Treats
- Tuck in a small chocolate bar, wrapped cookie, or mini biscuit pack for extra value.
- Wrap the Mug
- Place the filled mug in the center of a cellophane bag.
- Gather the top of the bag and secure with a twist tie or ribbon.
- Decorate with Ribbon & Tags
- Tie a festive ribbon around the gathered top.
- Attach a tag with a sweet message like “Warm Winter Wishes” or “Hot Cocoa Hug in a Mug.”
- Group for Display
- Arrange mugs in crates, baskets, or tiered stands for eye-catching presentation at markets.
Shopping List
- 10–20 Christmas mugs (buy in multi-packs if possible)
- Cocoa mix packets or ingredients for DIY mix
- Mini marshmallows
- Candy canes
- Clear cellophane bags
- Ribbon & tags
Why This Sells
People are always looking for easy, under-$20 gift ideas that look thoughtful but don’t require extra wrapping. These are perfect for last-minute shoppers and bulk “office gifts.”
Suggested Price Point
- Single mug set: $12–$18 (depending on mug quality and extras)
- “His & Hers” set of 2: $25–$30
Batching Tip
Line up all mugs and work assembly-line style: cocoa in all, marshmallows in all, candy canes in all, then wrap.
Packaging Idea
Offer a “Gift Ready” table sign so shoppers know they can give these immediately no extra wrapping needed.
Variations
- “Grinch Green” themed mugs with lime-colored candies.
- Coffee-themed version with instant coffee sachets.
- Kids version with fun character mugs and extra marshmallows.
Pro Tip
If you’re using homemade cocoa mix, include a small printed instruction card with the water/milk directions. It feels professional and avoids confusion.
Painted Pinecone Christmas Trees
These miniature pinecone “trees” are nature-inspired, adorable, and incredibly inexpensive to make. They’re ideal for rustic, cottagecore, and farmhouse Christmas lovers, and they work beautifully on shelves, mantels, and tables.
Materials Needed
- Large pinecones
- Small wood slices or bottle caps (for bases)
- Green and white acrylic paint
- Small paintbrushes
- Tiny beads or mini pom-poms
- Mini star confetti or star beads (affiliate)
- Hot glue
Instructions
- Prepare Pinecones
- Brush off any dirt or debris.
- If for resale, you may want to bake them at low heat (about 200°F / 95°C for 20–30 minutes) to ensure they’re fully dry and bug-free.
- Paint the Tips
- Decide if you want full green trees or just snowy tips.
- For snowy trees, lightly dry-brush white paint on the outer edges of each scale.
- For green trees, paint the entire pinecone green, then dry-brush white on tips.
- Attach the Base
- Hot glue the bottom of the pinecone onto a wood slice or painted bottle cap.
- Hold in place until the glue sets so it stands straight.
- Decorate the Tree
- Use tiny beads, mini pom-poms, or sequins as ornaments.
- Glue them randomly around the pinecone scales.
- Glue a tiny star on top as a tree topper.
- Finishing Touches
- Add a sprinkle of fine glitter while the last bits of paint are still tacky (optional).
Shopping List
- Pinecones (foraged or purchased)
- Wood slice bases
- Acrylic paint (green & white)
- Tiny beads, mini pom-poms, or sequins
- Tiny star confetti
- Hot glue sticks
Why This Sells
They’re inexpensive to make but look high-end when styled well. Customers love them for tiered trays, mantels, and little nooks plus they’re a cute alternative to bigger trees for small spaces or offices.
Suggested Price Point
- Single mini tree: $6–$10
- Set of 3: $18–$25
- Larger “forest” sets: price according to size (e.g., $30–$40)
Batching Tip
Paint all pinecones first and let them dry on parchment. Once dry, attach all bases, then move on to decorating in one go.
Packaging Idea
Group sets of 3 in a shallow kraft box with “Mini Pinecone Tree Trio” on the lid. Use white crinkle paper for a snowy look.
Variations
- Use metallic paint (gold, rose gold, silver) for glam collections.
- Create monochrome sets in all-white for minimalists.
- Add tiny fairy lights for premium versions.
Pro Tip
Use a clamp or heavy object to hold the pinecone upright on the base while the glue sets this keeps them from leaning.
Christmas Potpourri Jars (Stovetop Simmer Jars)
These sell like crazy because they look high-end but cost pennies to make. Customers love the visual appeal, the natural fragrance, and the idea of gifting a cozy-smelling home for the holidays. They’re ideal for teachers, hosts, neighbors, and Secret Santa gifts.
Materials Needed
- Mason jars (8 oz or 16 oz)
- Dried orange slices
- Cinnamon sticks
- Whole cloves
- Dried cranberries
- Bay leaves or rosemary sprigs
- Star anise (optional)
- Twine
- Kraft tags
- Optional: printable simmer instructions
Instructions
- Prep Your Ingredients
- Dry orange slices in advance (low oven for several hours).
- Ensure all ingredients are fully dry to prevent mold.
- Layer Ingredients
- Start with larger items: dried oranges and cinnamon sticks.
- Add a handful of dried cranberries around them.
- Sprinkle cloves and star anise for aroma.
- Place a small rosemary sprig or bay leaf on top for color and fragrance.
- Seal Jars Tight
- Screw lids on firmly so the contents stay fresh.
- Give jars a gentle shake to settle everything nicely.
- Add Tags
- Write simple stovetop instructions:
“Simmer in a pot of water for a natural Christmas scent.” - Tie the tag around the jar with twine or ribbon.
- Write simple stovetop instructions:
- Display for Maximum Appeal
- Arrange on wooden crates (affiliate), risers, or tiered stands for a Christmas-market-ready look.
Shopping List
- Mason jars (6–12 pack)
- Bulk dried oranges (or fresh oranges to dry yourself)
- Cinnamon sticks pack
- Whole cloves
- Dried cranberries
- Star anise
- Twine & tags
Why This Sells
It’s a zero-effort gift for buyers: beautiful, fragrant, and ready-to-use. People LOVE the natural, rustic aesthetic and the “cozy home” vibes.
Suggested Price Point
- 8 oz jar: $10–$12
- 16 oz jar: $15–$18
- Trio gift pack: $25–$30
Batching Tip
Dry a HUGE batch of oranges at once and keep in airtight bags. You can assemble 20–30 jars in under an hour when ingredients are prepped.
Packaging Idea
Add a tiny wooden scoop or mini cinnamon stick tied to the twine small touches increase perceived value dramatically.
Variations
- “Christmas Morning” scent (add nutmeg + vanilla bean)
- “Winter Forest” scent (juniper berries + pine)
- “Gingerbread Kitchen” scent (ginger, cinnamon, cloves)
Pro Tip
Your jars will sell faster if you layer the ingredients visibly and neatly the aesthetic is everything for this craft.
Hand-Painted Christmas Coasters

Coasters are practical, giftable, and super customizable. Painted Christmas versions make perfect host gifts, teacher gifts, and office gifts.
Materials Needed
- Cork or wood coasters
- Acrylic paint
- Paint pens
- Small detail brushes
- Clear sealer (matte or glossy)
- Ribbon
Instructions
- Prep the Coasters
- Clean surfaces thoroughly.
- Sand lightly if using wood to ensure smooth painting.
- Sketch Designs
- Lightly draw simple Christmas motifs: trees, snowflakes, holly, reindeer silhouettes.
- Paint the Background
- Paint solid backgrounds (white, red, forest green, black).
- Let dry completely.
- Detail the Designs
- Use paint pens or fine brushes for crisp lines.
- Add dots, shading, or metallic accents.
- Seal for Durability
- Apply 1–2 coats of clear sealer to make coasters water-resistant.
- Bundle and Decorate
- Stack 4 coasters and tie with ribbon or twine.
- Add a small tag with your brand or design name.
Shopping List
- Coaster blanks
- Acrylic paints
- Paint pens
- Clear sealer spray
- Ribbon
Why This Sells
Coasters are universally useful and easy to gift. Your customers don’t need to know the receiver’s size or preferences everyone uses coasters during the holidays.
Suggested Price Point
- Single coaster: $4–$6
- Set of 4: $15–$22
- Premium wooden set: $25–$32
Batching Tip
Paint all backgrounds first, then do all outlining and details. This keeps your workflow smooth and consistent.
Packaging Idea
Wrap sets in kraft paper with a “Holiday Coaster Set” sticker or tie with plaid ribbon.
Variations
- Minimalist Scandinavian patterns
- Metallic gold Christmas trees
- Personalized monogram coasters
Pro Tip
Paint pens give crisp detail and help prevent smudging essential for small, intricate designs.
Christmas Gnome Shelf Sitters
Gnomes are a Christmas phenomenon customers collect them, gift them, and decorate entire shelves with them. These plush shelf sitters are whimsical, cute, and highly profitable.
Materials Needed
- Felt or cotton fabric
- Faux fur (affiliate) (for beards)
- Rice or beads (for weighted base)
- Polyfill stuffing
- Wooden beads (affiliate) (for noses)
- Hot glue gun (affiliate)
- Decorative trims
Instructions
- Create the Body
- Cut a triangle or cone shape from felt.
- Glue or sew the sides together to form a soft cone.
- Add rice or beads to the bottom for weight.
- Stuff the rest with polyfill.
- Make the Beard
- Cut a triangular shape from faux fur.
- Cut from the back of the fur to avoid chopping the fibers bluntly.
- Glue beard to the top half of the body.
- Add the Nose
- Glue a wooden bead where the hat will overlap the beard.
- Create the Hat
- Cut a tall felt triangle.
- Roll into a cone and glue the seam.
- Slip hat over the body and glue lightly around the base.
- Decorate
Shopping List
- Felt sheets
- Faux fur
- Polyfill
- Wooden bead noses
- Weighted filler (rice or beads)
Why This Sells
Gnomes are universally loved holiday decor. They match farmhouse, Scandinavian, and whimsical Christmas styles meaning they appeal to a wide range of shoppers.
Suggested Price Point
- Small gnomes: $12–$15
- Medium gnomes: $18–$25
- Set of 3: $35–$45
Batching Tip
Cut all body pieces, all hats, and all beards at once. Then glue assembly-line style it’s dramatically faster.
Packaging Idea
Place in clear bags with a cardboard insert showing your logo and the gnome’s name (yes, named gnomes sell better!).
Variations
- Buffalo plaid hats
- Glitter beards
- Extra tall hats for whimsical versions
- Holiday color sets: red, green, cream
Pro Tip
Tilt the hat slightly over the nose it creates that classic adorable gnome look customers love.
Woodland Gnome Ornaments
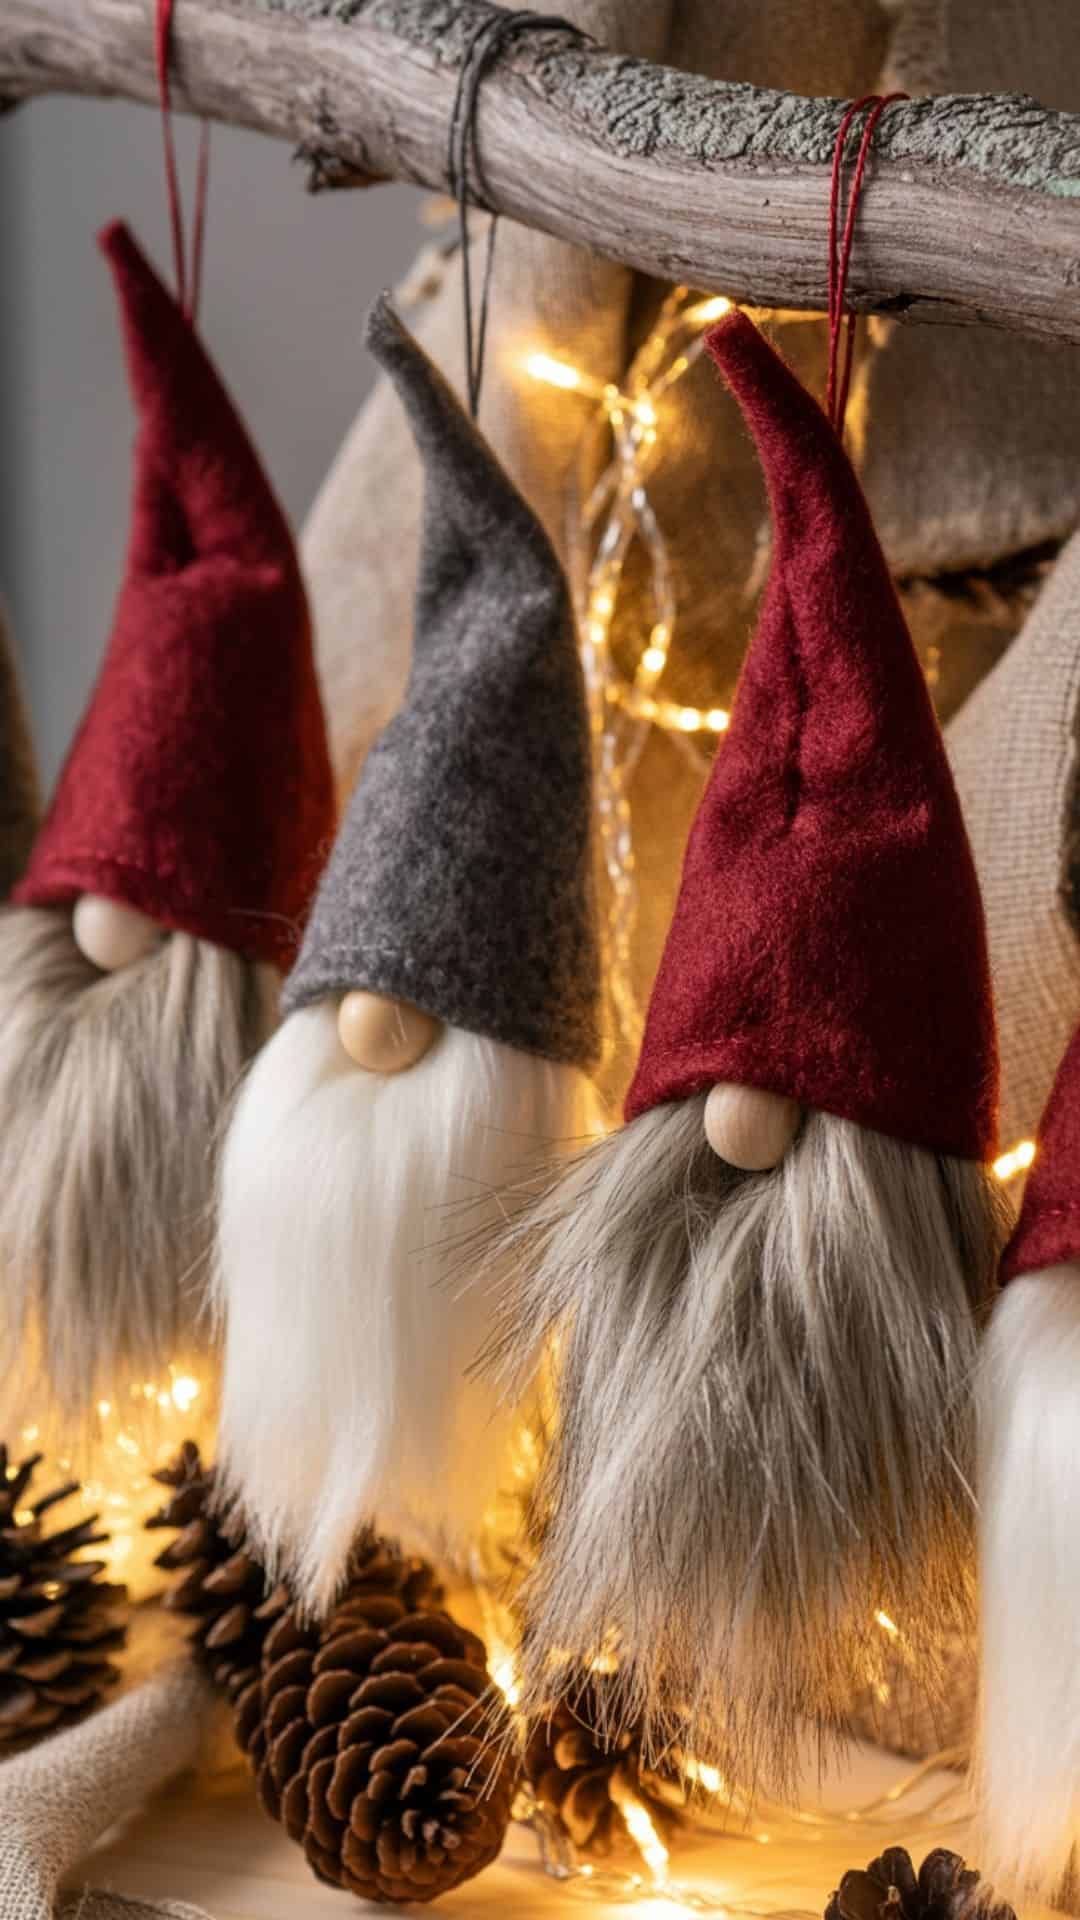
If there’s one character that keeps winning Christmas décor, it’s the gnome. These woodland-style gnome ornaments are whimsical, trendy, and easy to batch-make perfect for buyers who want something a little playful on their tree.
Materials Needed
- Small wooden beads (for noses)
- Faux fur fabric (for beards)
- Felt sheets (for hats)
- Twine or ribbon (for hanging loops)
- Hot glue gun + glue sticks
- Scissors
- Optional: tiny bells, snowflake buttons, or felt hearts
Instructions
- Cut the Beards
- Flip faux fur to the back side and draw small triangles (about 2–3 inches tall).
- Cut only through the backing, not the fur fibers, to keep the beard fluffy.
- Prepare the Hats
- Cut tall triangles out of felt, wide enough to wrap around the top of each beard.
- Roll into a cone shape and glue along the edge to create a hat.
- Add the Nose
- Glue a wooden bead near the top center of the beard piece.
- The hat will later sit just above the nose.
- Assemble Gnomes
- Add a line of hot glue along the top edge of the beard.
- Press the felt hat down so it overlaps the top of the beard and partially covers the bead, leaving just the “nose” visible.
- Hold until firmly set.
- Attach Hanging Loop
- Cut a small loop of twine or ribbon.
- Glue it to the back of the hat so the gnome hangs straight.
- Decorate
- Add mini snowflake buttons, bells, or tiny hearts to the hat for personality.
Shopping List
- Faux fur sheet
- Felt sheet multipack (neutral + Christmas colors)
- Small wooden beads
- Twine or thin ribbon
- Hot glue sticks
Why This Sells
Gnomes are collectible. Customers rarely buy just one they grab multiples for trees, garlands, and gifts. They photograph beautifully and have a high perceived value for very little material.
Suggested Price Point
- Single ornament: $7–$12
- Set of 3: $18–$25
- Set of 5 “family gnomes”: $30–$40
Batching Tip
Cut all beards first, then hats, then assemble in stages. A little prep up front means you can turn out dozens in a single evening.
Packaging Idea
Mount sets on kraft card backing, slide into clear cellophane sleeves, and label them as “Woodland Gnome Ornament Set.”
Variations
- Make “Nordic” sets in gray, white, and red.
- Add braids (using yarn) for gnome girls.
- Offer custom hat colors to match buyers’ décor themes.
Pro Tip
Angle the hat slightly to one side over the nose that tiny tilt makes the gnomes look extra charming and full of personality.
Recycled Glass Jar Christmas Lanterns
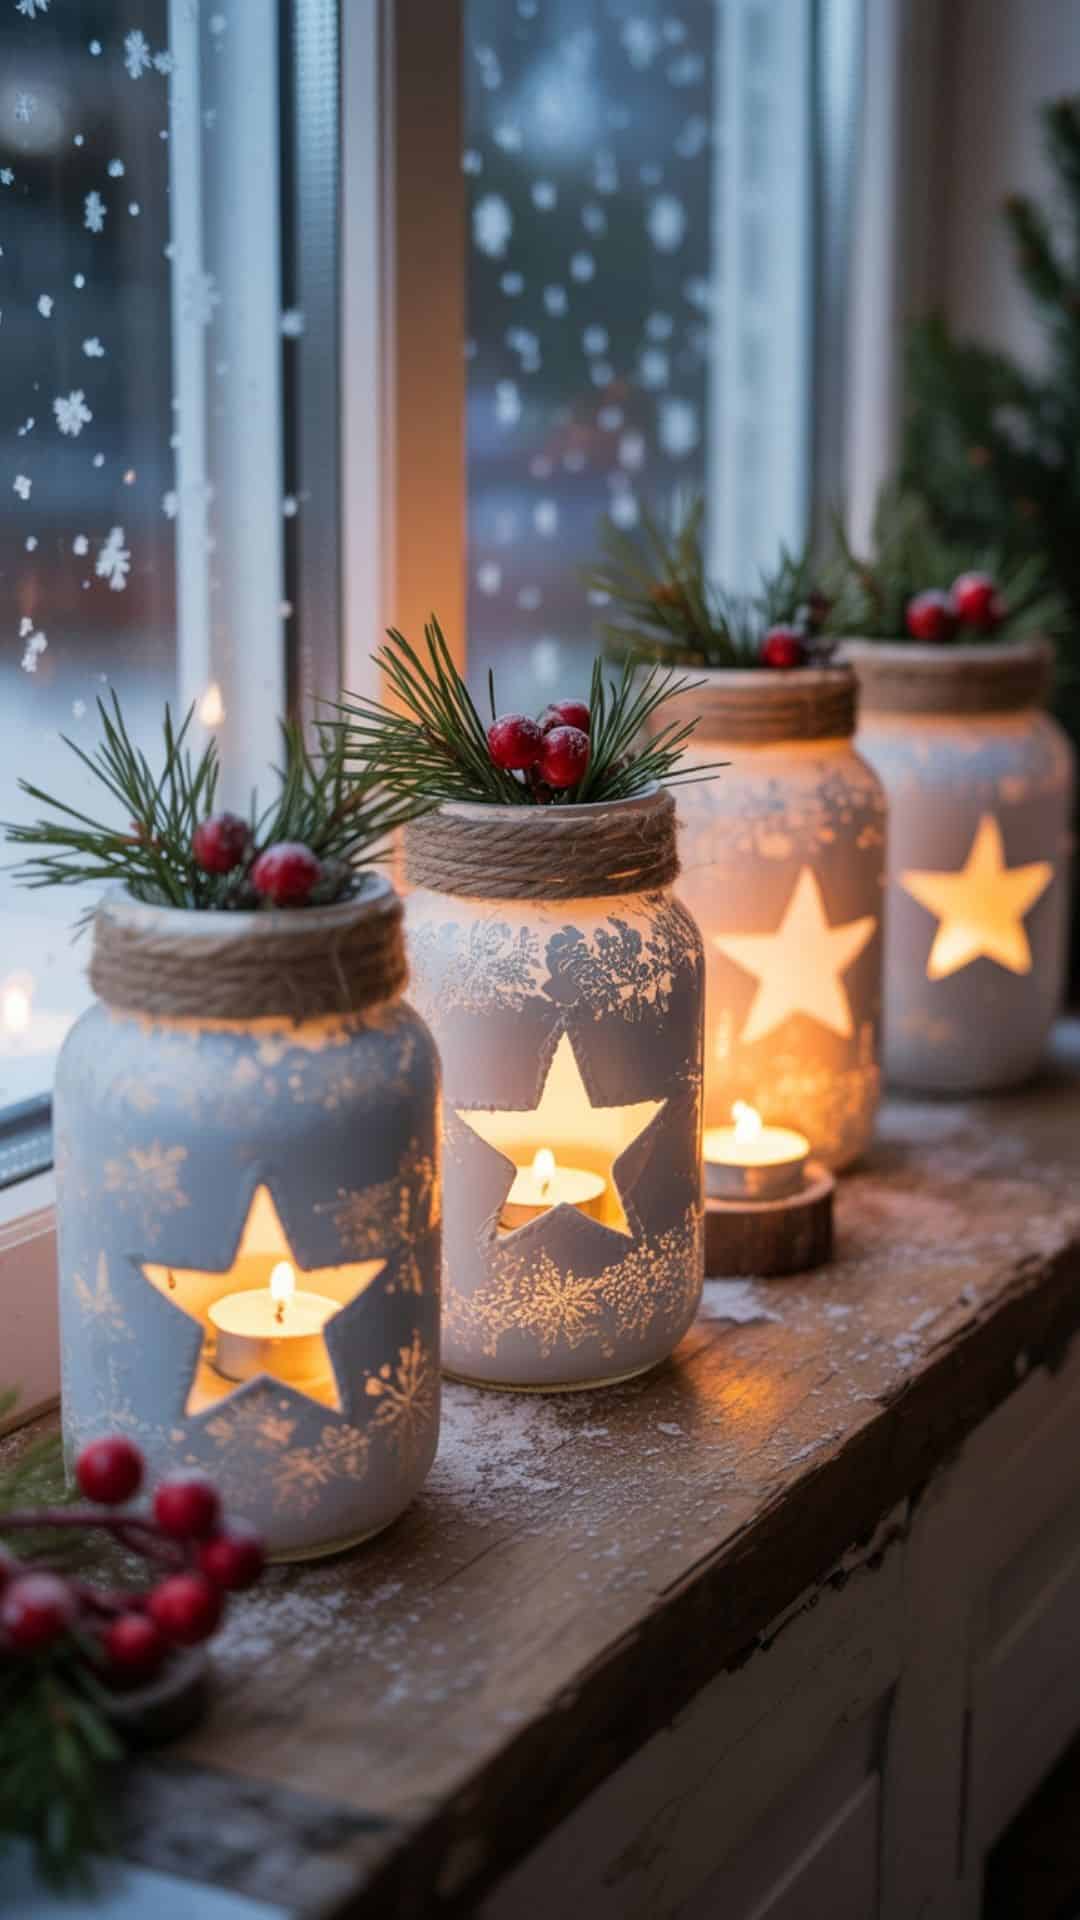
These lanterns are budget-friendly, eco-conscious, and magical when lit. They’re perfect for buyers who love cozy ambiance, porch decor, and simple table styling for Christmas.
Materials Needed
- Clean recycled glass jars (jam jars, sauce jars, etc.)
- Frosted glass spray paint or white chalk paint (affiliate)
- Painter’s tape or vinyl star/tree shapes (for masking)
- Jute twine or ribbon
- Sprigs of faux greenery or small pinecones
- Battery-operated tealights or small LED candles
- Hot glue gun (optional)
Instructions
- Prep the Jars
- Remove labels and sticky residue completely.
- Wash and dry jars thoroughly.
- Create Your Cut-Out Shapes
- Stick vinyl stars, trees, or snowflakes on the jar where you want clear “windows.”
- Or use painter’s tape cut into simple shapes.
- Paint or Frost the Jars
- Spray with frosted glass spray or dab on white chalk paint with a sponge for a textured snowy effect.
- Allow to dry completely.
- Carefully remove the tape or vinyl to reveal the clear shape.
- Decorate the Rim
- Wrap jute twine or ribbon around the top of the jar several times.
- Tie a bow.
- Hot glue a small pinecone or greenery sprig for extra flair.
- Add the Light
- Place a battery tealight inside each jar.
- Turn on to check how the light shines through the cut-out.
Shopping List
- Frosted glass spray or white chalk paint
- Painter’s tape or vinyl shapes
- Twine or ribbon
- Faux greenery and mini pinecones
- LED tealights
Why This Sells
Lanterns feel warm and magical at Christmas. These are safe (LED-based), reusable, and can be used on mantels, tables, shelves, or porches. The eco angle (recycled jars!) also appeals to modern shoppers.
Suggested Price Point
- Single lantern: $8–$12
- Set of 3: $22–$30
Batching Tip
Spray/frost all jars in one session. While they dry, prep your twine and greenery. Once dry, your final assembly goes very quickly.
Packaging Idea
Nestle lanterns in kraft boxes with shredded paper and include a tealight with each jar so they’re ready to use.
Variations
- Use gold or silver paint for glam Christmas décor.
- Add word stencils like “JOY” or “NOEL.”
- Make themed sets: stars, trees, snowflakes.
Pro Tip
Light them up and take a few styled photos glowing lantern photos are wonderful for your product pages and social posts.
Christmas Clay Ornaments

Clay ornaments are elegant, minimalist, and VERY popular with modern decor lovers. You can create dozens quickly using air-dry or oven-bake polymer clay (affiliate).
Materials Needed
- Air-dry clay OR polymer clay
- Rolling pin
- Cookie cutters (star, tree, snowflake)
- Lace, doilies, or nature items for texture
- Straw or skewer (for holes)
- Twine
- Optional: paint or gold accents
Instructions
- Prepare the Clay
- Knead until soft and smooth.
- Roll out to ¼ inch thickness.
- Add Texture
- Press lace or greenery (fern, cedar) onto the clay.
- Lift to reveal the imprint.
- Cut Shapes
- Use cookie cutters to make stars, trees, bells, etc.
- Add Hanging Holes
- Use a straw or skewer to poke a clean hole at the top.
- Dry or Bake
- Air-dry clay: 24–48 hours
- Polymer clay: Follow baking directions
- Finish
- Sand edges lightly.
- Add gold paint accents if desired.
- Thread twine through the hole.
Shopping List
Why This Sells
Minimalist decor is HUGE. These ornaments match Scandinavian, neutral, and farmhouse decor styles major Christmas 2025 trends.
Suggested Price Point
- Single ornament: $6–$10
- Set of 3: $15–$22
- Premium boxed set of 6: $25–$35
Batching Tip
Roll multiple clay sheets at once, imprint them all, then cut dozens of shapes quickly.
Packaging Idea
Place ornament sets in small kraft boxes filled with shredded paper for a boutique look.
Variations
- White + gold edges
- Terracotta clay for rustic charm
- Add essential oils for scented ornaments
Pro Tip
Dust clay lightly with cornstarch before imprinting to avoid sticking.
Christmas Cookie Mix in a Jar

Cookie mix in a jar looks stunning on a market table and makes gifting ridiculously easy. Buyers love that they can just add wet ingredients and bake festive Christmas cookies with almost no effort.
Materials Needed
- Quart-size mason jars
- Flour
- Brown sugar
- White sugar
- Baking powder/soda (as per your recipe)
- Chocolate chips
- Red and green candy-coated chocolates
- Fabric squares for lids
- Ribbon or twine
- Recipe tags
Instructions
- Choose a Simple Cookie Recipe
- Classic chocolate chip or chocolate chip + red/green candies works best.
- Convert the dry ingredients into jar format (layers).
- Layer Dry Ingredients
- Use a funnel or spoon to add each layer: flour, baking ingredients, sugars, chocolate chips, candy pieces.
- Tap the jar gently between layers to settle and keep lines clean.
- Seal and Dress the Jar
- Place a piece of fabric over the lid and secure with the ring.
- Or use the plain lid and tie a square of fabric and ribbon around the top.
- Add Recipe Tag
- Include “Just Add” instructions for eggs, melted butter, vanilla, etc.
- Add baking temp and time.
- Style for Display
- Group jars together in crates or baskets for maximum impact.
Shopping List
- Mason jars (quart size)
- Dry baking ingredients (flour, sugar, etc.)
- Chocolate chips and red/green candies
- Fabric squares or pre-cut lid covers
- Ribbon or baker’s twine
- Printable recipe tags
Why This Sells
People want gifts that feel homemade but don’t require a ton of effort. This is the perfect “lazy baker” gift it looks pretty, feels thoughtful, and tastes delicious.
Suggested Price Point
- Single jar: $12–$18
- Set of 2 (different flavors): $22–$30
Batching Tip
Measure dry ingredients in bulk and set up a filling station. One person layers, another caps and dresses, another ties tags.
Packaging Idea
Tag them as “Christmas Cookie Mix – Just Add Love (and Butter)” for a playful, giftable feel.
Variations
- White chocolate + cranberry mix
- Oatmeal chocolate chip mix
- Gingerbread cookie mix
Pro Tip
Use clear, readable recipe tags and test your recipe once to make sure measurements are perfect.
No-Sew Fleece Christmas Blankets
These are higher-ticket items that can really boost your holiday sales totals. They’re cozy, customizable, and surprisingly quick to make no sewing machine (affiliate) required.
Materials Needed
- 2 coordinating fleece pieces per blanket (same size)
- Fabric scissors or rotary cutter (affiliate)
- Large cutting mat (optional but helpful)
- Ruler or measuring tape
Instructions
- Cut Fleece Pieces
- Cut two equal-sized pieces (for a throw, about 1.5–2 meters long).
- Lay one on top of the other, wrong sides together (if there is a wrong side).
- Trim and Square Up
- Make sure edges are even and corners are right angles.
- Cut Corner Squares
- Cut a 4–5 inch square from each corner this creates space for the fringe.
- Cut Fringe All Around
- Cut strips 4–5 inches long and about 1 inch wide along all four sides, cutting both layers together.
- Keep fringes roughly the same width for a neat finish.
- Tie the Knots
- Tie the top and bottom fringe strips together in secure double knots.
- Work your way around the entire blanket.
- Smooth & Finish
- Shake out the blanket and smooth the knots.
- Fold neatly for display.
Shopping List
- Fleece yardage in Christmas prints or matching solids
- Fabric scissors or rotary cutter
- Measuring tape
Why This Sells
Everyone loves a cozy throw for winter. These make fantastic big gifts perfect for couch snuggling, movie nights, and teen bedrooms and have a premium feel and price point.
Suggested Price Point
- Child-sized throw: $30–$40
- Adult throw: $45–$65
- Oversized couch blanket: $65–$85
Batching Tip
Cut multiple blankets’ worth of fleece at once, then move to the fringe-cutting stage, then tying. Put on a Christmas movie and knot away.
Packaging Idea
Roll blankets into bundles, tie with wide ribbon, and add a tag that says “Cozy Christmas Movie Night Blanket.”
Variations
- Reversible blankets (plaid on one side, solid on the other).
- Kids’ versions with character fleece or bright prints.
- Matching pillow covers as add-ons.
Pro Tip
Use high-quality, thick fleece it dramatically increases the perceived value and keeps the blanket from feeling flimsy.
Printable-Style Handcrafted Christmas Gift Tag Sets

Gift tags are small but mighty sellers. When they’re pretty, sturdy, and ready to use, people scoop them up to dress up basic wrapping paper and add a handmade touch to gifts.
Materials Needed
- Heavyweight cardstock or kraft paper
- Tag punch or scissors + tag templates
- Stamps, brush pens, or printed designs
- Hole punch
- Twine or thin ribbon
- Mini clothespins (optional for sets)
Instructions
- Cut the Tag Shapes
- Use a tag punch or trace a template and cut by hand.
- Make sets of 10–20 tags at a time in coordinating designs.
- Add Designs
- Stamp small trees, snowflakes, stars, or wreaths.
- Or hand-letter simple phrases like “Merry,” “Joy,” and “With Love.”
- Keep the style fairly simple and cohesive think modern, farmhouse, or minimalist.
- Punch the Holes
- Use a hole punch at the top center of each tag.
- Add Twine
- Cut lengths of string or ribbon and loop through each tag, ready for tying.
- Bundle the Sets
- Group tags into sets (e.g., 10 or 20 tags).
- Tie the stack with twine or hold them together with a mini clothespin.
Shopping List
- Cardstock or kraft paper
- Tag punch or template
- Hole punch
- Twine or thin ribbon
- Stamps/ink or brush pens
Why This Sells
Everyone wraps gifts. Most people want their gifts to look cute without spending ages on presentation. Premium-looking tags are an easy upsell at your booth or online shop.
Suggested Price Point
- Set of 10 tags: $6–$10
- Set of 20 tags: $10–$15
- Deluxe sets with metallic ink or ribbon: $15–$18
Batching Tip
Cut all tags first, then decorate in “collections” (e.g., all snowflakes at once, all trees at once). It keeps your designs cohesive and speeds things up.
Packaging Idea
Slide tag sets into small clear sleeves or envelopes with a branded backing card labeled “Handcrafted Christmas Gift Tags.”
Hot Chocolate Spoon Stirrers
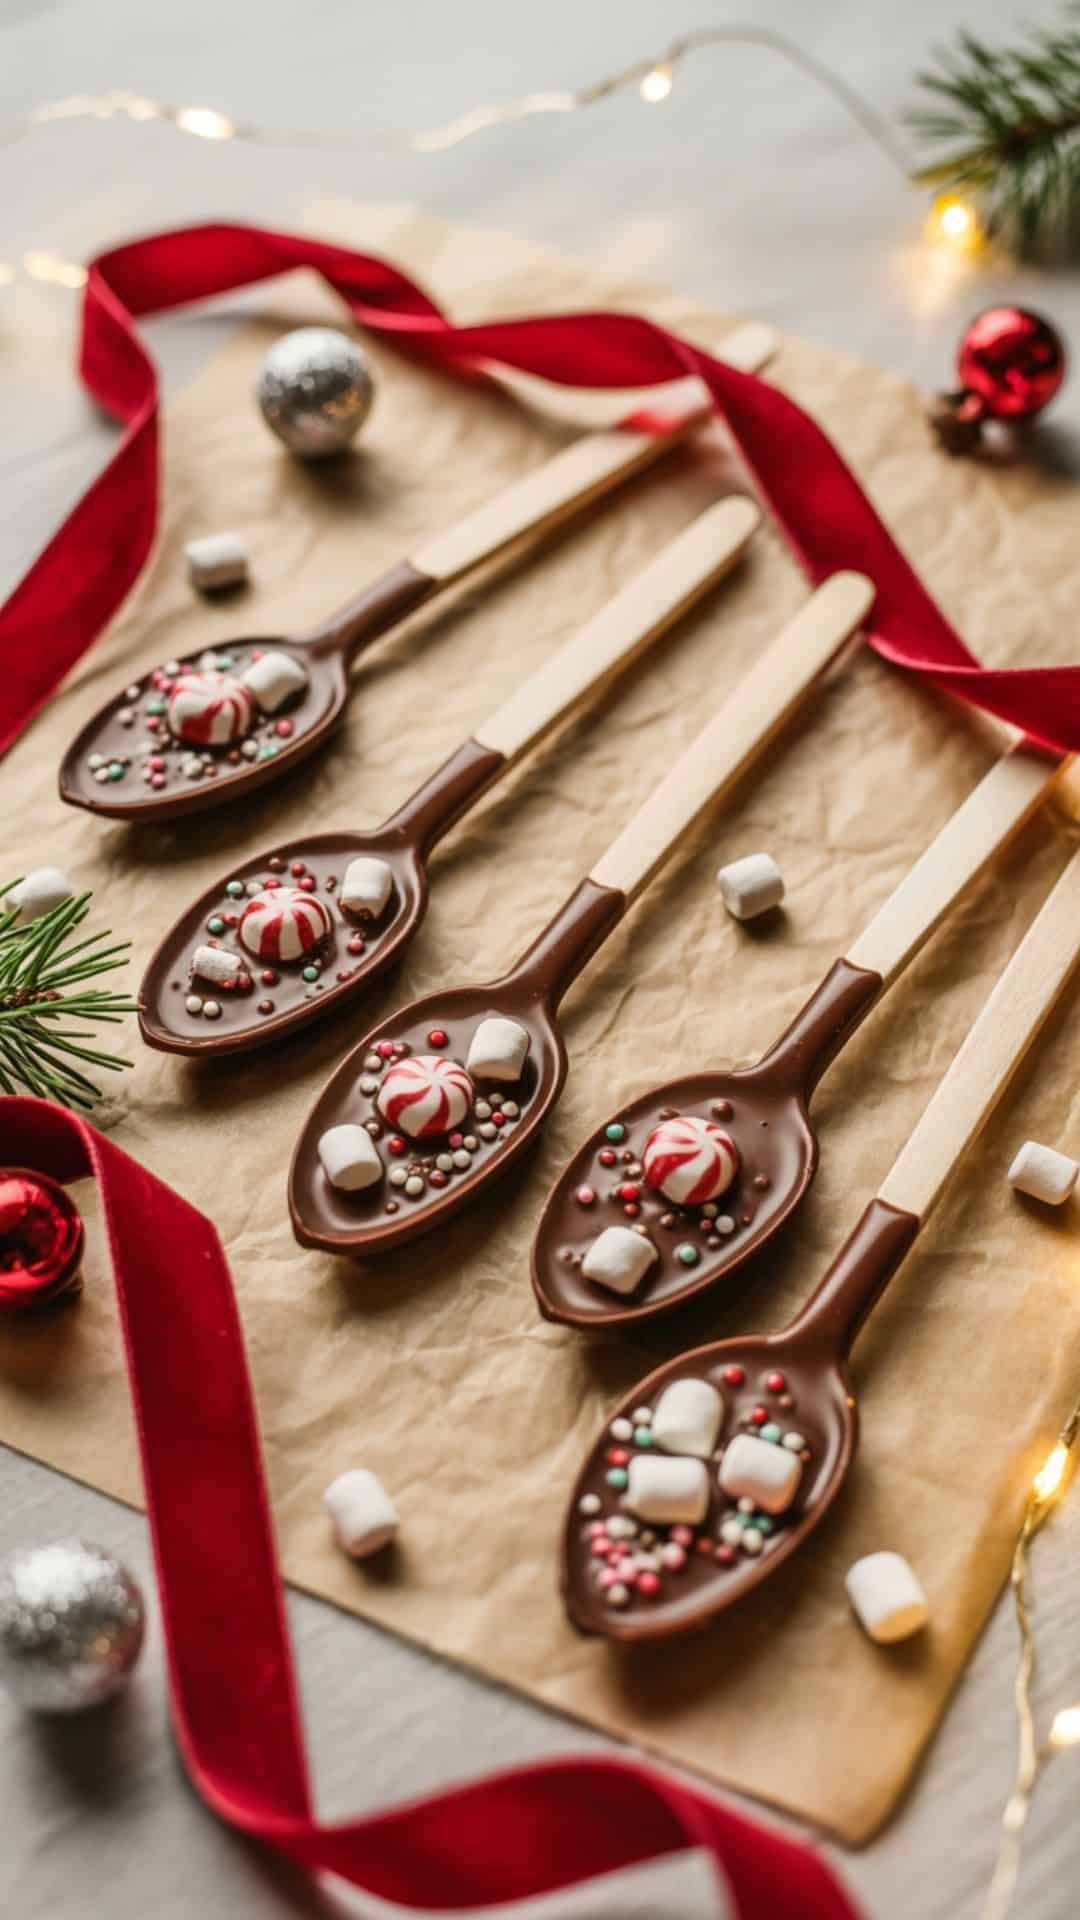
A fun, edible, giftable craft that sells extremely well because people buy them as stocking stuffers, teacher gifts, and hot cocoa bar treats.
Materials Needed
- Wooden or reusable spoons
- Chocolate chips (milk, white, or dark)
- Mini marshmallows
- Crushed candy canes
- Christmas sprinkles
- Baking sheet + parchment
- Cellophane bags + ribbon
Instructions
- Melt Chocolate
- Melt in short microwave bursts until smooth.
- Dip Spoons
- Dip halfway into chocolate, swirl for even coating.
- Lay on parchment to set slightly.
- Decorate
- Add marshmallows, sprinkles, crushed candy canes, or dried orange zest.
- Final Set
- Refrigerate 10 minutes until fully firm.
- Package
- Place each spoon in a cellophane bag and tie with ribbon.
Shopping List
- Chocolate
- Wooden spoons
- Sprinkles
- Candy canes
Why This Sells
They’re consumable (so customers return!), adorable, and perfect for gift bundles.
Suggested Price Point
- Single spoon: $3–$5
- Set of 4: $10–$15
Batching Tip
Dip all spoons first, then decorate in groupings (peppermint, marshmallow, sprinkle).
Packaging Idea
Group sets in boxes labeled “Hot Cocoa Spoon Set – Stir Into Warm Milk.”
Variations
- White chocolate peppermint
- Salted caramel chocolate
- Gingerbread chocolate spoons
Pro Tip
Use deeper cups for dipping it gives spoons a more even, luxurious finish.
Rustic Cinnamon Stick Christmas Ornaments

These ornaments look charming, smell incredible, and cost almost nothing to make. They fit rustic, farmhouse, nature-inspired, and Scandinavian Christmas décor styles making them a guaranteed market favorite.
Materials Needed
- Cinnamon sticks (full-sized)
- Hot glue gun
- Jute twine
- Mini pine sprigs
- Mini red berries, bells, or ribbon
- Scissors
Instructions
- Choose a Shape
- Cinnamon sticks look amazing in simple shapes: stars, trees, snowflakes, crosses, or rustic bundles.
- Plan your layout before gluing.
- Glue Your Structure
- For stars, glue 5 sticks together in overlapping angles.
- For trees, stack horizontal sticks (smallest at top, longest at bottom) and glue onto a vertical “trunk” stick.
- For bundles, tie 3–4 sticks together with twine.
- Add Decorative Touches
- Glue on a tiny pine sprig.
- Add a red berry cluster or a jingle bell.
- Tie thin twine into a bow for a cozy finish.
- Add Hanging Loop
- Glue or tie a loop of twine at the top for hanging.
- Allow to Cure
- Let glue fully cool before packaging or displaying.
Shopping List
- Bulk cinnamon sticks
- Jute twine
- Mini artificial pine sprigs
- Mini red berries or bells
- Hot glue
Why This Sells
They smell like Christmas, look high-end, and fit almost every décor style. Customers love natural ornaments and parents especially like non-breakable options for families with kids.
Suggested Price Point
- Single ornament: $5–$8
- Set of 3: $12–$18
Batching Tip
Lay out 10–20 ornaments and glue all structures first. Then decorate all at once. Assembly-line style is extremely fast with this craft.
Packaging Idea
Mount ornaments on kraft card backing and slide into clear sleeves. Add a label that says:
“Rustic Cinnamon Stick Ornament — Naturally Festive!”
Variations
- Add white paint for a snowy look
- Create cinnamon “snowflakes” using mini sticks
- Tie plaid ribbon for farmhouse style
Pro Tip
Use slightly longer cinnamon sticks for star shapes the proportions look more polished.
Burlap Ribbon Christmas Wreaths
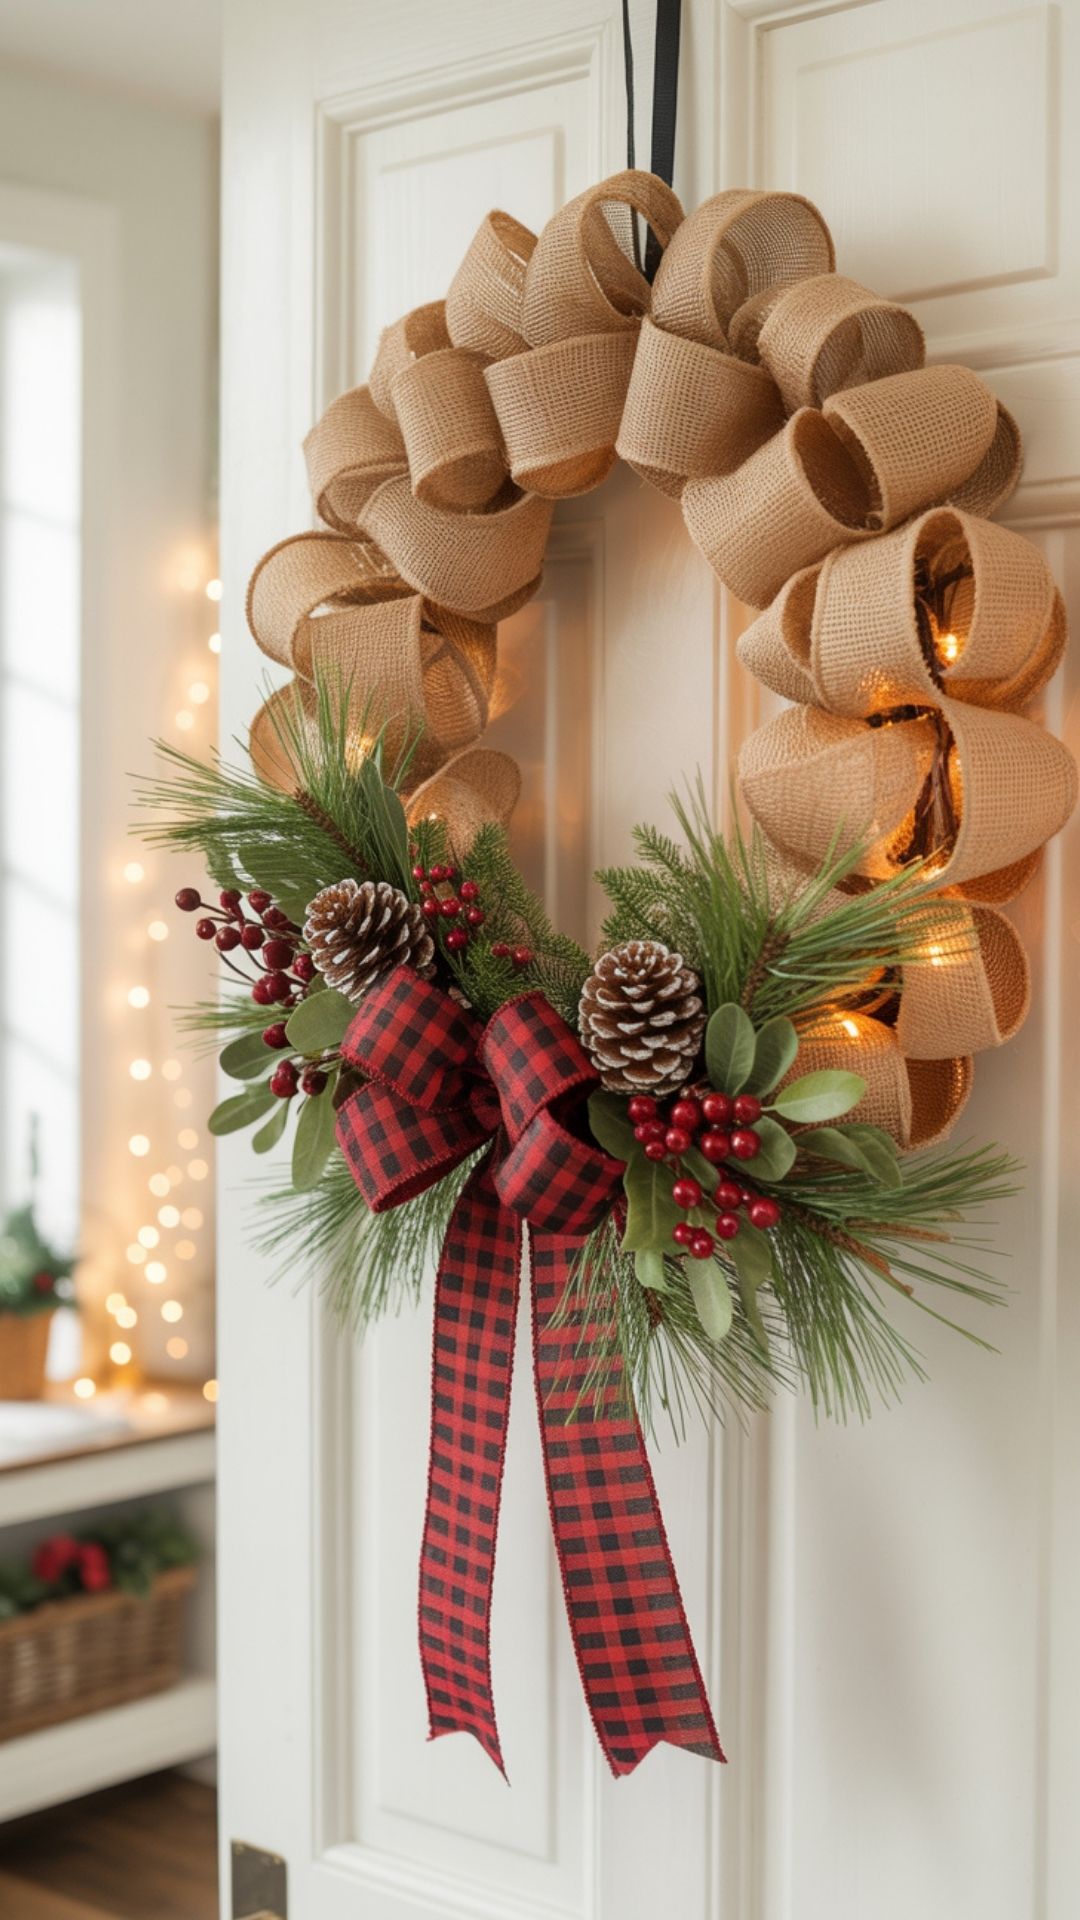
Wreaths are high-value sellers, especially when made with rustic burlap ribbon (affiliate) and classic Christmas accents. They look boutique-quality but are very easy to assemble.
Materials Needed
- Wire wreath frame
- Burlap ribbon
- Floral wire
- Pinecone picks
- Faux greenery sprigs
- Buffalo plaid bow (or ribbon to make your own)
- Hot glue gun
Instructions
- Wrap the Frame
- Attach burlap ribbon to the frame with floral wire.
- Loop and tuck the ribbon through the sections of the wire frame, puffing it up to create volume.
- Secure the Ribbon
- Twist floral wire at key points to keep everything stable.
- Continue looping burlap around the entire frame.
- Add Greenery
- Insert faux greenery sprigs (affiliate) into the burlap folds.
- Secure with hot glue or floral wire.
- Attach Pinecones & Accents
- Hot glue pinecones and small holiday accents (berries, bells) around the wreath.
- Add the Bow
- Glue or wire the buffalo plaid bow to the bottom or side of the wreath.
- Fluff & Shape
- Adjust loops and greenery so everything looks balanced and full.
Shopping List
- Wire wreath frame
- Burlap ribbon
- Buffalo plaid ribbon
- Faux greenery
- Pinecones
- Floral wire
Why This Sells
Wreaths are always premium holiday sellers because they’re the first décor item people want on their doors. Rustic versions fit farmhouse, vintage, and neutral holiday themes.
Suggested Price Point
- Standard wreath: $35–$50
- Large deluxe wreath: $50–$75+
Batching Tip
Make several bases at once (just the burlap wraps), then add accents as you go. This keeps your design consistent without slowing down.
Packaging Idea
Place wreaths in large kraft boxes with a window front or wrap lightly in tissue with a large logo sticker.
Variations
- Use red velvet ribbon (affiliate) for classic elegance
- Make all-greenery versions for minimalist buyers
- Create mini wreaths for windows or chairs
Pro Tip
Floral wire provides a stronger hold than glue when attaching heavy greenery. Use glue only for small accents.
Christmas Hot Cocoa Bombs
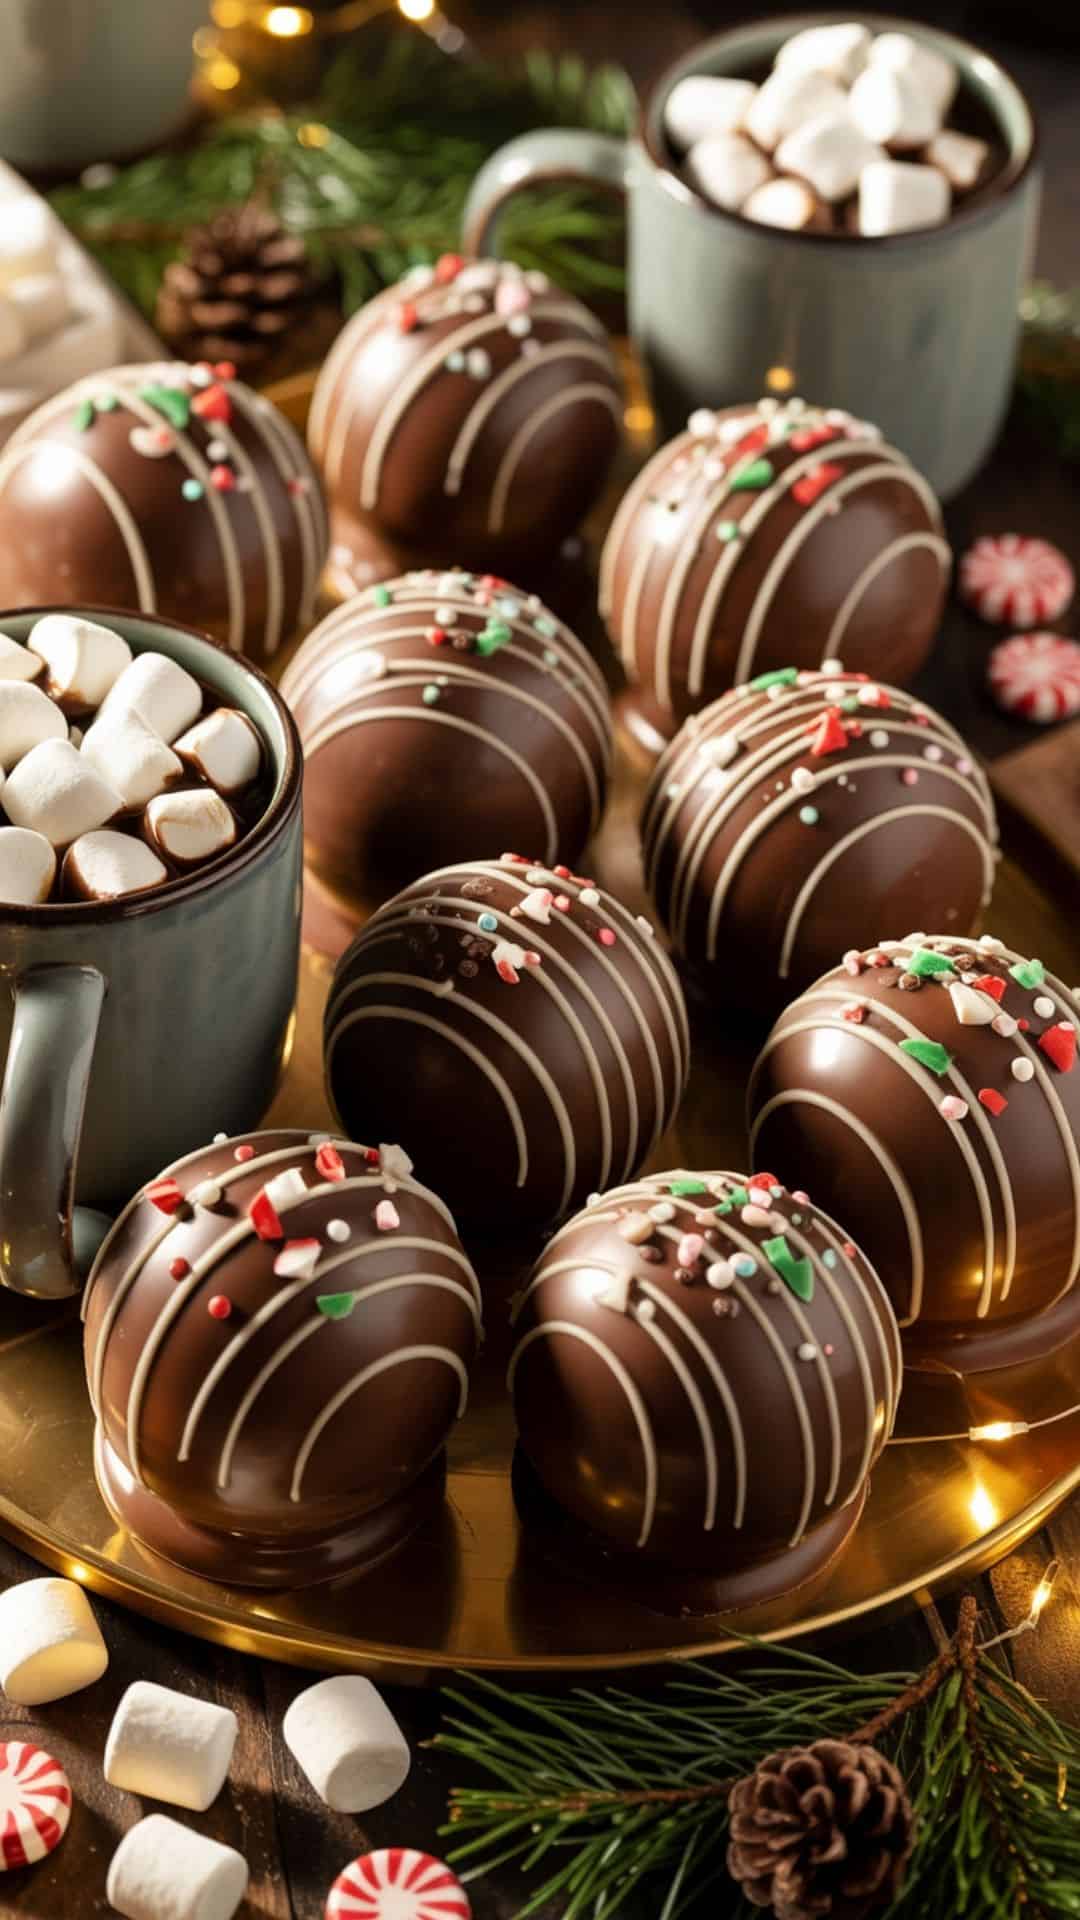
Cocoa bombs continue to dominate Christmas markets because they feel luxurious, fun, and magical plus they’re consumable, which means repeat customers.
Materials Needed
- Silicone hot cocoa bomb molds
- High-quality chocolate (milk, dark, or white)
- Hot cocoa mix
- Mini marshmallows
- Crushed candy canes
- Christmas sprinkles
- Piping bags (for drizzling chocolate)
- Food-safe gloves
Instructions
- Melt the Chocolate
- Melt chocolate slowly using a double boiler or microwave in 20-second bursts.
- Stir until smooth.
- Coat the Molds
- Brush or spoon chocolate into each mold cavity.
- Freeze for 5–10 minutes.
- Apply a Second Coat
- Add another layer of chocolate to reinforce the shells.
- Freeze again until firm.
- Release the Shells
- Gently push the chocolate shells out of the molds.
- Wear gloves to avoid fingerprints.
- Fill the Bombs
- Add 1–2 teaspoons of cocoa mix to half the shells.
- Add mini marshmallows and crushed candy cane.
- Seal the Bombs
- Heat a plate slightly.
- Press the empty shell half onto the warm plate for 2–3 seconds to melt the edge.
- Quickly place onto a filled shell to seal.
- Decorate
- Pipe chocolate drizzle across the top.
- Add Christmas sprinkles or edible glitter.
Shopping List
- Silicone molds
- Chocolate
- Cocoa mix
- Marshmallows
- Candy canes
- Sprinkles
Why This Sells
Cocoa bombs are Instagram-famous. They make perfect teacher gifts, coworker gifts, and stocking stuffers. Kids LOVE giving and receiving them.
Suggested Price Point
- Single cocoa bomb: $5–$7
- Gift box (affiliate) of 4: $18–$22
- Premium box of 6: $25–$32
Batching Tip
Use multiple molds to produce dozens at once. Melt large batches of chocolate so you never have downtime.
Packaging Idea
Clear gift boxes with red crinkle paper and a tag reading “Drop Into Hot Milk & Enjoy the Magic!”
Variations
- White chocolate peppermint bombs
- Dark chocolate mocha bombs
- Snowman bombs with faces drawn on
Pro Tip
Temper your chocolate or use melting wafers for shiny, professional-looking shells that don’t melt in your hands.
Mini Wood Slice Place Cards
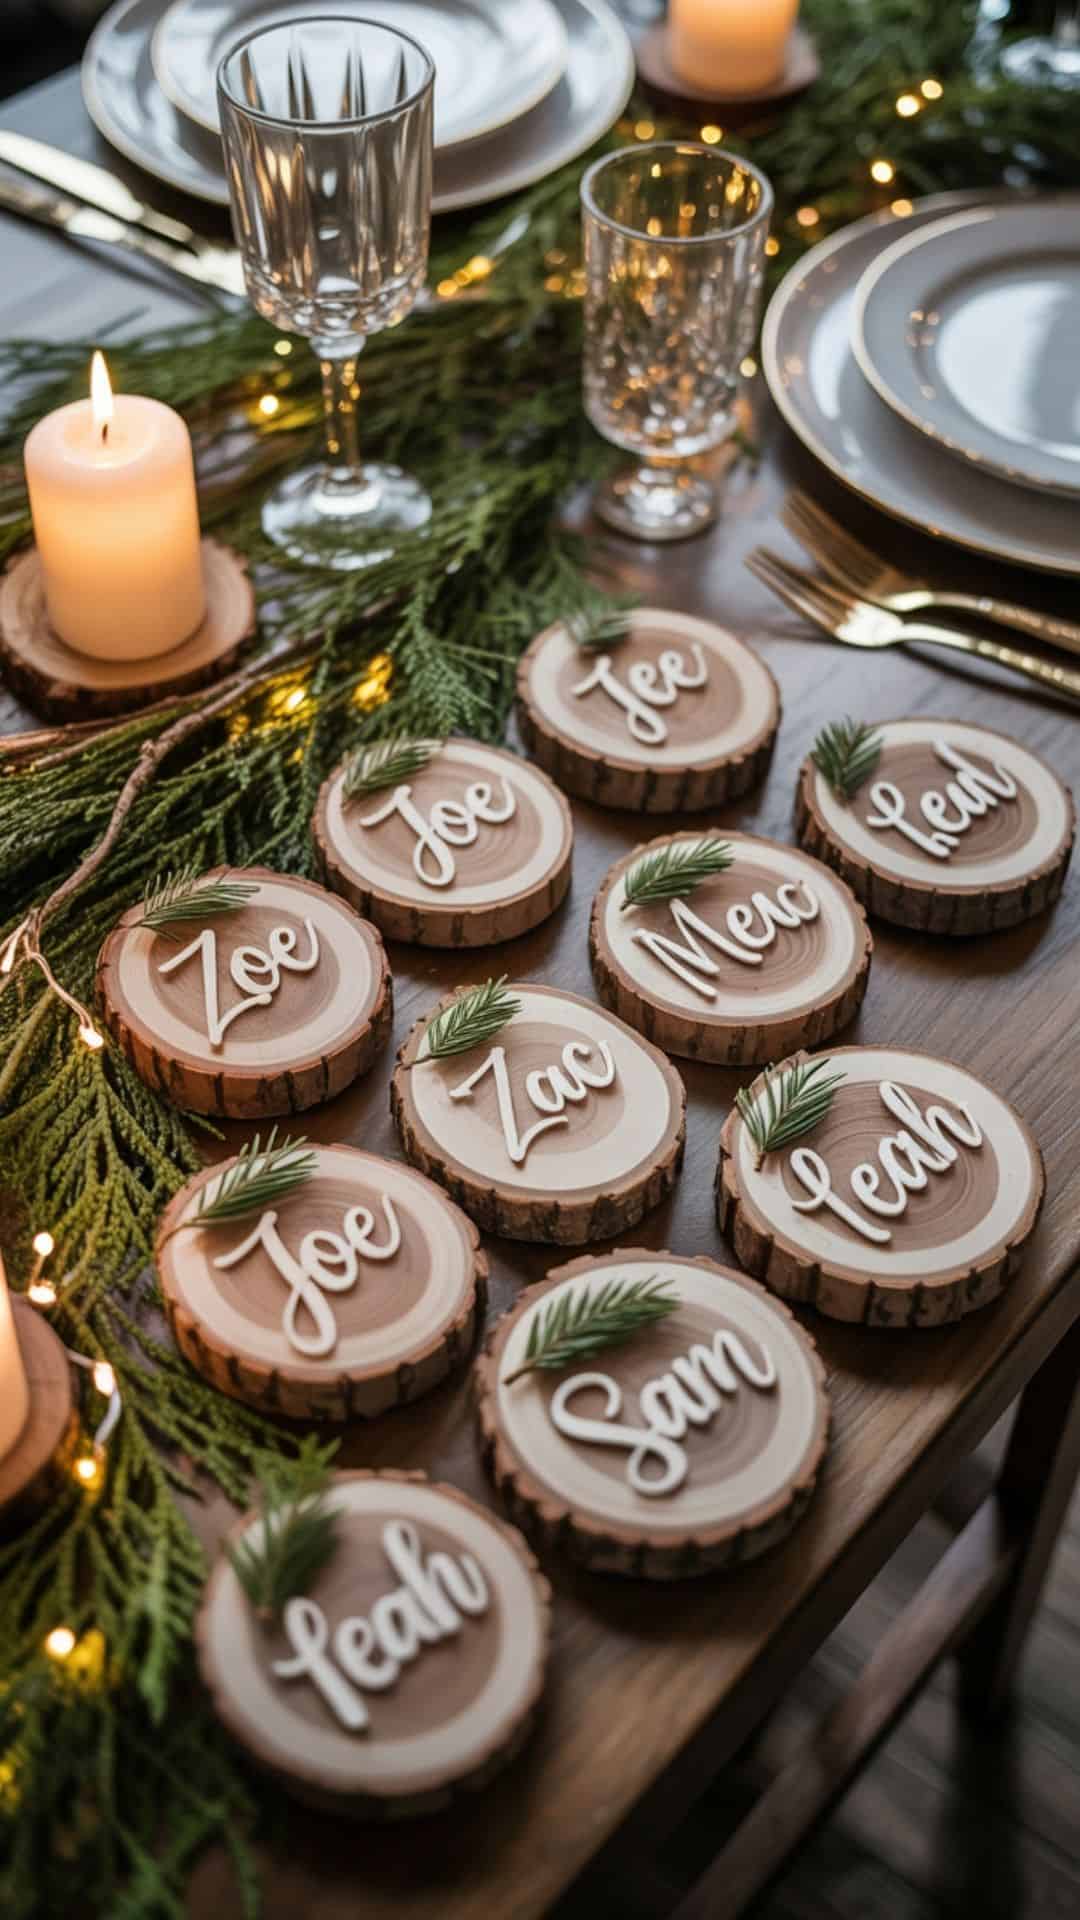
Perfect for Christmas dinners, parties, and weddings, these mini wood slice place cards are charming, reusable, and double as keepsake ornaments.
Materials Needed
- Small wood slices
- White paint pen or acrylic paint
- Faux greenery cuttings
- Hot glue
- Twine (optional for hanging loops)
Instructions
- Prep Slices
- Make sure wood slices are smooth.
- Lightly sand if needed.
- Hand-Letter Names
- Use a paint pen for clean, crisp names.
- Keep your lettering simple: script or modern block fonts both look beautiful.
- Add Decoration
- Glue a small piece of greenery or a tiny pinecone near the top or bottom edge.
- Optional Ornament Loop
- Glue a twine loop to the back so guests can take these home as ornaments.
Shopping List
Why This Sells
People love personalized items especially when they double as décor and gifts. These are perfect for holiday tables, weddings, and corporate events.
Suggested Price Point
- Single place card: $4–$6
- Set of 6: $20–$24
- Set of 12: $35–$45
Batching Tip
Letter all slices first, then glue greenery and loops. Keeps workflow simple and clean.
Packaging Idea
Tie sets with twine and pack in kraft boxes labeled “Personalized Wood Slice Place Cards (Reusable!)”
Variations
- Add snowflake stamps
- Burn names into the wood using a woodburning tool
- Use black paint pens on light slices for modern contrast
Pro Tip
Use a pencil to lightly sketch names first for perfect spacing.
Christmas Felt Envelope Gift Holders

Gift cards are one of the most purchased holiday gifts and these felt envelopes give shoppers a cute, reusable, handcrafted alternative to boring store-bought holders.
Materials Needed
- Felt sheets (red, cream, green)
- Scissors or rotary cutter
- Embroidery thread or twine
- Needle or fabric glue
- Buttons, mini embellishments
- Optional: iron-on patches
Instructions
- Cut Envelope Shape
- Cut a rectangle approx. 6″ x 4″ and fold to create an envelope shape.
- Stitch or Glue Edges
- Use blanket stitch for a handmade look.
- Fabric glue works for faster batches.
- Create Closure
- Sew a button and make a small slit.
- Or add Velcro dots for easy closing.
- Decorate
- Add mini felt wreaths, embroidered snowflakes, or ribbon accents.
- Test Fit
- Insert a gift card to ensure it slides in smoothly.
Shopping List
- Felt sheets
- Embroidery thread
- Buttons
- Velcro dots
Why This Sells
Shoppers always need cute ways to package gift cards they’re willing to pay extra for something reusable and special.
Suggested Price Point
- Single envelope: $6–$10
- Set of 3: $15–$20
Batching Tip
Cut all envelope shapes at once using a rotary cutter and stacked felt speeds production dramatically.
Packaging Idea
Stack multiples, tie with twine, and add a kraft tag:
“Reusable Felt Gift Card Holders – Handmade for Christmas”
Variations
- Add names with iron-on letters
- Neutral minimalist versions
- Kids’ versions with Santa or Rudolph faces
Pro Tip
Use thick felt thin felt flops and looks cheap.
Christmas Tree Bead Ornaments
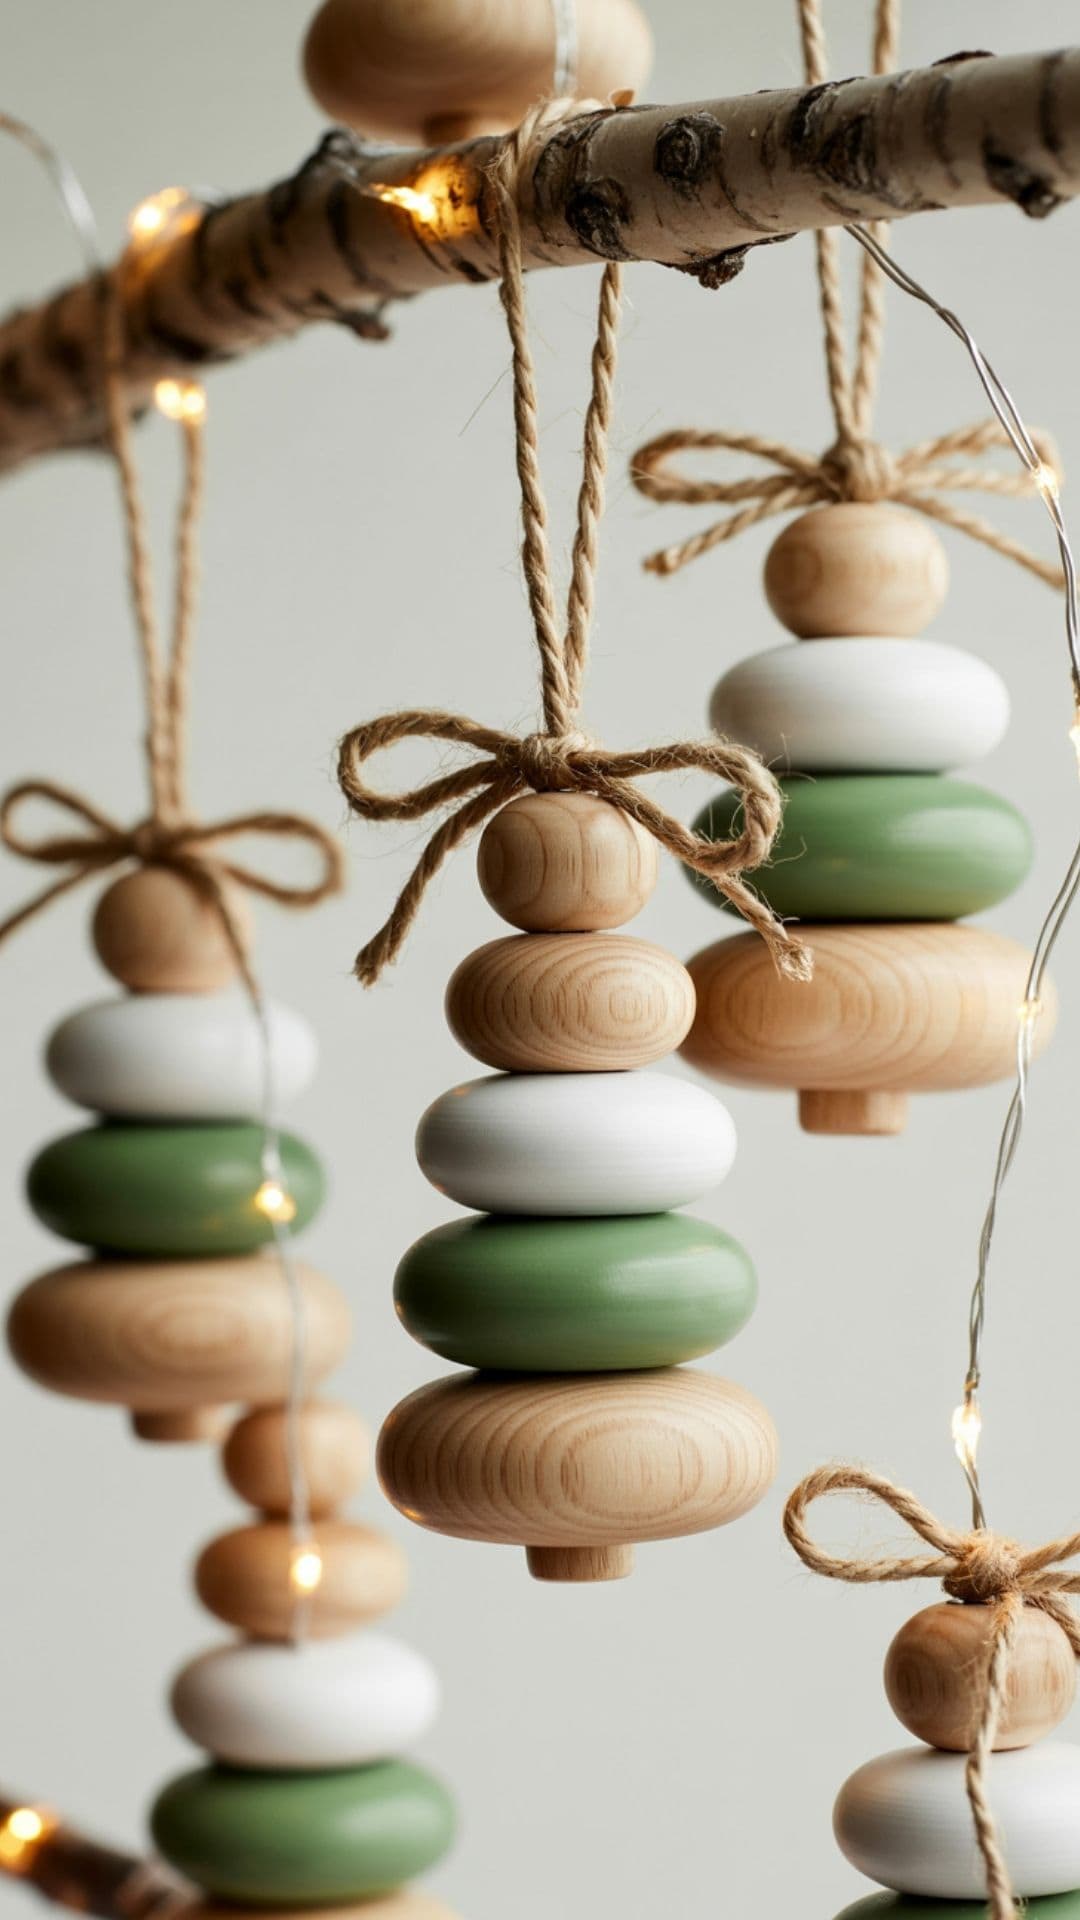
These minimalist ornaments are clean, modern, and irresistibly cute. They appeal to Scandinavian, farmhouse, boho, and neutral Christmas decor lovers a huge trend on Pinterest and Etsy.
Materials Needed
- Wooden beads (assorted sizes)
- Twine or thin cord
- Small star beads or wooden stars
- Hot glue
- Scissors
- Optional: acrylic paint (white, sage green, red)
Instructions
- Prepare the Beads
- Choose 3–4 bead sizes that gradually increase from small to large.
- Optionally paint beads white, muted green, or leave natural for Scandinavian style.
- Let fully dry before assembling.
- Cut the Cord
- Cut a 10–12 inch piece of twine.
- Fold it in half so you have a loop at the top for hanging.
- Thread the Beads
- Thread the smallest bead first through both ends of the twine.
- Add the next largest bead, and continue stacking until your ornament looks like a small tree.
- Pull tight so beads sit snugly.
- Secure the Bottom
- Tie a tight knot under the last bead.
- Add a small dot of hot glue to prevent slip.
- Add the Star Topper
- Thread or glue a wooden star bead at the top of the tree.
- Finish the Hanging Loop
- Tie a knot at the top to create a loop.
- Trim excess twine neatly.
Shopping List
- Wooden bead pack (various sizes)
- Twine or cord
- Wooden stars (affiliate)
- Paint (optional)
- Hot glue
Why This Sells
They match the hottest Christmas aesthetic neutral, minimalist décor. Buyers love ornaments that fit multiple styles, and these are lightweight, giftable, and very cheap to make.
Suggested Price Point
- Single ornament: $6–$10
- Set of 3: $15–$20
- Neutral Scandinavian set of 5: $25–$32
Batching Tip
Paint all beads first in batches, then thread ornaments assembly-line style. It’s incredibly fast once materials are prepped.
Packaging Idea
Mount sets on kraft card backing with the label “Minimalist Bead Tree Ornaments (Handmade)” and slide into clear sleeves.
Variations
- Use all natural wood for Scandinavian style
- Red + white “Nordic Christmas” sets
- Add tiny jingle bells between beads
Pro Tip
Use stiff twine or thin waxed cord it threads easier and holds shape better than soft cotton twine.
Painted Gingerbread House Jars
These adorable glowing jars look like miniature gingerbread houses and make magical Christmas décor. They’re perfect for mantels, windowsills, and table centerpieces.
Materials Needed
- Mason jars or recycled jars
- White acrylic paint or paint pens
- LED tealights or fairy lights
- Twine or ribbon
- Optional: faux snow or glitter
Instructions
- Clean the Jars
- Remove labels and wash the glass thoroughly.
- Dry completely.
- Sketch Your Gingerbread Design
- Using a white paint pen, outline windows, doors, hearts, scalloped rooflines, and dots.
- Keep designs simple and symmetrical for best visual appeal.
- Paint Over Lines if Needed
- Go over lines to deepen color or smooth strokes.
- Add little “icing dots” around windows and roofs.
- Optional: Add Faux Snow
- Dab the top rim with white paint or brush-on faux snow for a frosted look.
- Insert Light
- Add an LED tealight or fairy lights inside the jar.
- Turn on to test how evenly the light shines.
- Decorate the Rim
- Tie twine, lace, or ribbon around the top.
Shopping List
Why This Sells
Shoppers adore gingerbread-themed décor and anything that lights up. These look high-end on display and are safe for households with kids.
Suggested Price Point
- Single jar: $10–$14
- Set of 2: $18–$25
- Set of 3 village jars: $28–$35
Batching Tip
Sketch designs in pencil first or create a template for consistent houses.
Packaging Idea
Line gift boxes with shredded paper to protect jars, include a tealight, and label them “Gingerbread House Lantern.”
Variations
- Gold paint pen for elegant versions
- Use brown tinted glass for true “gingerbread” coloring
- Create themed sets: bakery, cottage, church
Pro Tip
Paint pens work FAR better than brushes clean lines, no smudges, and faster drying.
Fabric Scrap Christmas Garland
This is the perfect craft for using up leftover fabric scraps. It’s cozy, rustic, and trendy ideal for farmhouse and cottage-style Christmas homes.
Materials Needed
- Fabric scraps (plaid, gingham, linen, burlap, cotton)
- Scissors (or pinking shears for a textured edge)
- Jute rope or thick twine
- Optional: wooden beads
Instructions
- Cut Fabric Strips
- Cut strips about 1″–1.5″ wide and 8″–10″ long.
- Use pinking shears if you want a zigzag, anti-fray edge.
- Prepare the Rope
- Cut your garland base (3–6 feet long depending on use).
- Tie Fabric Pieces
- Tie each strip onto the rope with a simple knot.
- Slide knots together for a full, fluffy garland.
- Alternate colors and patterns for a balanced look.
- Add Optional Details
- Insert wooden beads between sections.
- Tie ribbon pieces sporadically for added texture.
- Fluff the Garland
- Trim uneven pieces and bunch fabric for fullness.
Shopping List
- Fabric scraps
- Jute rope
- Wooden beads (optional)
Why This Sells
It’s lightweight, gorgeous, and versatile. Shoppers use garlands on mantels, stair rails, headboards, and photo walls. With farmhouse still trending, these sell very well.
Suggested Price Point
- 3 ft garland: $12–$20
- 6 ft garland: $25–$35
Batching Tip
Pre-cut 50–100 fabric strips so you can assemble garlands super fast.
Packaging Idea
Roll the garland and secure with twine. Add a kraft label that reads:
“Handmade Christmas Fabric Garland — Perfect for Mantels & Railings.”
Variations
- All-neutral linen + white for minimalist décor
- Kids’ version with bright colors
- Add fairy lights woven into the garland
Pro Tip
Use a mix of textures (linen + cotton + burlap) it instantly elevates the look.
Painted Wooden Christmas Village Houses

These minimalist village houses are trendy, adorable, and easy to create in collections. Buyers love arranging them on shelves, mantels, and tabletops.
Materials Needed
- Wooden blocks or pre-cut house shapes
- Acrylic paint (white, green, gold, black)
- Paint pens
- Small brushes
- Optional: faux snow or glitter
Instructions
- Prep the Wood
- Sand any rough edges.
- Wipe clean.
- Paint the Houses
- Choose a color palette: neutrals, holiday colors, or metallics.
- Paint each house front and sides.
- Allow to dry fully.
- Add Windows & Doors
- Use a fine paint pen to add windows, doors, lines, dots, stars, or wreaths.
- Keep designs simple clean minimalism sells best.
- Optional Snow Accent
- Dry-brush white paint on the roof edges for a snowy feel.
- Add glitter if desired.
- Create Sets
- Group 3–5 houses for display.
- Ensure heights and colors vary for visual interest.
Shopping List
- Wooden house blocks
- Acrylic paints
- Paint pens
- Sandpaper
Why This Sells
Christmas villages are classic but minimalist versions appeal to modern décor lovers. They’re perfect for mantels, entry tables, and shelf styling.
Suggested Price Point
- Single house: $6–$8
- Set of 3: $18–$24
- Set of 5: $28–$35
Batching Tip
Paint all houses in one color group, then do all detailing. This makes your sets more cohesive.
Packaging Idea
Pack sets in kraft boxes with faux snow sprinkled around the houses for a magical “village reveal.”
Variations
- Metallic gold houses
- All-white winter village
- Pastel Christmas village for nursery décor
Pro Tip
Use small wooden blocks with slightly varied roof shapes the variety makes the sets look boutique-level.
Christmas Wax Melts (Festive Shapes & Scents)

Wax melts are popular because they’re affordable, scent-strong, and make great small gifts. Christmas melts in cute shapes ALWAYS sell well.
Materials Needed
- Soy wax or pillar blend wax
- Silicone molds (snowflake, tree, gingerbread)
- Christmas fragrance oils
- Mica powders (optional)
- Double boiler
- Small tins or bags for packaging
Instructions
- Melt the Wax
- Use a double boiler.
- Heat wax to the correct melting temperature (usually 160–180°F / 71–82°C).
- Add Fragrance
- Let wax cool slightly (to 140–150°F / 60–65°C).
- Add fragrance oil according to safe usage rates.
- Stir thoroughly.
- Add Color (Optional)
- Mix in mica powders for color.
- Stir until evenly distributed.
- Pour Into Molds
- Carefully pour wax into silicone molds.
- Tap lightly to remove air bubbles.
- Cool & Release
- Allow to harden completely.
- Pop wax melts out of molds.
- Package
- Place sets in tins, clear bags, or boxes.
- Add labels with scent and safety notes.
Shopping List
- Wax
- Fragrance oils
- Silicone molds
- Mica colors
- Packaging tins or bags
Why This Sells
People love giftable scents. Wax melts are inexpensive, consumable (so customers return), and easy to customize with seasonal shapes and scents.
Suggested Price Point
- 4-pack: $6–$8
- 8-pack: $10–$14
- Premium tin sets: $12–$18
Batching Tip
Melt big batches of wax at once and pour multiple molds simultaneously.
Packaging Idea
Use metal tins with clear lids and a label:
“Christmas Wax Melt Collection – Holiday Scents Inside.”
Variations
- Peppermint snowflakes
- Gingerbread men with brown mica
- Pine tree melts with gold dusting
Pro Tip
Use silicone molds with clean, crisp edges poorly shaped molds produce cheap-looking melts.
Christmas Tree Cone Decorations
These decorative table-top trees are gorgeous, modern, and easy to make with multiple materials (yarn, twine, ribbon, fabric). They’re often sold in sets.
Materials Needed
- Foam cones
- Yarn, twine, ribbon, or fabric strips
- Hot glue
- Wooden stars or ornaments for toppers
- Optional: beads, mini lights, glitter
Instructions
- Choose Your Style
- Yarn trees = soft + cozy
- Twine trees = rustic farmhouse
- Ribbon/fabric trees = elegant + glam
- Wrap the Cone
- Start at the bottom and glue the end of the yarn/twine in place.
- Wrap tightly, working upward in clean spirals.
- Add small glue dabs every few inches for stability.
- Cover the Tip
- Tuck the final strand neatly at the top and glue securely.
- Decorate
- Add small pearl beads, mini bells, or star toppers.
- Keep designs simple for high-end appeal.
- Create Sets
- Vary the cone sizes and colors for beautiful trio sets.
Shopping List
Why This Sells
These trendy trees show up in every Christmas Pinterest roundup. They’re versatile for mantels, tables, and shelves and sets always sell well.
Suggested Price Point
- Single small tree: $8–$12
- Medium tree: $12–$18
- Set of 3: $25–$45 (depending on size + embellishment)
Batching Tip
Wrap multiple cones in a single style first (e.g., all yarn trees), then decorate them together to save time.
Packaging Idea
Bundle set with kraft paper wrap and a tag reading “Handmade Holiday Tabletop Trees.”
Variations
- White + gold for minimal glam
- Rustic burlap strips
- Vintage ribbon patterns for cottagecore
Pro Tip
Match your color palette within each set cohesive trios sell MUCH faster than random color mixes.
Macramé Snowflake Ornaments
Macramé remains a huge trend, and Christmas snowflakes are stunning, lightweight, and highly giftable. They blend perfectly with Scandinavian and boho holiday décor.
Materials Needed
- Cotton macramé cord (3–5 mm)
- Wooden rings (optional center)
- Scissors
- Brush/comb (for fringe)
- Hot glue (optional for securing knots)
Instructions
- Prep Cord Pieces
- Cut 12–20 strands of equal length depending on your snowflake size.
- Attach to Ring or Center Cord
- Fold each piece in half and attach with Lark’s Head knots around a wooden ring or a central cord loop.
- Create Snowflake Spokes
- Group strands in pairs and tie square knots outward from the center.
- Repeat around the ring.
- Shape the Snowflake
- Tie diagonal or spiral knots to form points.
- Use symmetry snowflakes look best when balanced.
- Trim the Fringe
- Comb out the ends to soften them.
- Trim into a circular or pointed shape.
- Add Hanging Loop
- Attach a small loop of twine or cord at the top for hanging.
Shopping List
- Macramé cord
- Wooden rings
- Scissors
- Small comb
Why This Sells
Macramé ornaments look high-end, match almost any decor theme, and are incredibly lightweight for shipping. Buyers LOVE them for neutral Christmas trees.
Suggested Price Point
- Small snowflake: $8–$12
- Large detailed snowflake: $15–$20
- Set of 3: $20–$30
Batching Tip
Pre-cut cords for 10–15 ornaments at once. This saves more time than any other step.
Packaging Idea
Lay snowflakes flat in a clear sleeve with a kraft insert labeled “Handmade Macramé Snowflake Ornament.”
Variations
- Use metallic cord for glam versions
- Add wooden beads to the spokes
- Make star-shaped versions using fewer cords
Pro Tip
Comb fringe gently rough handling tangles the fibers. A soft brush gives a premium finish.
Holiday Spice Simmer Sachets

These smell like Christmas in a bag shoppers LOVE them. They’re cheap, fast, and irresistible for gift-giving, stocking stuffers, and market impulse buys.
Materials Needed
- Muslin bags or small cotton drawstring bags
- Dried orange slices
- Cinnamon sticks
- Whole cloves
- Star anise
- Bay leaves or rosemary
- Twine
- Kraft tags
Instructions
- Prep Ingredients
- Have dried oranges, spices, and herbs laid out in bowls.
- Keep portions consistent for easy batching.
- Fill Each Sachet
- Add 1–2 dried orange slices.
- Add 1 cinnamon stick, a handful of cloves, and a star anise.
- Add bay leaves for color and fragrance.
- Tie Closed
- Pull the drawstring tight.
- Reinforce with twine tied in a bow.
- Add Instructions Tag
Example tag:
“Simmer in a pot of water for a natural holiday scent.” - Display Beautifully
- Use baskets, crates, or tiered stands for a rustic look.
Shopping List
- Muslin bags
- Dried oranges
- Spices (cinnamon, cloves, star anise)
- Twine
- Tags
Why This Sells
It’s consumable, fragrant, gorgeous, and fits ANY gift list. Also great for people who don’t want candles or wax melts.
Suggested Price Point
- Single sachet: $5–$7
- Set of 3: $12–$18
Batching Tip
Create a filling line ingredients measured and scooped in seconds. You can make 30+ sachets in under an hour.
Packaging Idea
Clear front bags with kraft backing so customers can see the beautiful spices inside.
Variations
- Add mini candy canes for “Sweet Christmas” sachets
- Add dried apple slices for “Mulled Cider” versions
Pro Tip
Star anise is the most visually appealing spice make sure each sachet includes one.
Mini Christmas Terrariums (Jar or Globe Style)

These whimsical mini winter scenes feel magical and are incredibly photogenic perfect for Etsy and boutique-style markets. Customers use them for shelves, mantels, centerpieces, and even office desks.
Materials Needed
- Small glass globes, jars, or cloches
- Faux snow
- Mini bottle-brush trees
- Mini deer, houses, or figurines
- Tweezers (for placement)
- Hot glue
- Optional: fairy light strings
Instructions
- Prep the Container
- Clean the inside of the jar or globe.
- Decide whether you want glued-down pieces or loose snow scenes.
- Add Faux Snow
- Pour ½–1 inch of faux snow into the base.
- Position the Trees
- Add a small dab of hot glue to the bottom of each tree.
- Place firmly into the snow so they stand upright.
- Add Characters or Houses
- Use tweezers to gently place mini deer, houses, or figurines.
- Glue for stability or leave loose for a more natural, snowy look.
- Optional: Add Lights
- Wrap micro fairy lights around the base or around trees for a magical glow.
- Seal or Decorate the Lid
- Tie ribbon, lace, or twine around the top.
- Add snowflakes, tiny bells, or greenery accents.
Shopping List
- Mini glass jars or terrarium globes
- Faux snow
- Bottle-brush trees
- Mini figurines
- Hot glue
- Micro lights (optional)
Why This Sells
Miniature worlds fascinate people! These tiny winter scenes are adorable, giftable, and perfect for both kids and adults.
Suggested Price Point
- Single terrarium: $10–$15
- Set of 3: $25–$35
- Lighted globe terrarium: $18–$25
Batching Tip
Glue several trees at once, then move on to figurines, then to lids. Working in stages speeds everything up.
Packaging Idea
Place each terrarium in a shallow box with crinkle paper. Add a label:
“Mini Winter Scene Terrarium — Handmade Holiday Magic.”
Variations
- Snowman scenes
- Nativity minis
- Forest animals in winter
Pro Tip
Use fine faux snow for a realistic look large flakes look messy in miniatures.
Christmas Clay Ornaments

Clay ornaments are elegant, minimalist, and VERY popular with modern decor lovers. You can create dozens quickly using air-dry or oven-bake polymer clay.
Materials Needed
- Air-dry clay OR polymer clay
- Rolling pin
- Cookie cutters (star, tree, snowflake)
- Lace, doilies, or nature items for texture
- Straw or skewer (for holes)
- Twine
- Optional: paint or gold accents
Instructions
- Prepare the Clay
- Knead until soft and smooth.
- Roll out to ¼ inch thickness.
- Add Texture
- Press lace or greenery (fern, cedar) onto the clay.
- Lift to reveal the imprint.
- Cut Shapes
- Use cookie cutters to make stars, trees, bells, etc.
- Add Hanging Holes
- Use a straw or skewer to poke a clean hole at the top.
- Dry or Bake
- Air-dry clay: 24–48 hours
- Polymer clay: Follow baking directions
- Finish
- Sand edges lightly.
- Add gold paint accents if desired.
- Thread twine through the hole.
Shopping List
Why This Sells
Minimalist decor is HUGE. These ornaments match Scandinavian, neutral, and farmhouse decor styles major Christmas 2025 trends.
Suggested Price Point
- Single ornament: $6–$10
- Set of 3: $15–$22
- Premium boxed set of 6: $25–$35
Batching Tip
Roll multiple clay sheets at once, imprint them all, then cut dozens of shapes quickly.
Packaging Idea
Place ornament sets in small kraft boxes filled with shredded paper for a boutique look.
Variations
- White + gold edges
- Terracotta clay for rustic charm
- Add essential oils for scented ornaments
Pro Tip
Dust clay lightly with cornstarch before imprinting to avoid sticking.
Cinnamon Stick Star Ornaments
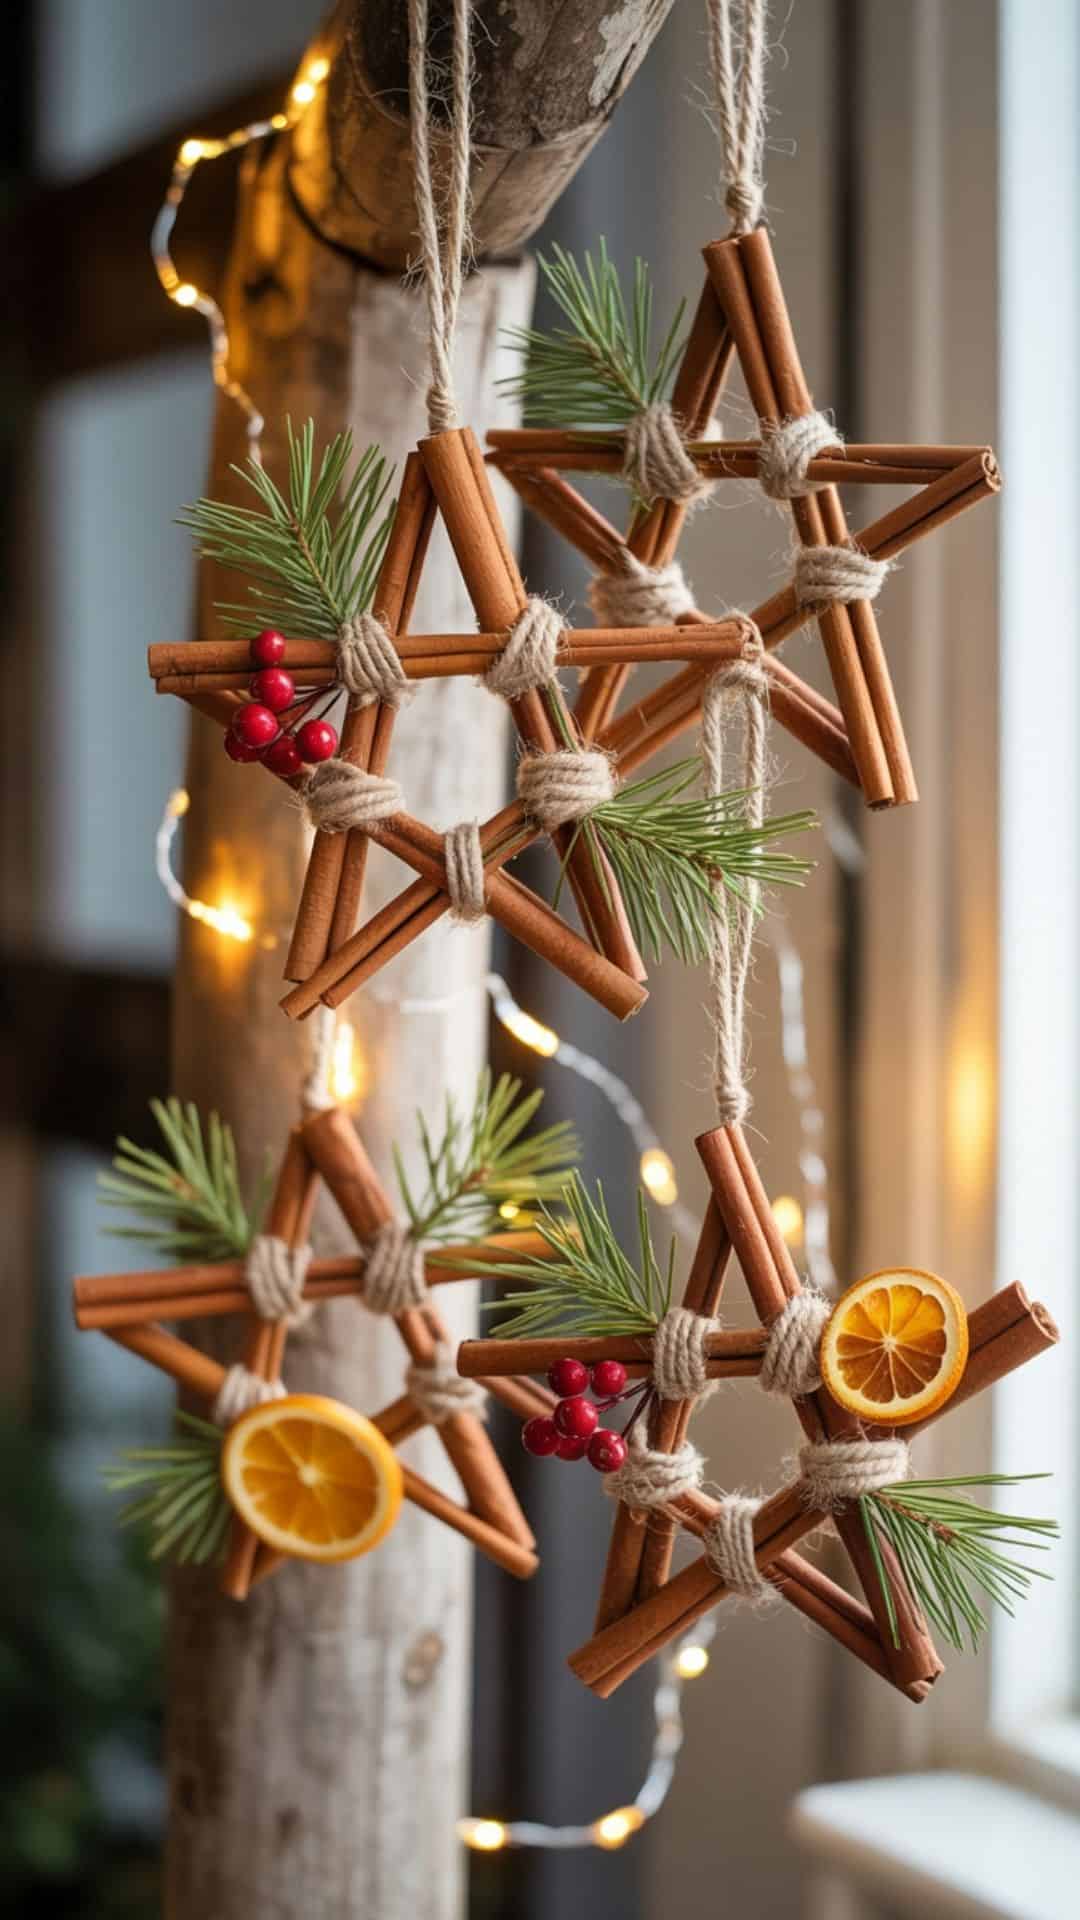
These rustic ornaments smell amazing and look beautiful, making them perfect for farmhouse, woodland, and natural holiday decor. They’re extremely inexpensive to make and batch incredibly fast, yet they look like premium boutique items.
Materials Needed
- Cinnamon sticks (full-length)
- Jute twine
- Hot glue
- Mini pine sprigs
- Mini red berries or bells
- Dried orange pieces (optional)
- Scissors
Instructions
- Form the Star Shape
- Lay out 5 cinnamon sticks into a classic star pattern.
- Glue each intersection lightly to secure shape.
- Let dry for a few minutes.
- Wrap with Twine for Strength & Style
- Wrap jute twine around the star’s corners to reinforce the glue.
- Tie tightly and trim excess.
- This not only strengthens the ornament but gives it a handcrafted, rustic finish.
- Add Greenery and Berries
- Glue a tiny pine sprig near one of the intersections.
- Add a red berry cluster, bell, or dried orange piece for color.
- Add a Hanging Loop
- Tie a jute loop at the top of one star point.
- Keep the loop long enough to hang beautifully on a Christmas tree.
- Finishing Touch
- Lightly brush cinnamon stars with a pinch of faux snow (optional) for a frosted winter look.
Shopping List
- Cinnamon sticks (big multipack)
- Jute twine
- Faux pine sprigs
- Mini red berries or micro-bells
- Hot glue sticks
- Greenery
- Faux snow
Why This Sells
They look artisanal, smell wonderful, and match the extremely popular rustic Christmas and farmhouse styles. Buyers often purchase multiples because they make perfect teacher gifts, stocking stuffers, and tree fillers.
Suggested Price Point
- Single ornament: $5–$8
- Set of 3: $14–$20
- Set of 5: $20–$28
Batching Tip
Pre-glue all star structures first, then add décor to all of them in one session. You can easily produce 20+ in under 90 minutes.
Packaging Idea
Group ornaments into sets and package in clear bags with kraft backings labeled:
“Handmade Cinnamon Star Ornament – Naturally Festive”
Add a tiny pine sprig for elevated presentation.
Variations
- Add white paint for “snow-dusted” cinnamon stars
- Swap berries for jingle bells for sound and charm
- Create mini stars using shorter cinnamon sticks
Pro Tip
Use whole cinnamon sticks not decorative ones for the strongest scent and best visual texture.
Christmas Book Page Ornaments

These ornaments hit the sweet spot between vintage, neutral, farmhouse, and literary charm, making them incredibly popular on Etsy and in boutique-style Christmas markets. They’re inexpensive to create and look high-end, especially when paired with kraft tags and twine.
Materials Needed
- Clear plastic or glass fillable ornaments
- Old book pages, sheet music, or printed vintage pages
- Scissors or paper trimmer
- Pencil or dowel for curling strips
- Twine or ribbon
- Mini confetti stars or faux snow (optional)
- Kraft tags
Instructions
- Prepare the Paper Strips
- Cut book pages or music sheets into long strips (¼–½ inch wide).
- Curl each strip by winding it around a pencil or dowel.
- Release to achieve soft spirals.
- Fill the Ornament
- Open the ornament top and insert the curled strips.
- Mix in tiny gold stars or faux snow for added sparkle.
- Don’t overfill—leave room so the curls show cleanly.
- Secure the Top
- Replace the ornament cap and ensure it clicks firmly.
- Add a dab of hot glue inside the cap if you want extra security.
- Add Twine or Ribbon
- Tie a rustic bow around the top.
- Add a twine or ribbon hanging loop.
- Add a Tag
- Attach a kraft tag reading:
“Handmade Book Page Ornament”
or
“A Little Christmas Story”
- Attach a kraft tag reading:
Shopping List
- Clear ornaments (pack of 10–20)
- Old books or sheet music
- Twine
- Mini gold stars
- Kraft tags
Why This Sells
These ornaments appeal to book lovers, teachers, librarians, vintage décor fans, and minimalists. They’re lightweight, easy to ship, and extremely photogenic—great for Etsy.
Suggested Price Point
- Single ornament: $6–$10
- Set of 3: $15–$22
- Set of 6 (gift box): $25–$35
Batching Tip
Pre-cut and curl a large batch of paper strips, then fill all ornaments at once. You can complete 20+ ornaments in under an hour.
Packaging Idea
Place ornaments in small kraft boxes with a transparent window and fill the bottom with shredded brown paper to elevate the vintage look.
Variations
- Use sheet music for a “Musical Christmas” theme
- Add red or gold ribbon for glam styles
- Create themed sets (romance, poetry, mystery pages)
Pro Tip
Choose book pages with darker, crisp text light, high-contrast lettering photographs best and looks more premium.
More Crafts
More crafts to make fast and sell for maximum profit!
- Handmade Hits: Summer Farmer Market Crafts to Make and Sell]
- How to Make $100 Flipping Cutting Boards in One Weekend
- Flipping Thrift Store Junk: A Beginner’s Guide to Profitable Finds
- DIY Jean Tote Bag: How to Turn Old Jeans into a Sturdy Shopping Bag
- Crafts You Can Make in Under 30 Minutes to Sell for Profit
- 30 Clever Ways to Repurpose Old Jeans You’ll Use