Minimal Air-Dry Clay Tea Light Holders: Beginner-Friendly DIY
Clay tea light holders are where simple forms meet atmosphere. These small, sculptural pieces are designed to soften a space casting gentle shadows and adding warmth without demanding attention. Whether styled on a dining table, shelf, or bedside, they bring that quiet, evening glow that instantly makes a home feel calm and intentional.
What makes this project especially satisfying is how elevated it looks for such a simple process. With just a small amount of air-dry clay and a few basic tools, you’ll create something that feels modern, sculptural, and design-forward rather than overly “crafty.”
This is also one of those confidence-building DIYs you’ll come back to again and again. It’s beginner-friendly, calming to make, and ideal for gifting or selling at markets because each piece feels thoughtful, handmade, and quietly special.
This website contains affiliate links. As an Amazon Associate, I earn from qualifying purchases. Please read our disclaimer.
Project Overview: Minimal Air-Dry Clay Tea Light Holders
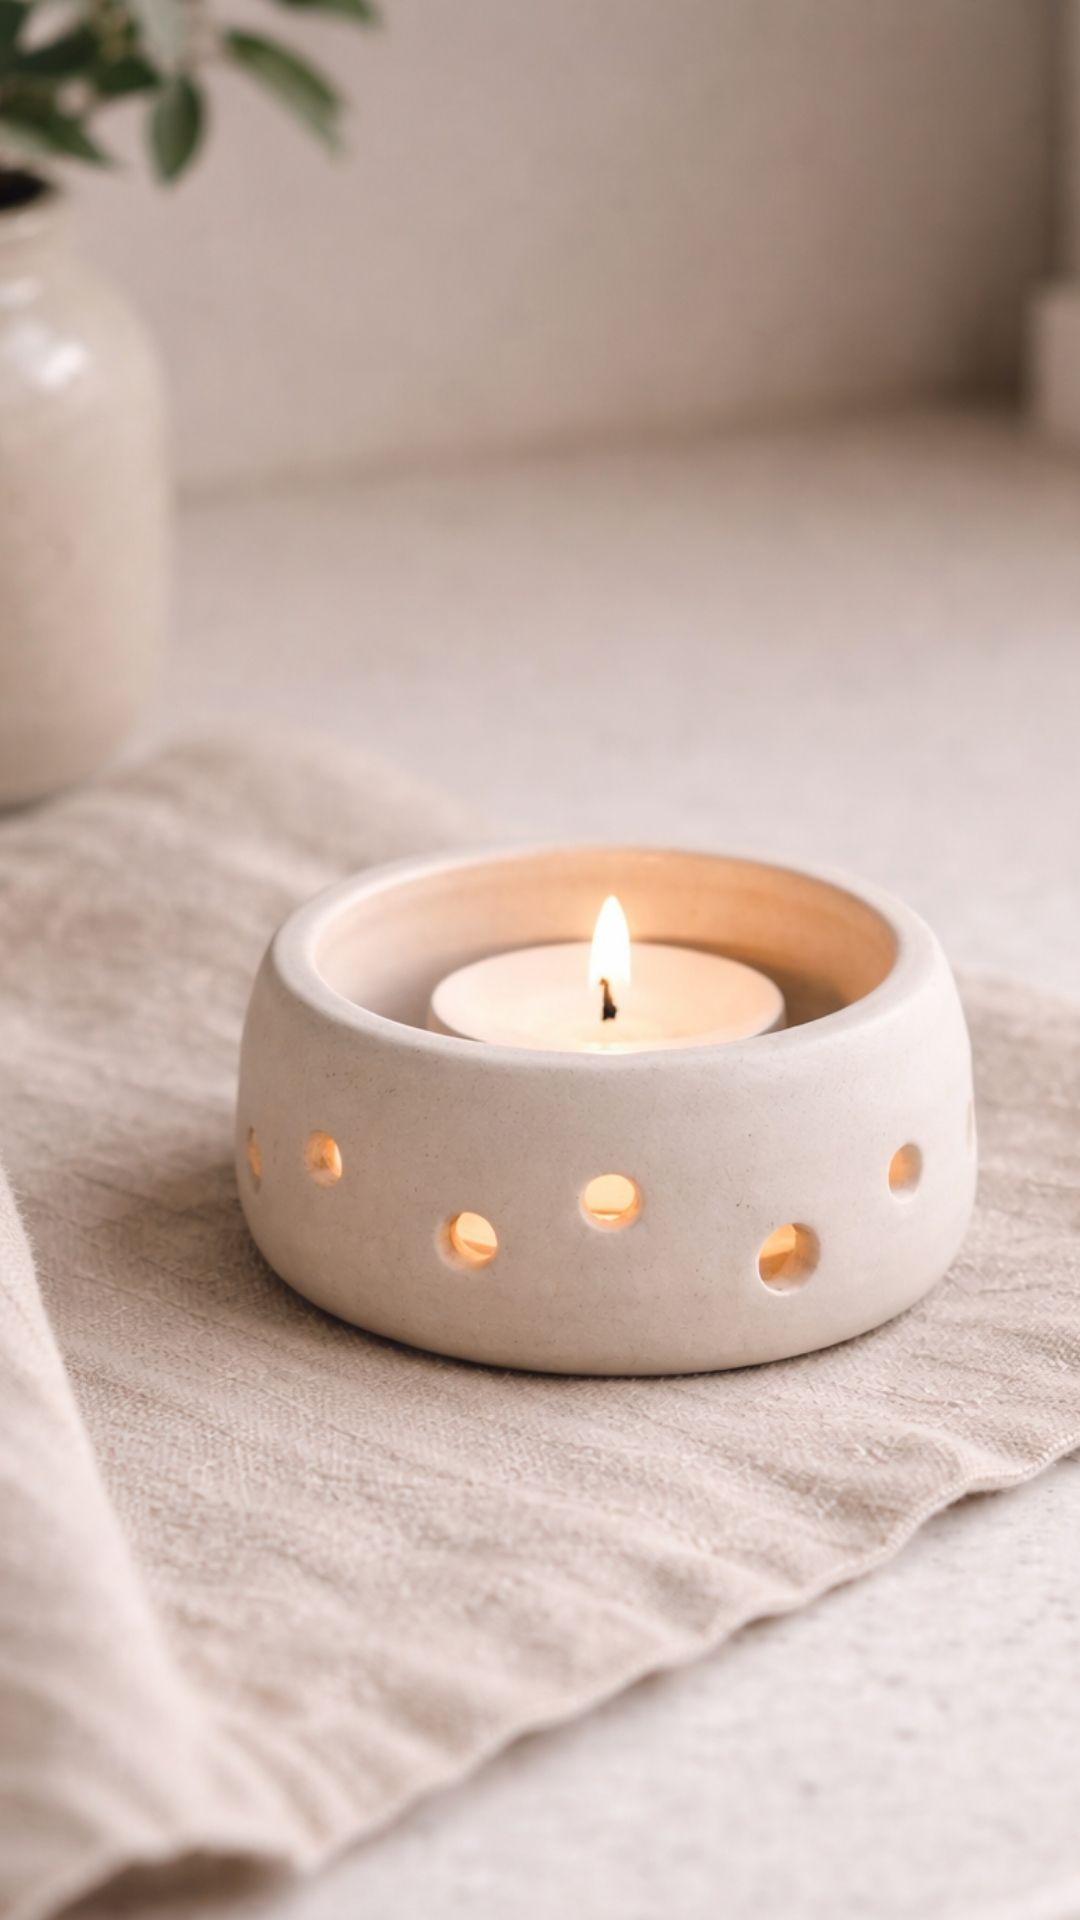
These tea light holders feature clean silhouettes, balanced proportions, and optional cut-out details that allow candlelight to gently glow through the form. Styled alone or grouped in small clusters, they feel sculptural and intentional perfect for modern homes, cozy corners, and minimalist decor lovers.
They’re quick to make, endlessly repeatable, and easy to customize in color, texture, and size making them ideal for batching and building a cohesive collection.
Materials & Tools
Materials
- Air-dry clay (white or natural tone; ~2–3 oz per holder)
- Tea light candles (real or LED)
- Acrylic paint (optional: ivory, stone gray, blush, sand)
- Satin or matte sealer/varnish
Tools
- Smooth work surface
- Small bowl of water
- Soft sponge or cloth
- Straw, skewer, or small cutter (for cut-outs)
- Fine-grit sandpaper (220–400 grit)
- Plastic wrap (for shaping candle well)
Step-by-Step Tutorial: Minimal Air-Dry Clay Tea Light Holders
Step 1: Shape the Base
Start with a ball of air-dry clay slightly larger than a golf ball. Press it gently onto your work surface to form a squat cylinder or rounded dome. Keep the base flat so it sits securely.
Technique note: Rotate the clay as you press to keep the shape even.
Step 2: Create the Candle Well
Using your thumb or the bottom of a tea light candle wrapped in plastic, press a shallow indentation into the center. Remove the candle and refine the edges.
Tip: Don’t go too deep leave enough clay at the base for strength.
Step 3: Refine the Shape
Smooth the outer walls and rim using a damp fingertip or sponge. Decide whether you want straight sides, a soft curve, or a gentle taper.
Optional variation: Slightly pinch the rim inward for a more sculptural feel.
Step 4: Add Cut-Out Details (Optional)
Use a straw, skewer, or small cutter to add dots, arches, or vertical slits around the sides. Keep spacing even for a clean, modern look.
Design tip: Fewer cut-outs = more minimalist and higher-end.
Step 5: Smooth All Edges
Carefully smooth around each cut-out to prevent cracking and ensure a polished finish once dry.
Step 6: Dry Slowly
Allow the holder to dry for 24–48 hours, flipping halfway through so the base dries evenly. Keep away from direct heat or sunlight.
Step 7: Sand for a Polished Look
Once fully dry, lightly sand the rim, base, and cut-outs. Remove dust with a soft cloth.
Step 8: Finish the Surface
Leave natural for an earthy look or paint in soft neutrals like ivory, stone gray, or blush. Apply thin coats.
Step 9: Seal for Use
Seal with a matte or satin varnish to protect the surface and enhance durability. Let cure fully.
Step 10: Light & Style
Add a tea light and enjoy the warm glow. Style individually or group in odd numbers for a layered, cozy effect.

Finished Piece Styling
These holders shine when styled simply on a tray, along a shelf, or clustered at the center of a table. They’re gift-ready, market-ready, and photograph beautifully in soft, neutral spaces.
Why This Craft Sells So Well
- Universal decor appeal
- Lightweight and giftable
- Neutral colors suit many styles
- Looks sculptural and high-end
- Easy to batch consistently
- Strong perceived value for size
Suggested Price Point
Standard Size / Core Version
$14–22 per holder
This reflects simple forms, smooth finish, and sealed surface. Most makers land comfortably here for single pieces.
Premium / Elevated Versions
$24–38
Justified by:
- Hand-carved textures
- Larger or thicker forms
- Custom colors or finishes
- Sets with curated styling
Set Pricing (Highly Recommended)
- Set of 2: $26–40
- Set of 3: $36–60
Sets feel intentional, increase perceived value, and raise average order value.
Pricing confidence tip: Customers aren’t just buying a candle holder they’re buying sculptural design, mood, and handmade artistry. Don’t underprice good work.
Batching Tip
Shape all bases first, then move through each step assembly-line style. This saves time and ensures consistent sizing.
Packaging Idea
Wrap each holder in kraft paper or a small box, tie with twine, and add a minimal tag. Group sets on wooden trays for markets or photos.
Fun Variations to Offer
- Warm terracotta or charcoal tones
- Taller, lantern-style forms
- Seasonal cut-out patterns
- Matte vs satin finishes
- Mini bedside versions
Pro Tip
Keep walls evenly thick uneven thickness is the main cause of cracking during drying.
Wrapping Up
Minimal air-dry clay tea light holders are the kind of project that builds confidence fast. They’re simple, calming to make, and endlessly adaptable perfect whether you’re crafting for yourself, gifting, or selling.
If you’re new to clay, this is a beautiful place to start. Trust the process, embrace the imperfections, and enjoy the soft glow of something you made by hand.