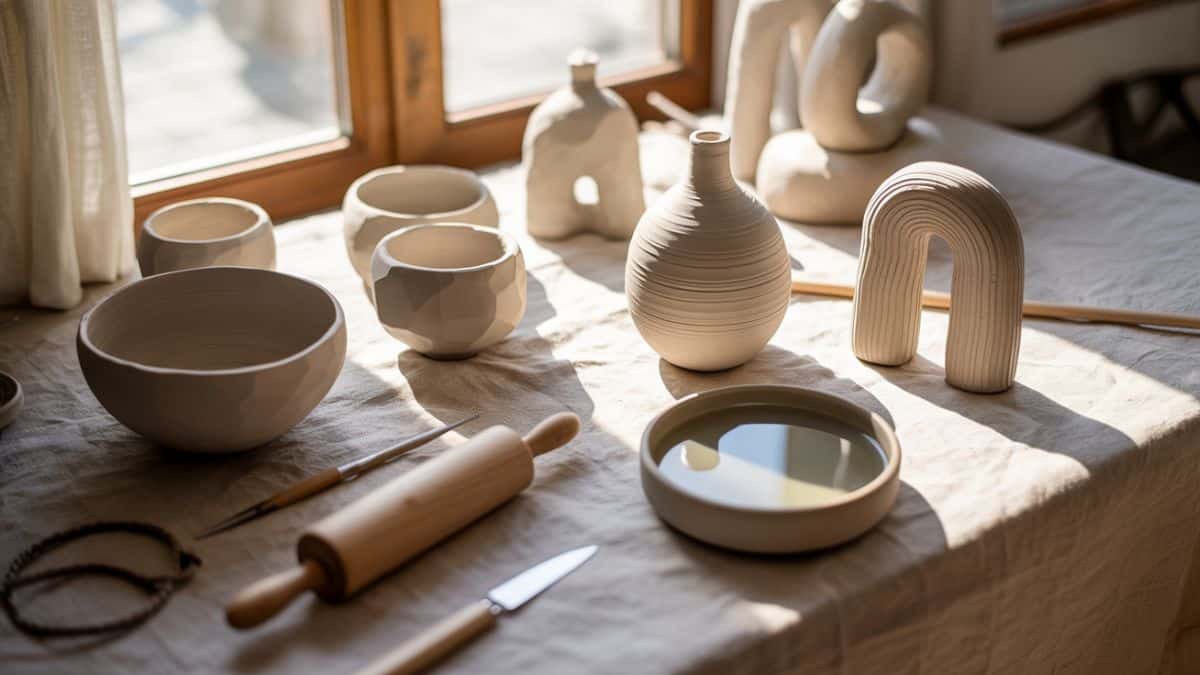
Air-Dry Clay Projects That Start Simple and End Stunning
There’s something quietly magical about air-dry clay. It starts as a soft, unassuming block nothing fancy, nothing intimidating and yet, in your hands, it becomes something meaningful. A small bowl that catches your rings at the end of the day. A sculptural piece that softens a shelf. A handmade detail that makes your home feel more yours.
This guide is for anyone who’s ever admired beautiful clay pieces online and wondered if they could really make something like that at home. The answer is yes without a kiln, without expensive tools, and without prior experience. Each project in this article begins with simple techniques and builds just enough skill to feel exciting, not overwhelming. You’ll move from easy, confidence-boosting makes to pieces that feel elevated, intentional, and display-worthy.
Think of this as a creative progression rather than a checklist. You don’t need to make everything at once. Start where you feel comfortable. Let your hands learn as you go. By the end, you won’t just have finished pieces you’ll have a new creative rhythm and the confidence to experiment beyond the page.
This website contains affiliate links. As an Amazon Associate, I earn from qualifying purchases. Please read our disclaimer.
The Absolute Basics: Your Clay Foundation
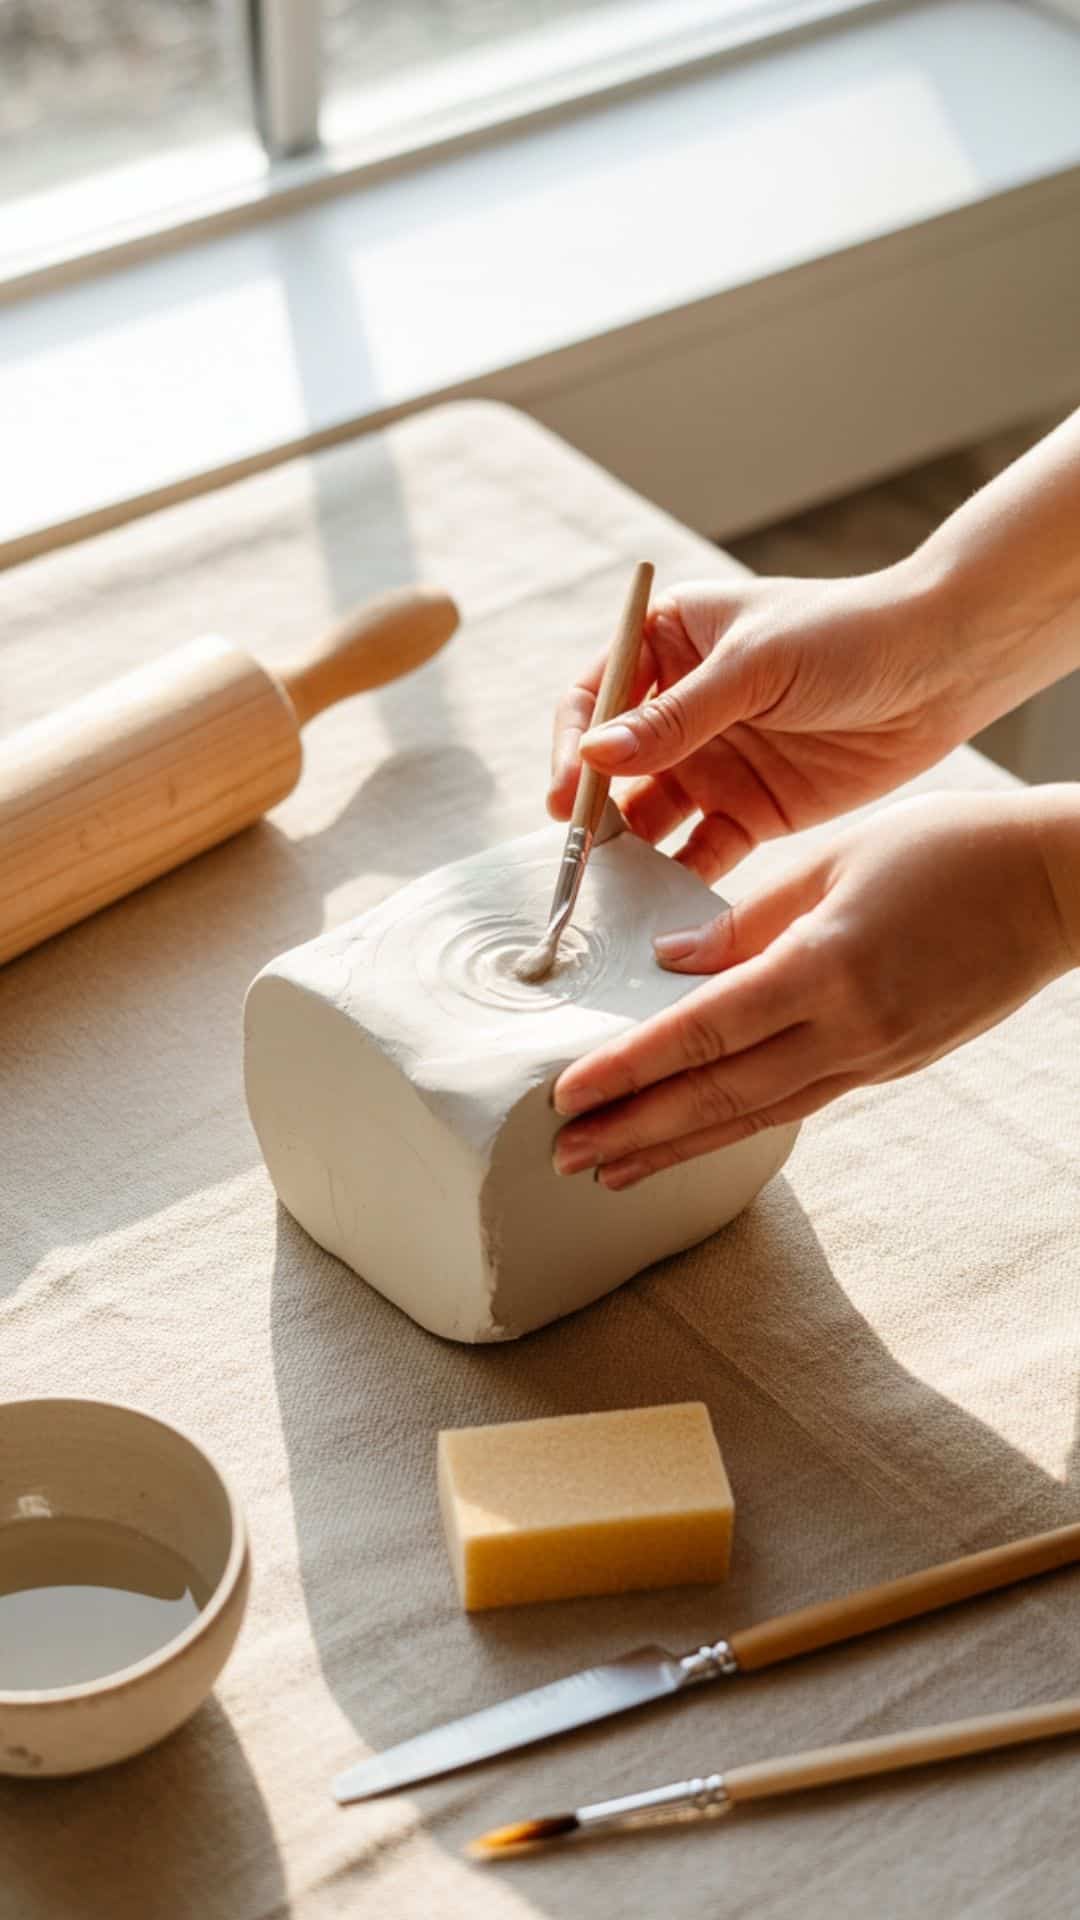
Before we shape anything beautiful, it helps to understand what makes air-dry clay so forgiving and so enjoyable to work with. This is the part where pressure disappears. Air-dry clay doesn’t require a kiln, a wheel, or any specialized training. It hardens naturally as it’s exposed to air, usually within 24 to 48 hours, making it ideal for relaxed, at-home creativity.
At its core, air-dry clay is wonderfully beginner-friendly. It’s non-toxic, affordable, and easy to smooth, shape, and correct as you go. If something doesn’t look quite right, you can usually fix it with a damp fingertip and a little patience. That flexibility is what makes these projects feel accessible rather than intimidating.
You don’t need a studio setup to get started. A simple non-stick surface like a silicone mat or parchment paper protects your table and keeps the clay from sticking. A small bowl of water nearby helps smooth edges and revive clay that starts to feel dry. Most shaping can be done with your hands alone, and the rest with tools you likely already own.
A Simple Starter Setup
- Natural Air-dry clay or white air-dry clay (white or natural tones are easiest for beginners)
- Non-stick work surface
- Small bowl of water
- Rolling pin or smooth bottle
- Craft knife (affiliate) or butter knife
- Soft sponge or paintbrush
- Fine-grit sandpaper (for finishing)
As you work, keep any unused clay tightly wrapped in plastic. Air-dry clay begins curing the moment it meets the air, so protecting what you’re not using helps prevent waste and frustration.
Three Golden Rules for Working With Air-Dry Clay
Work with confidence, but don’t rush.
Shape deliberately, but remember that clay responds best when handled gently and fairly quickly. If it starts to dry while you’re working, lightly moisten your fingers and smooth the surface.
Score and slip for strong joins.
Whenever you attach two pieces handles, legs, arms, or walls scratch both surfaces lightly, apply a bit of clay-and-water paste (called slip), and press together. This simple step prevents cracking and keeps your piece intact as it dries.
Let pieces dry slowly.
Resist the urge to speed things up. Dry your projects away from heat and direct sunlight. For thicker pieces, flipping them halfway through drying or placing them on a wire rack allows air to circulate evenly and reduces warping.
Once you understand these basics, everything else becomes easier. With just a block of clay, a few everyday tools, and these foundational habits, you’re ready to move from simple shapes to pieces that feel truly intentional.
Project 1: The Hanging Wall Planter (Crescent Form)
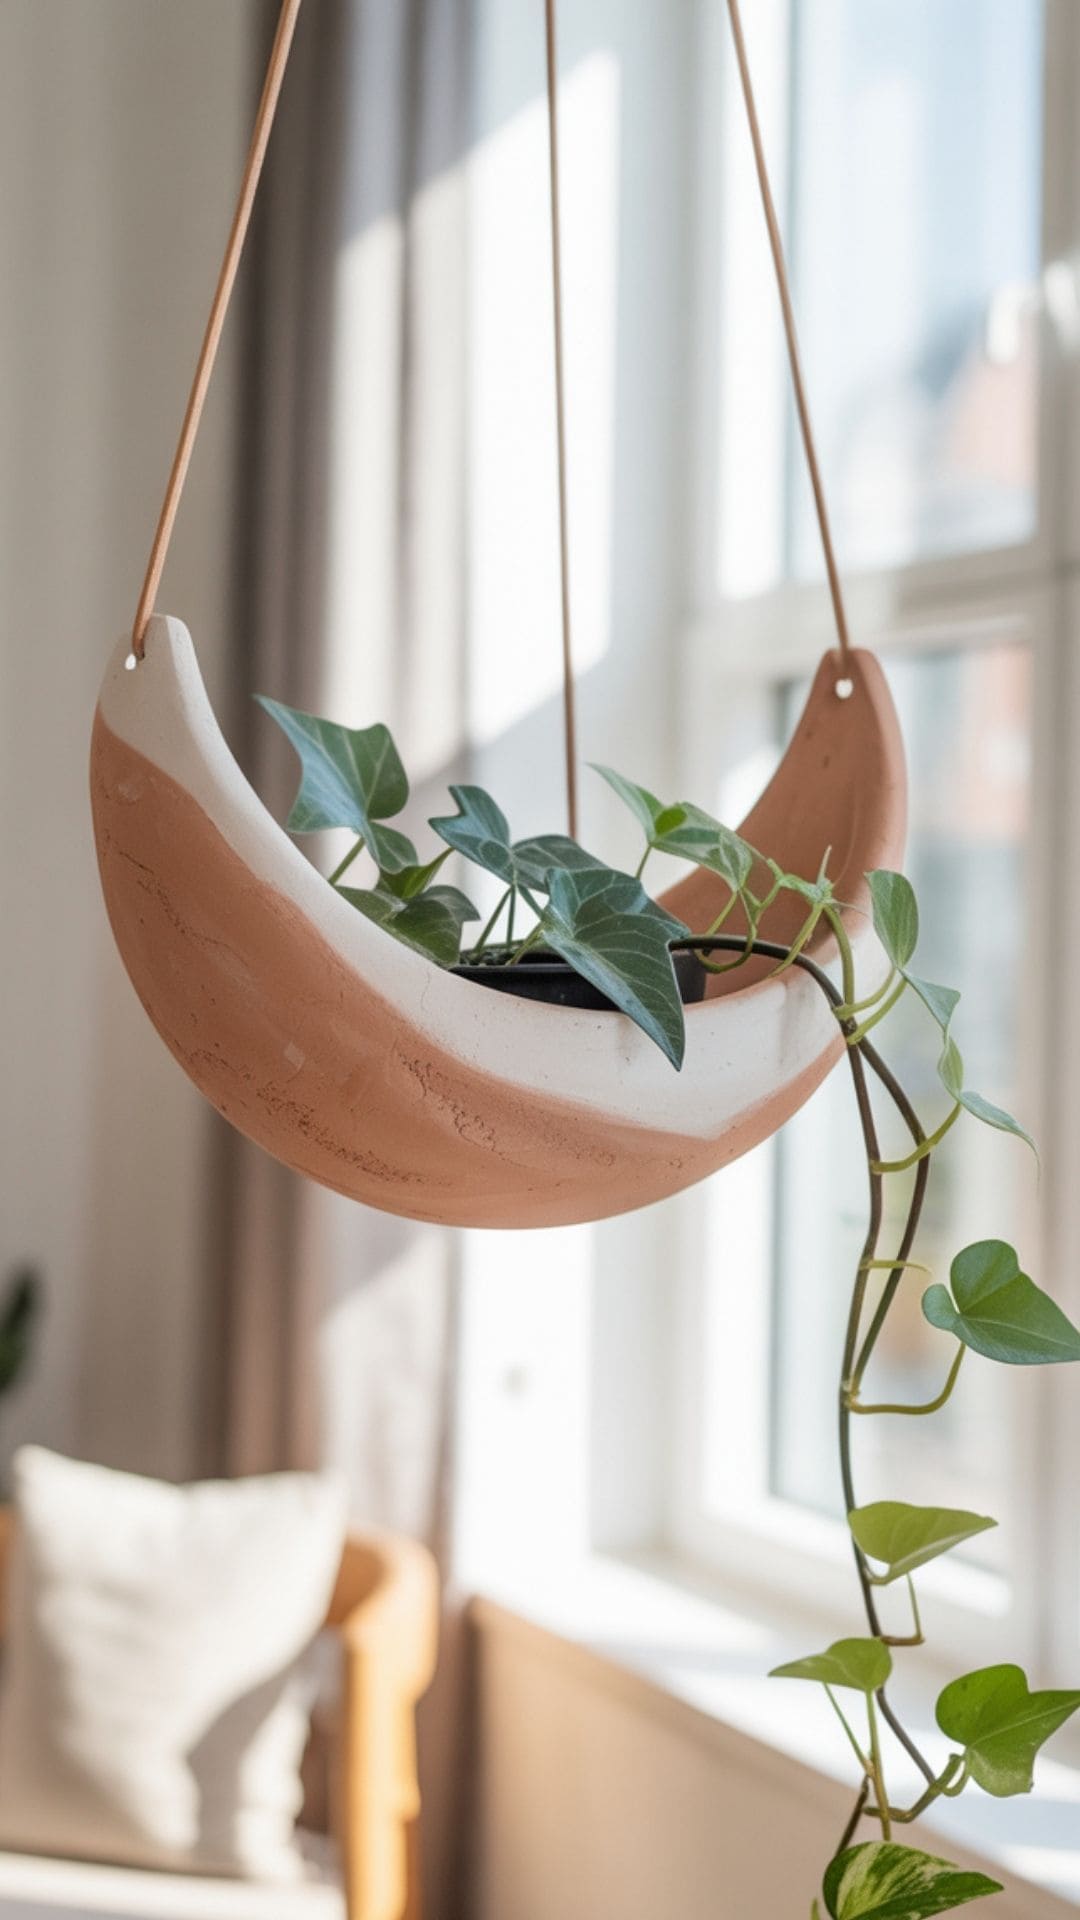
This project introduces sculptural thinking how clay can live on a wall, not just a surface. The crescent wall planter is lightweight, modern, and quietly dramatic. Its curved form creates shadow and movement, while the simple hanging cords keep it grounded and natural. It’s a beautiful next step that still relies on the same fundamentals you’ve already learned: slabs, smoothing, patience, and thoughtful finishing.
Designed for faux plants or air plants, this piece brings a gallery-like feel to any sunlit corner.
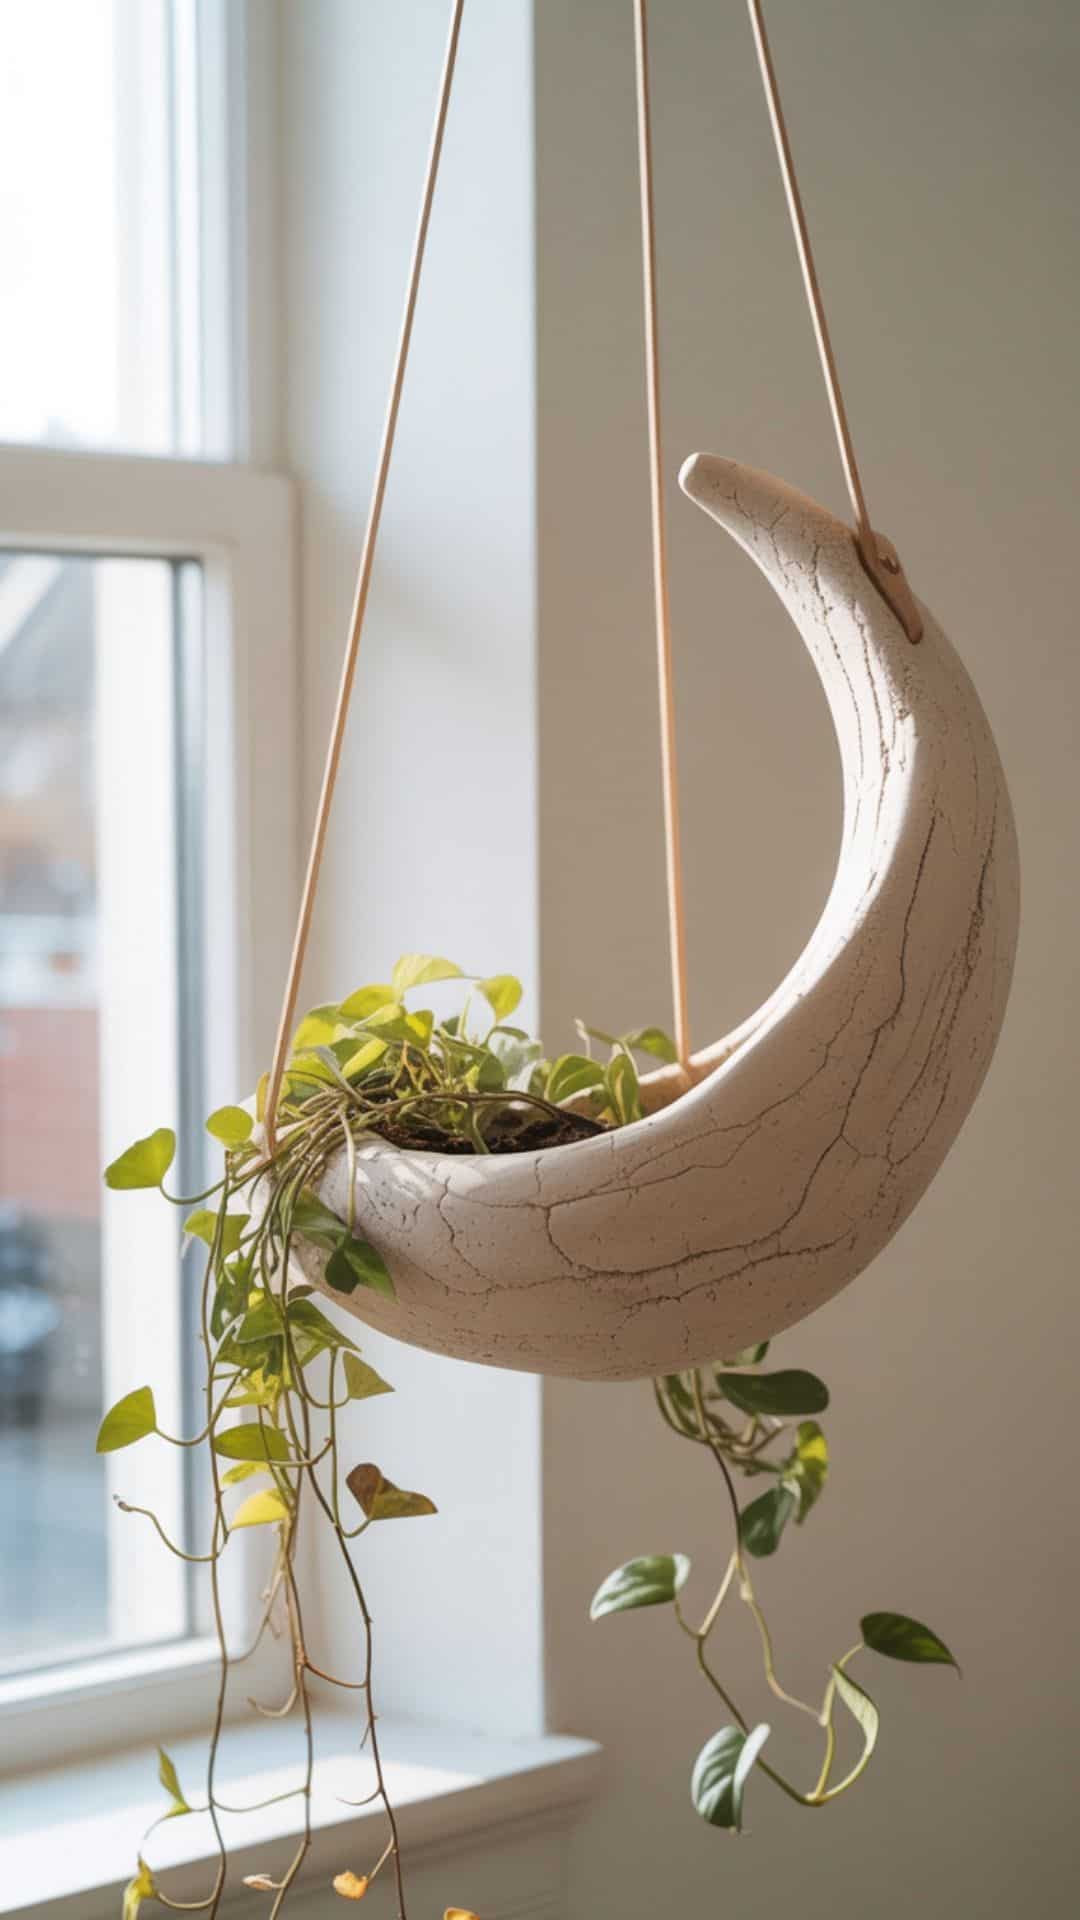
Get the step-by-step tutorial for crescent air-dry clay wall planters!
Project 2: Clay Tea Light Holders
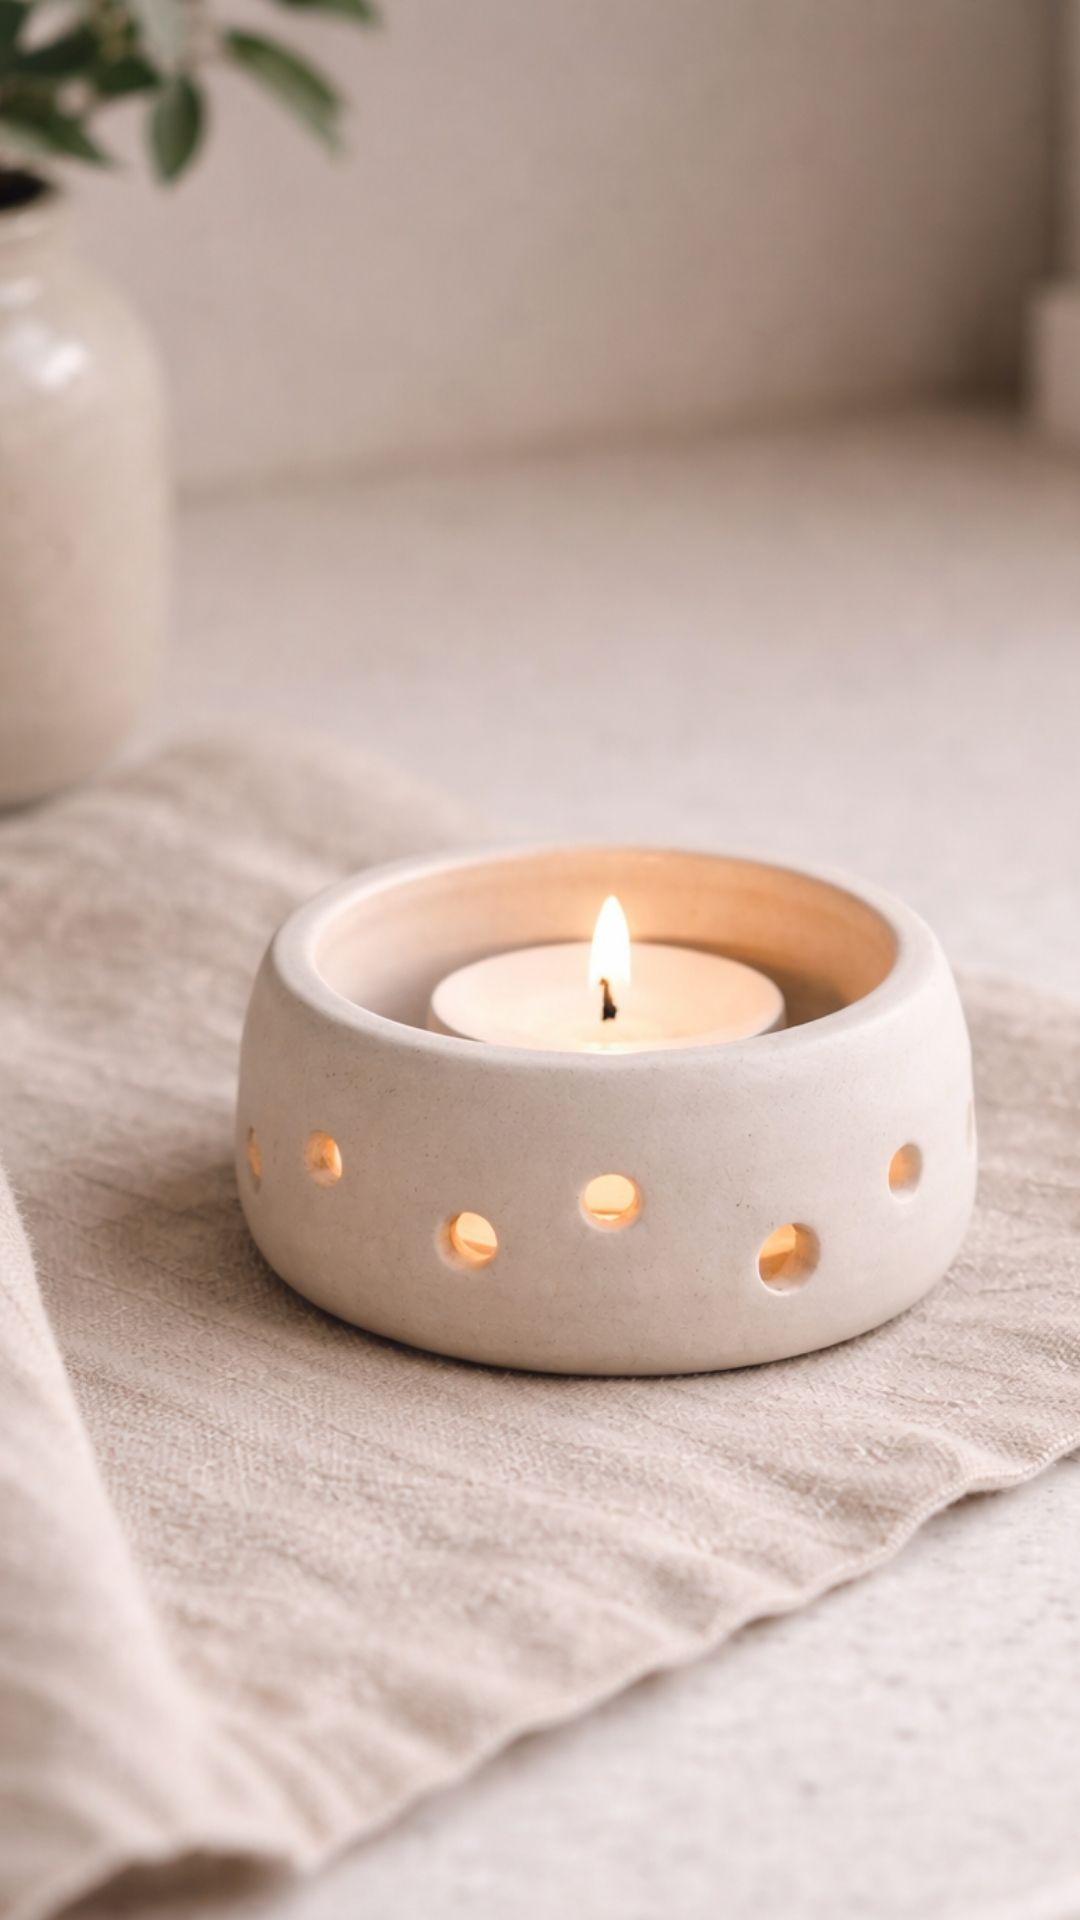
Clay tea light holders are where simple forms meet atmosphere. These small, sculptural pieces are designed to soften a space casting gentle shadows and adding warmth without demanding attention. Whether styled on a dining table, shelf, or bedside, they bring that quiet, evening glow that instantly makes a home feel calm and intentional.
This project is especially satisfying because it looks far more complex than it is. You’ll practice working with thickness, negative space, and clean openings, all while creating something that’s quick, giftable, and endlessly repeatable. Get the full step-by-step tutorial for minimal air-dry clay tea light holders!
Project 3: The Coil-Built Bottle Vase
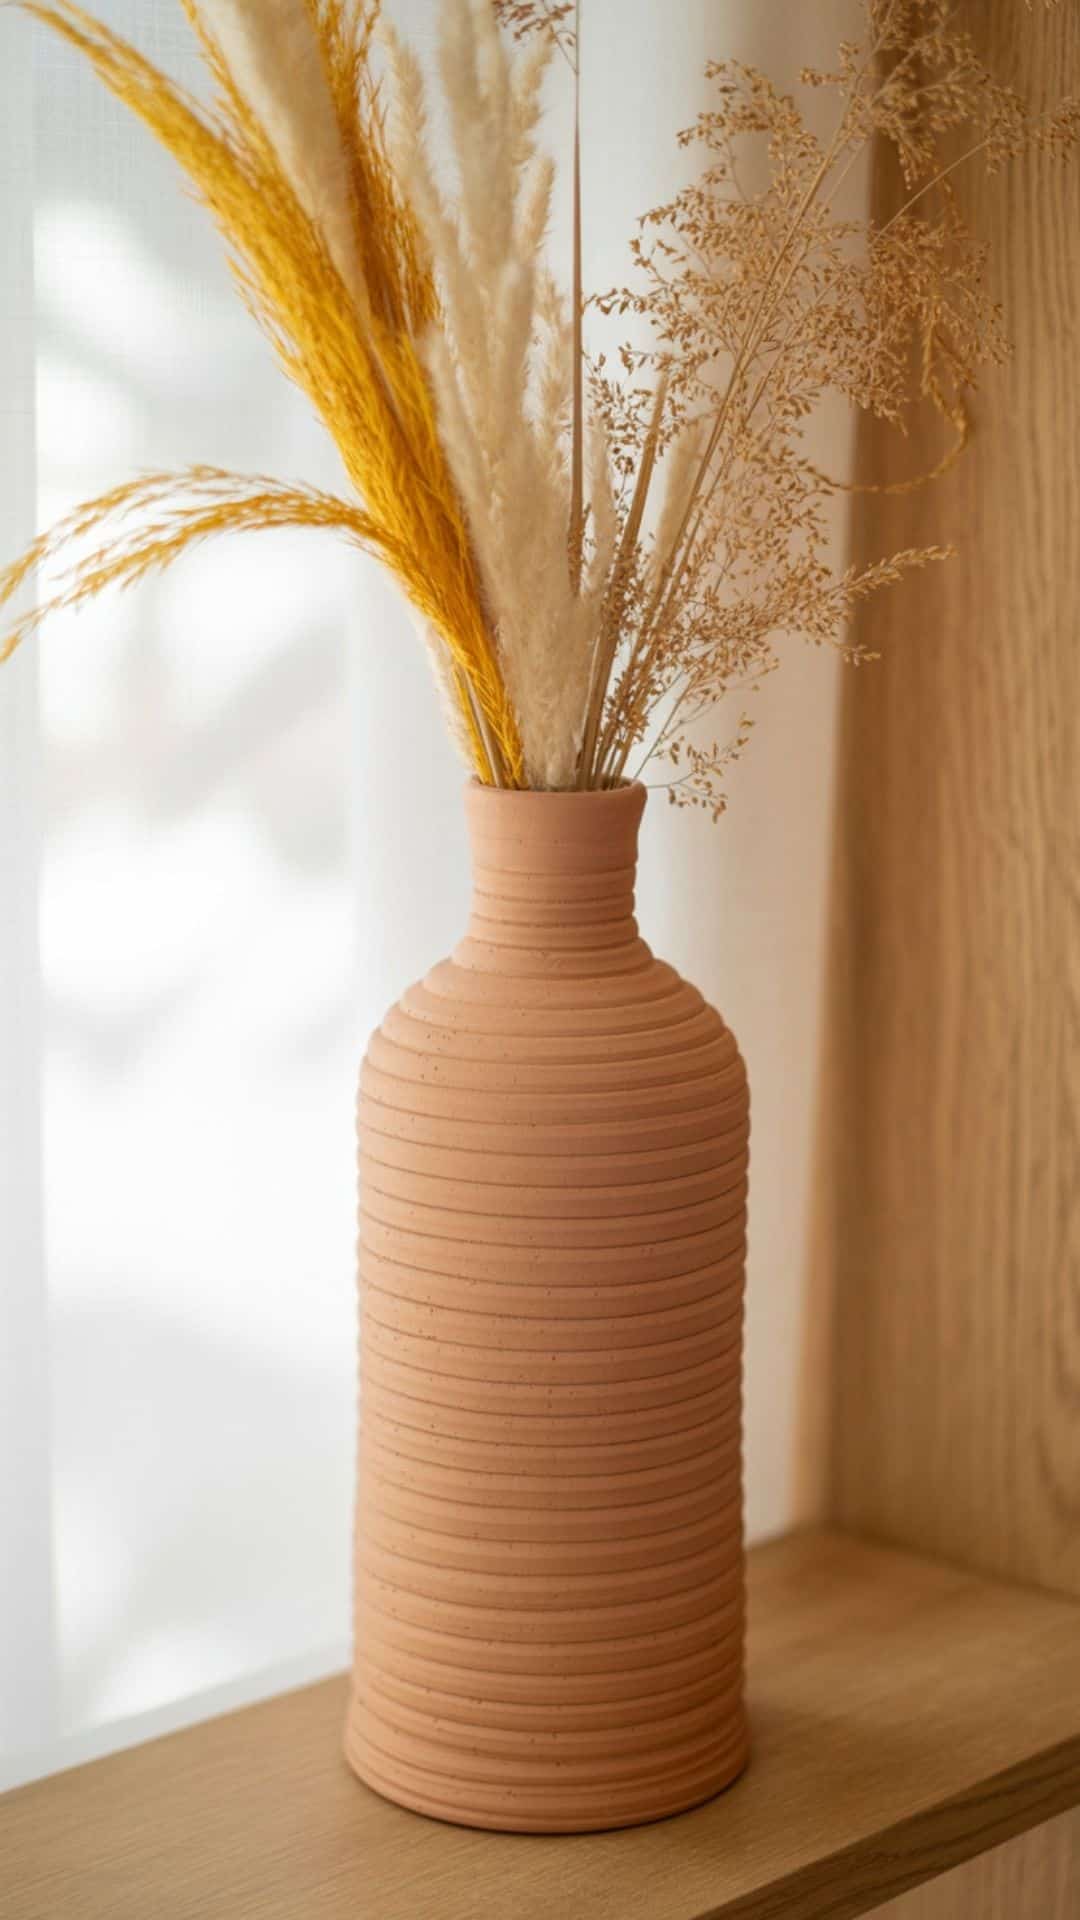
This is where your skills gently level up. Coil building is one of the oldest pottery techniques in the world, and it’s surprisingly calming to learn. Instead of rolling out slabs, you’ll build this vase slowly coil by coil watching the form rise in your hands. The finished piece feels organic, sculptural, and intentionally imperfect in the best way.
The beauty of a coil-built vase is that it celebrates the handmade look. You can smooth the inside for strength while leaving the exterior ridges visible for texture, or soften them slightly for a more refined finish. Either way, it becomes a statement piece that looks right at home styled with dried grasses or left empty on a shelf. Get the full step-by-step tutorial for this air-dry coil-built bottle vase!
Project 4: The Embossed Paperweight

This project is all about weight, touch, and quiet detail. The embossed paperweight feels smooth and grounding in your hand like a river stone that’s been gently shaped over time. It’s simple in form but elevated by a single pressed design, making it a beautiful, functional piece for a desk, shelf, or stack of papers.
What makes this project special is how little it needs. No assembly, no paint if you don’t want it just clay, pressure, and patience. It’s an ideal project when you want something calming and tactile, with a finished result that feels intentionally minimal.
Step-by-Step Tutorial: The Embossed Paperweight
Step 1: Shape the Base
Start with a ball of air-dry clay about the size of your palm. Roll it gently until smooth, then press it slightly to create a low, rounded form think smooth river stone, not flat.
Step 2: Add a Thumb Indentation
Press your thumb lightly into one side to create a shallow indentation. This gives the paperweight an ergonomic feel and adds subtle sculptural interest.
Step 3: Emboss the Design
While the clay is still soft, press a leaf, botanical stamp, lace, or carved texture into the surface. Apply even pressure, then lift carefully to reveal the design.
Step 4: Refine the Edges
Use a damp fingertip to smooth the edges and any cracks around the design. Keep the form organic imperfections add character.
Step 5: Dry Slowly
Let the paperweight dry on a flat surface for 48 hours, flipping it halfway through so both sides dry evenly. Avoid heat or direct sunlight.
Step 6: Sand and Smooth
Once fully dry, lightly sand the entire piece with fine-grit sandpaper. Focus on softening edges while keeping the embossed design crisp.
Step 7: Finish the Surface
For a natural look, leave the clay unpainted and seal with matte varnish. For a stone-like effect, paint with charcoal, slate gray, or warm taupe, then seal.
Step 8: Seal and Cure
Apply one thin coat of varnish and allow it to dry fully. This protects the surface and enhances the texture without adding shine.
Step 9: Style and Use
Place your paperweight on a desk, stack of books, or workspace. It’s simple, grounding, and quietly beautiful.
Project 5: The Stamped Bowl
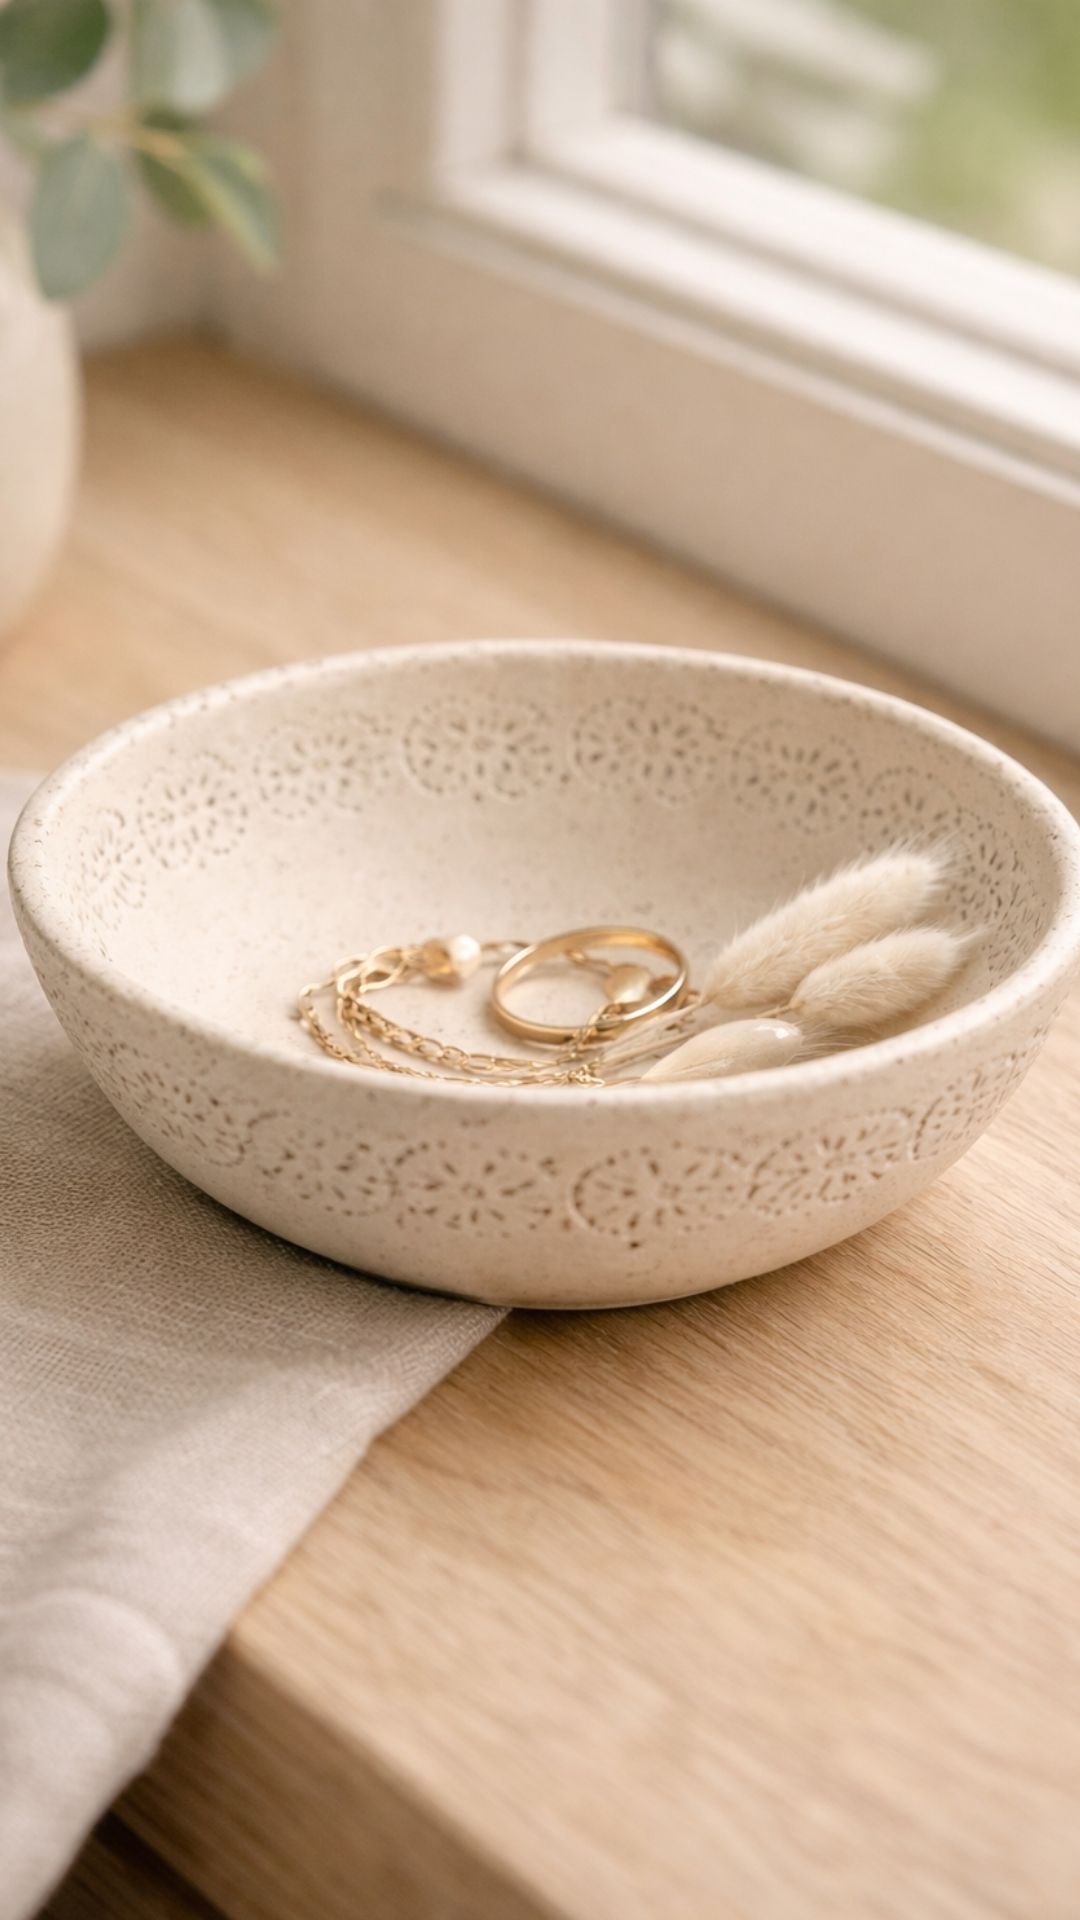
This project is where texture becomes the star. The stamped bowl feels quietly timeless soft curves, gentle impressions, and a finish that highlights the beauty of clay rather than covering it up. It’s the kind of piece that looks as though it’s always belonged in your home, resting on a windowsill or holding small treasures on a dresser.
What makes the stamped bowl especially satisfying is how simple the process is. You’ll shape a basic form you already know, then elevate it with pattern and subtle paint washes that settle into the texture, giving the bowl depth and character without feeling busy.
Step-by-Step Tutorial: The Stamped Bowl
Step 1: Roll Out the Clay
Roll your air-dry clay to about ¼ inch thick on a non-stick surface, keeping the slab even to avoid weak spots.
Step 2: Add the Stamped Texture
Before shaping, press your chosen texture into the clay. Use rubber stamps, lace, carved wood, or even the underside of a textured glass. Press evenly but gently so the pattern is clear without tearing the clay.
Step 3: Cut and Shape the Bowl
Use a bowl or lid to cut out a circle. Lift the clay carefully and drape it over the outside of a bowl covered in plastic wrap. Gently press so it takes on a soft, curved shape.
Step 4: Let It Set
Allow the clay to rest on the mold for 6–12 hours, until it’s firm enough to hold its shape. Remove carefully and let it dry fully for 24–48 hours, flipping halfway through.
Step 5: Smooth the Edges
Once dry, lightly sand the rim and any rough spots using fine-grit sandpaper. Focus on softening the edges while preserving the stamped detail.
Step 6: Apply a Color Wash
Mix acrylic paint with water to create a thin wash in ivory, taupe, or soft gray. Brush it over the bowl, then gently wipe away excess so the color settles into the stamped pattern.
Step 7: Add Subtle Highlights (Optional)
For more depth, add a second lighter wash around the rim or inside edges and blend gently with a sponge.
Step 8: Seal the Finish
Once completely dry, seal the bowl with matte or satin varnish to protect the surface and enhance the ceramic-like feel.
Step 9: Style and Display
Use the finished bowl to hold jewelry, dried flowers (affiliate), or small keepsakes. Its texture and neutral tones make it endlessly versatile.
Project 6: Minimal Air-Dry Clay Salt Cellar
This minimalist salt cellar is small, sculptural, and endlessly useful. It’s the kind of kitchen piece that quietly elevates your countertop simple in form, satisfying to use, and beautiful enough to leave out all the time. With its shallow bowl and fitted lid, it feels intentional and timeless rather than trendy.
What makes this project especially rewarding is that it introduces a new clay skill: making two pieces that work together. Learning to size a lid correctly and refine clean edges is a confidence boost, and the finished piece feels surprisingly high-end for such a straightforward build.
Step-by-Step Tutorial: Minimal Air-Dry Clay Salt Cellar

Step 1: Shape the Bowl Base
Start with a ball of air-dry clay slightly larger than a golf ball. Press it gently into a squat bowl shape, keeping the base flat and the walls even. Aim for a shallow interior rather than a deep one.
Step 2: Refine the Interior
Use your thumb or the rounded end of a spoon to smooth and widen the inside. Keep the rim thickness consistent for a clean, modern look.
Step 3: Create the Lid
Roll out a slab of clay about ¼ inch thick. Place the bowl upside down on the slab and trace around it, cutting a slightly wider circle for the lid so it rests comfortably on top.
Step 4: Add a Lid Handle
Roll a small ball of clay and gently press it onto the center of the lid to create a simple knob. Score and slip if needed, then smooth the join so it looks seamless.
Step 5: Test the Fit
Place the lid on the bowl while both pieces are still leather-hard. Adjust the edges gently if needed to ensure a good fit without sticking.
Step 6: Dry Slowly
Let both pieces dry separately for 24–48 hours, flipping them halfway through drying so air reaches all sides evenly.
Step 7: Sand for Precision
Once fully dry, lightly sand the rim of the bowl and the underside of the lid so they sit smoothly together.
Step 8: Finish the Surface
Leave the clay natural for a stone-like look, or paint in ivory, warm beige, or soft gray. Apply thin coats and let dry completely.
Step 9: Seal for Kitchen Use
Seal both pieces with satin or food-safe waterproof varnish (for dry goods only). Allow to cure fully before use.
Step 10: Style and Use
Fill with flaky sea salt and place it near the stove. Pair with a small wooden spoon for an effortlessly styled, functional kitchen detail.
Project 7: Minimalist Spoon Rest

This minimalist spoon rest is one of those deceptively simple projects that instantly earns its place in your home. With its shallow curve and subtle notch, it’s designed to hold cooking utensils neatly while protecting your countertop practical, understated, and quietly beautiful.
What makes this project especially satisfying is how little time it takes compared to how often you’ll use it. It’s the kind of piece that feels thoughtful rather than crafty, blending seamlessly into a modern or neutral kitchen. It also happens to be one of the best beginner projects because it relies on just a few core techniques: slab rolling, gentle shaping, smoothing, and finishing.
Step-by-Step Tutorial: Minimalist Air-Dry Clay Spoon Rest
Step 1: Roll Out the Clay
Roll your air-dry clay to about ¼ inch thick on a non-stick surface. Keep the slab even so the rest dries flat and strong.
Step 2: Cut the Spoon Rest Shape
Using a craft knife or blade, cut a long oval or soft rectangle about 8 inches long and 3 inches wide. Round the corners slightly with your fingers for a clean, modern look.
Step 3: Create the Utensil Notch
At one end of the shape, gently cut or press a small curved notch. This will cradle the handle of your spoon and keep it from slipping.
Step 4: Add a Gentle Curve
Lift the opposite end slightly and place a small object like a rolled cloth or spoon handle underneath to create a subtle upward curve. This helps catch drips while keeping the rest elegant and low-profile.
Step 5: Smooth and Refine
Use a damp fingertip or sponge to smooth the edges, surface, and notch. Take your time here this step is what gives the piece its polished, store-bought feel.
Step 6: Dry Slowly
Let the spoon rest dry for 24–48 hours, flipping it halfway through so air can circulate evenly. Keep it away from direct heat to avoid warping.
Step 7: Sand for a Clean Finish
Once completely dry, lightly sand the edges and surface with fine-grit sandpaper to remove any imperfections. Wipe away dust with a soft cloth.
Step 8: Finish the Surface
Leave the clay natural for a stone-like look, or paint it in ivory, warm gray, or soft beige. Apply thin coats and allow them to dry fully.
Step 9: Seal for Use
Seal with satin or waterproof varnish to protect the surface from moisture and make it kitchen-friendly.
Step 10: Style and Use
Place your spoon rest beside the stove and use it daily. It’s simple, useful, and quietly satisfying exactly the kind of project that shows how practical air-dry clay can be.
This minimalist salt cellar is small, sculptural, and endlessly useful. It’s the kind of kitchen piece that quietly elevates your countertop simple in form, satisfying to use, and beautiful enough to leave out all the time. With its shallow bowl and fitted lid, it feels intentional and timeless rather than trendy.
What makes this project especially rewarding is that it introduces a new clay skill: making two pieces that work together. Learning to size a lid correctly and refine clean edges is a confidence boost, and the finished piece feels surprisingly high-end for such a straightforward build.
Project 8: The Modern Air-Dry Clay Incense Holder

This project is all about restraint. Clean lines, gentle curves, and a sense of calm that feels intentional rather than bare. The modern incense holder is quick to make, but it teaches you how small details proportion, balance, and finish can completely change the feel of a piece.
It’s a beautiful pause in the creative journey. After sculptural forms and attachments, this project brings you back to simplicity and precision, showing how air-dry clay can feel quietly luxurious.
Step-by-Step Tutorial: The Modern Air-Dry Clay Incense Holder
Step 1: Roll and Cut the Base
Roll your air-dry clay to about ¼ inch thick on a smooth, non-stick surface. Use a ruler and craft knife to cut a clean rectangle roughly 6 inches long and 1½ inches wide. Soften the edges slightly with your fingertips.
Step 2: Form the Gentle Curve
Lift one end of the clay rectangle and gently curve it upward about 1 inch high. Support it with a small object (like a paint bottle or spoon handle) and let it rest for 15–20 minutes so it holds the shape.
Step 3: Create the Incense Hole
While the clay is still workable, use an incense stick to poke a hole at the raised end. Angle it slightly toward the center of the tray so ash falls neatly along the surface.
Step 4: Add Subtle Texture
Use a fine-toothed comb or clay tool to create shallow, parallel lines along the surface. Keep pressure light for a refined, modern look.
Step 5: Smooth and Refine
Dip your finger in water and smooth the edges and curved end, removing any cracks or roughness. This step gives the piece its polished finish.
Step 6: Dry Slowly
Allow the piece to dry completely for 24–48 hours, flipping it once halfway through to prevent warping.
Step 7: Sand for Perfection
Once fully dry, lightly sand the surface and edges with fine-grit sandpaper until smooth and satin-like.
Step 8: Paint or Leave Natural
For a minimalist look, leave the clay unpainted and seal with clear matte varnish. For a soft ceramic finish, paint in ivory, stone gray, or warm taupe, then seal with satin varnish.
Step 9: Seal the Finish
Apply one thin coat of varnish and allow it to dry fully before use.
Step 10: Style and Use
Insert an incense stick, light it, and let the ash fall naturally along the tray. Style with candles, linen, or greenery for a spa-inspired moment.
Project 9: Flower Frog
This project is a beautiful blend of function and simplicity. The flower frog is one of those quiet, timeless objects that feels both old-world and perfectly modern. Small and unassuming, it sits on top of a jar or vase and gently guides each stem into place, helping you create loose, natural arrangements that feel effortless rather than overworked.
What makes the clay flower frog especially satisfying is how honest it is. There’s no need for paint or decoration the form, weight, and handmade imperfections are what give it character. It’s also incredibly practical, making it one of those projects you’ll reach for again and again once it’s finished.
Step-by-Step Tutorial: The Air-Dry Clay Flower Frog
Step 1: Shape the Base
Start with a ball of air-dry clay about the size of your palm. Roll it gently until smooth, then press it down on your work surface to form a thick disc about ½–¾ inch tall. Keep the edges softly rounded rather than sharp.
Step 2: Create the Center Hole
Using the end of a paintbrush, pen, or dowel, press a larger hole into the center of the disc. This opening will accommodate thicker stems and help anchor your arrangement.
Step 3: Add the Stem Holes
Use a skewer, straw, or pencil to poke smaller holes around the center hole. Vary the angles slightly some straight, some gently tilted outward so flowers naturally fan out when arranged.
Step 4: Smooth and Refine
Lightly dampen your fingers and smooth the surface and edges, softening any cracks around the holes. Avoid adding too much water just enough to refine the shape.
Step 5: Dry Slowly
Allow the flower frog to dry on a flat surface for 48 hours, flipping it after the first day so air can circulate evenly. Keep it away from heat and direct sunlight to prevent cracking.
Step 6: Optional Sanding
Once fully dry, lightly sand the bottom and edges with fine-grit sandpaper to ensure it sits flat and feels smooth to the touch.
Step 7: Seal for Use With Water
If you plan to use fresh flowers, apply two to three thin coats of waterproof or satin varnish, allowing each coat to dry completely. This helps protect the clay from moisture.
Step 8: Style and Arrange
Place your finished flower frog on top of a glass jar or vase filled with water. Insert stems one by one wildflowers, herbs, or garden clippings work beautifully. The frog will hold each stem exactly where you want it.
Project 10: Pressed Flower Ornaments

This project is where clay meets nature in the most delicate way. Pressed flower ornaments feel nostalgic and timeless like something discovered in an old cottage or tucked into a keepsake box (affiliate). Each one captures a moment in time, preserving petals, stems, and leaves inside soft clay.
They’re simple to make, deeply satisfying, and endlessly versatile. Use them as seasonal ornaments, gift tags, wall décor, or keepsakes tied with twine. No two will ever look the same, which is exactly what makes them special.
Step-by-Step Tutorial: Pressed Flower Ornaments
Step 1: Prepare the Flowers
Gather small, flat flowers and greenery think daisies, pansies, ferns, baby’s breath, or wildflowers. Press them between the pages of a heavy book or in a flower press for at least one week, until fully dry and flat.
Step 2: Roll Out the Clay
Roll your air-dry clay to about ¼ inch thick on a non-stick surface. Keep the slab even so the ornaments dry flat and strong.
Step 3: Cut Out the Ornament Shapes
Use a round cookie cutter, glass, or handmade template to cut out your ornament shapes. Gently lift each piece and smooth the edges with your fingers.
Step 4: Add the Hanging Hole
Before decorating, use a straw or skewer to poke a small hole near the top of each ornament. Make sure it’s clean and centered for hanging later.
Step 5: Arrange the Pressed Flowers
Place pressed flowers gently onto the clay surface. Play with composition one simple bloom or a small botanical cluster works beautifully.
Step 6: Press the Flowers In
Lay a piece of parchment paper over the ornament and gently roll over it with a rolling pin. Press just enough to embed the flowers into the clay without crushing them.
Step 7: Dry Slowly
Place the ornaments flat on parchment paper and allow them to dry for 24–48 hours, flipping them halfway through so both sides dry evenly.
Step 8: Seal the Surface
Once fully dry, seal the ornaments with matte or gloss varnish. This protects the flowers and brings out their natural color.
Step 9: Add Twine or Ribbon
Thread jute, twine, or ribbon through the hole and knot securely. Keep it simple to let the ornament shine.
Step 10: Style and Display
Hang them on branches, tie them to gifts, or display them on a hook or wall. Each ornament feels like a small piece of preserved nature.
Project 11: Golden Napkin Rings

This project brings a touch of quiet luxury into your clay journey. Golden napkin rings are simple in shape but elevated in finish proof that air-dry clay can look refined, intentional, and beautifully styled for entertaining.
They’re lightweight, slightly organic, and far more charming than anything store-bought. Whether you’re setting a table for guests or simply adding beauty to everyday meals, these napkin rings feel special without being fussy.
Step-by-Step Tutorial: Golden Air-Dry Clay Napkin Rings
Step 1: Roll Out the Clay
Roll your air-dry clay to about ¼ inch thick on a non-stick surface. Keep the slab even so the rings dry smoothly.
Step 2: Cut the Strips
Using a ruler and craft knife, cut long strips about 1½ inches wide and 5 inches long. These will form your napkin rings.
Step 3: Add Subtle Texture (Optional)
For extra character, gently press lace, a leaf, or a rubber stamp into the surface. Keep it faint just enough to show through the metallic finish.
Step 4: Form the Rings
Wrap each clay strip around a cardboard paper towel tube or smooth bottle. Overlap the ends slightly to create a ring shape.
Step 5: Secure the Seam
Score and slip the overlapping ends, press together firmly, and smooth the seam with a damp fingertip until it blends in.
Step 6: Remove and Refine
Carefully slide the rings off the form while still soft. Smooth edges and correct any uneven areas.
Step 7: Dry Slowly
Allow the rings to dry for 24–48 hours, rotating them halfway through to prevent flat spots or warping.
Step 8: Sand for Smoothness
Once fully dry, lightly sand the rings with fine-grit sandpaper, focusing on seams and edges.
Step 9: Paint with Gold
Apply two thin coats of metallic gold acrylic paint (affiliate), allowing each coat to dry completely. Visible brush strokes add warmth and a handmade feel.
Step 10: Seal the Finish
Seal with satin varnish to protect the paint and give the rings a soft, cast-metal glow.
Step 11: Style the Table
Slide the rings onto linen napkins and pair with neutral tableware, candles, or greenery for an elevated table setting.
Project 12: Floral Clay Magnets

This project is proof that the smallest pieces can bring the most joy. Floral clay magnets are cheerful, lightweight, and endlessly customizable perfect for using up leftover clay while creating something bright and practical. They’re quick to make, easy to personalize, and ideal for gifting or adding a handmade touch to your kitchen or workspace.
Despite their simplicity, these little flowers teach precision: shaping small forms, layering elements, and finishing neatly. They’re a lovely contrast to the more sculptural projects you’ve already made.
Step-by-Step Tutorial: Floral Clay Magnets
Step 1: Shape the Base
Roll a small ball of clay and flatten it slightly to form a round or soft flower-shaped base, about 1½–2 inches wide.
Step 2: Create the Petals
Roll several tiny balls of clay, then flatten each into a teardrop shape. Arrange them in a circle, slightly overlapping, to form petals.
Step 3: Add the Flower Center
Roll one smaller ball of clay and place it in the center. Press gently so it adheres without flattening too much.
Step 4: Refine and Smooth
Use a damp fingertip or small brush to smooth seams between petals and remove cracks. Keep details soft and rounded.
Step 5: Dry Completely
Let the flowers dry on a flat surface for 24–48 hours, flipping them halfway through so both sides dry evenly.
Step 6: Sand the Edges
Once dry, lightly sand the edges and back of each flower with fine-grit sandpaper to ensure a clean finish.
Step 7: Paint the Flowers
Paint using acrylics soft pastels for a gentle look or bold brights for a cheerful pop. Apply thin layers and let dry fully.
Step 8: Seal the Surface
Seal with matte or satin varnish to protect the paint and add durability.
Step 9: Attach the Magnets
Use a strong adhesive to glue a small magnet to the back of each flower. Let cure according to glue instructions.
Step 10: Style and Display
Arrange your finished magnets on a fridge or magnetic board clustered or spaced out like a little garden.
Project 13: The Minimalist Desk Organizer
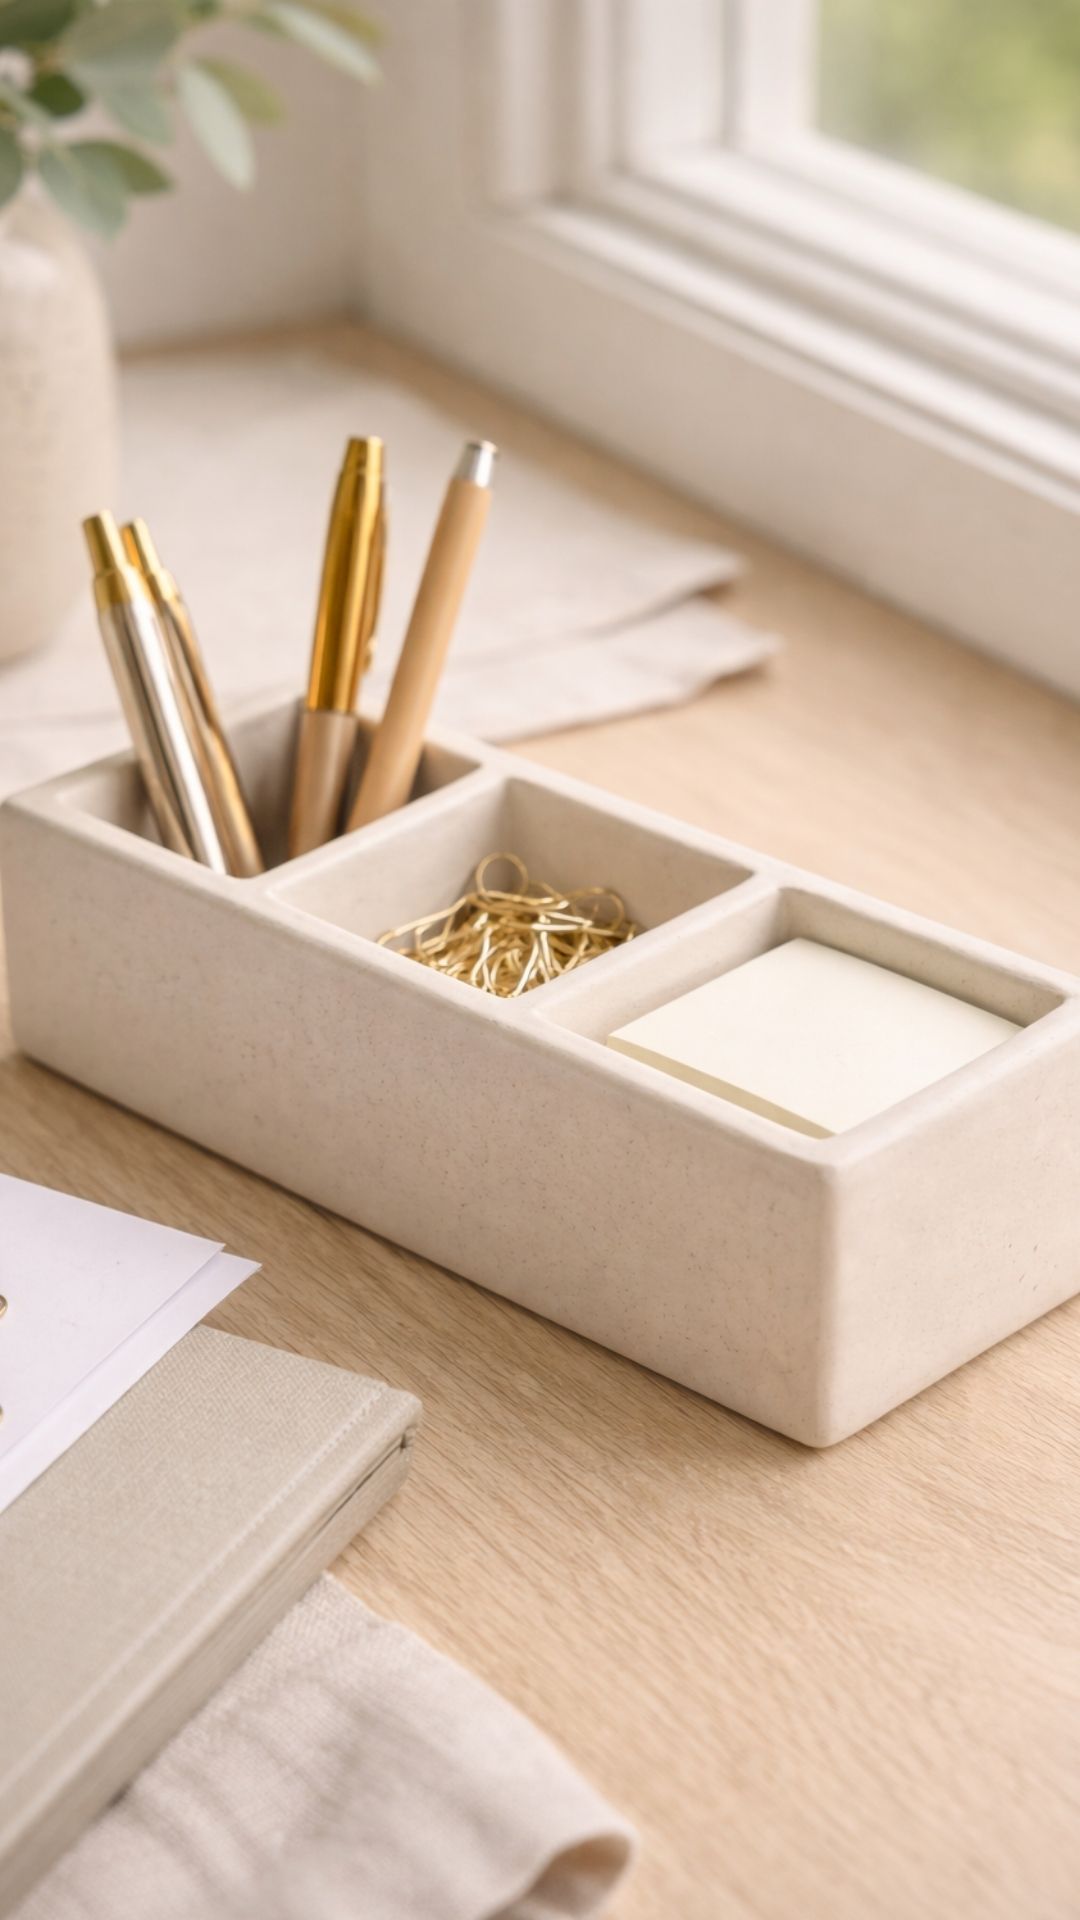
This final project brings everything together. The minimalist desk organizer (affiliate) is clean, functional, and intentionally simple proof that air-dry clay can look truly architectural. It’s less about decoration and more about form, proportion, and finish. When it’s done, it feels like something you’d find in a design studio, not a craft drawer.
This piece asks you to slow down and work thoughtfully. Straight edges, clean joins, and patient drying are key and the result is a practical object you’ll use every single day.
Step-by-Step Tutorial: The Minimalist Desk Organizer
Step 1: Plan the Layout
Before touching the clay, sketch a simple layout. Decide how many compartments you want one long section for pens, one medium for notes or cards, and a small one for clips or pins.
Step 2: Roll the Base
Roll a thick slab of air-dry clay about ½ inch thick. Trim it into a clean rectangle using a ruler and craft knife. This will be the foundation, so keep edges straight and even.
Step 3: Create the Walls
Roll another slab about ¼ inch thick. Cut long strips to form the outer walls of your organizer. Match the length carefully to the base edges.
Step 4: Attach the Outer Walls
Score and slip the edges of the base and wall strips. Press the walls into place one at a time, smoothing the seams inside and out with a damp sponge.
Step 5: Add Interior Dividers
Cut thinner strips of clay to create internal compartments. Attach them using the same score-and-slip method, checking spacing as you go.
Step 6: Refine the Shape
Use a damp sponge or fingertip to smooth all edges and corners. Keep lines soft but intentional this is where the piece starts to look professional.
Step 7: Dry Slowly
Let the organizer dry for 48 hours, flipping it carefully after the first day so the base dries evenly. Keep it away from direct heat.
Step 8: Sand for Precision
Once fully dry, lightly sand all surfaces and edges with fine-grit sandpaper. Focus on corners and joins to achieve a seamless look.
Step 9: Finish the Surface
Leave the clay natural for a stone-like look, or paint in ivory, warm gray, or soft taupe. Apply thin coats and let dry fully.
Step 10: Seal and Cure
Seal with matte or satin varnish to protect the surface and give it a smooth, refined finish.
Step 11: Style and Use
Fill your organizer with pens, clips, and notes. Place it on your desk and enjoy the quiet satisfaction of a functional piece you made yourself.
Project 14: The Classic Air-Dry Clay Trinket Dish

This is where everything begins the project that gently introduces you to working with air-dry clay while delivering a finished piece that feels genuinely special. The classic trinket dish is simple in form, but incredibly satisfying to make. It teaches you the essentials: rolling an even slab, shaping with intention, smoothing surfaces, and adding subtle decorative details that elevate the final result.
What makes this project such a perfect starting point is its flexibility. You can keep it minimal and organic, or layer in texture, soft color washes, and delicate dotting to create a look that mimics glazed ceramic. Either way, the result is a small, useful object that earns its place on a bedside table, dresser, or desk.
This is the kind of project that builds confidence fast. You’ll finish it and think, “Oh… I can actually do this.” And once you’ve made one, you’ll want to make three more.
Step-by-Step Tutorial: Classic Air-Dry Clay Trinket Dish
Step 1: Roll and Shape the Base
Roll your air-dry clay on a non-stick surface to about ¼ inch thick, keeping the thickness even. Use a bowl or lid to cut a clean circle. Gently lift the clay and place it over an upside-down bowl covered in plastic wrap. Press lightly so the clay curves naturally without stretching.
Step 2: Let It Set and Hold Its Shape
Allow the clay to rest on the bowl for 6–12 hours, just until it becomes firm enough to hold its shape. Carefully remove it from the mold and place it on a flat surface to dry completely for 24–48 hours.
Step 3: Smooth and Refine
Once fully dry, lightly sand the rim and surface using fine-grit sandpaper. Focus on softening edges and removing any fingerprints. Wipe away dust with a slightly damp cloth and let dry.
Step 4: Add Etched Details
When the clay is leather-hard (or very gently on a dry piece), use a toothpick or skewer to carve shallow geometric lines, dots, or simple patterns around the rim. Keep it subtle these details will shine once painted.
Step 5: Paint the Base Layer
Apply a thin coat of white or cream acrylic paint over the entire dish. This brightens the clay and creates a soft base for layered color. Let it dry completely.
Step 6: Create the Soft Glaze Effect
Mix light green, gray, and white acrylic paint to create a muted sage or seafoam tone. Thin slightly with water. Brush it on in light layers, allowing some of the white base to show through for a ceramic-style finish.
Step 7: Highlight the Texture
Use a diluted beige or ivory paint and brush lightly over etched areas. Wipe away excess so the color settles into the grooves, giving depth and contrast.
Step 8: Add Dotted Details
Using the rounded end of a paintbrush or stylus dipped in white paint, add evenly spaced dots around the rim. Light pencil marks can help with spacing and are easily erased later.
Step 9: Optional Soft Shimmer
For a subtle glow, mix a tiny amount of pearlescent paint with satin varnish. Lightly brush from the center outward, fading naturally. This step adds depth without overpowering the design.
Step 10: Seal the Finish
Once fully dry, apply two thin coats of satin varnish, allowing each coat to dry before the next. This protects the surface and enhances the ceramic-like sheen.
Step 11: Style and Enjoy
Place your trinket dish on a bedside table or dresser and fill it with rings or small keepsakes. This first finished piece marks the beginning of your clay journey and it won’t be your last.
Project 15: The Cactus Ring Holder

This project brings a touch of playfulness into the mix without losing that calm, elevated feel. The cactus ring holder is small, sculptural, and surprisingly practical. It’s a perfect introduction to building forms in the round and attaching multiple pieces together, all while creating something you’ll actually use every day.
Despite its charm, this project teaches important skills: shaping smooth cylinders, attaching elements securely, and adding fine surface texture. It’s approachable, forgiving, and incredibly satisfying to finish.
Step-by-Step Tutorial: Air-Dry Clay Cactus Ring Holder
Step 1: Create the Base
Roll out a slab of clay about ¼ inch thick. Cut a neat circle using a lid or glass. Smooth the edges and set aside this will anchor your piece.
Step 2: Shape the Main Cactus
Form a thick cylinder about 3–4 inches tall, tapering slightly at the top. Roll gently to keep the surface smooth.
Step 3: Make the Arms
Roll two smaller coils and curve them upward to create cactus arms. Trim one end of each arm at a slight angle so they sit flush against the main body.
Step 4: Score and Slip the Arms
Score the attachment points on both the arms and the main cactus. Apply slip and press firmly together. Blend seams with a damp fingertip.
Step 5: Attach the Cactus to the Base
Score and slip the bottom of the cactus and the center of the base. Press together securely and smooth the join. Add a thin coil around the base if extra support is needed.
Step 6: Add Texture
Use a toothpick or skewer to carve vertical lines down the cactus body and arms. Add tiny dotted clusters between lines for a realistic yet stylized look.
Step 7: Dry Slowly
Let the piece dry for 48 hours, flipping carefully after the first day. Avoid heat or direct sunlight.
Step 8: Sand and Smooth
Once fully dry, lightly sand any rough areas while preserving the carved texture. Remove dust with a soft brush.
Step 9: Paint the Cactus
Paint with muted sage green acrylic paint in thin layers. Paint the base in ivory, sand, or blush for contrast. Let each coat dry fully.
Step 10: Seal the Finish
Apply a coat of matte or satin varnish to protect the surface and enhance the ceramic look.
Step 11: Style and Use
Slip rings onto the arms and place the piece on a dresser or tray. It’s playful, practical, and unmistakably handmade.
Project 16. DIY Clay Diffuser Stones
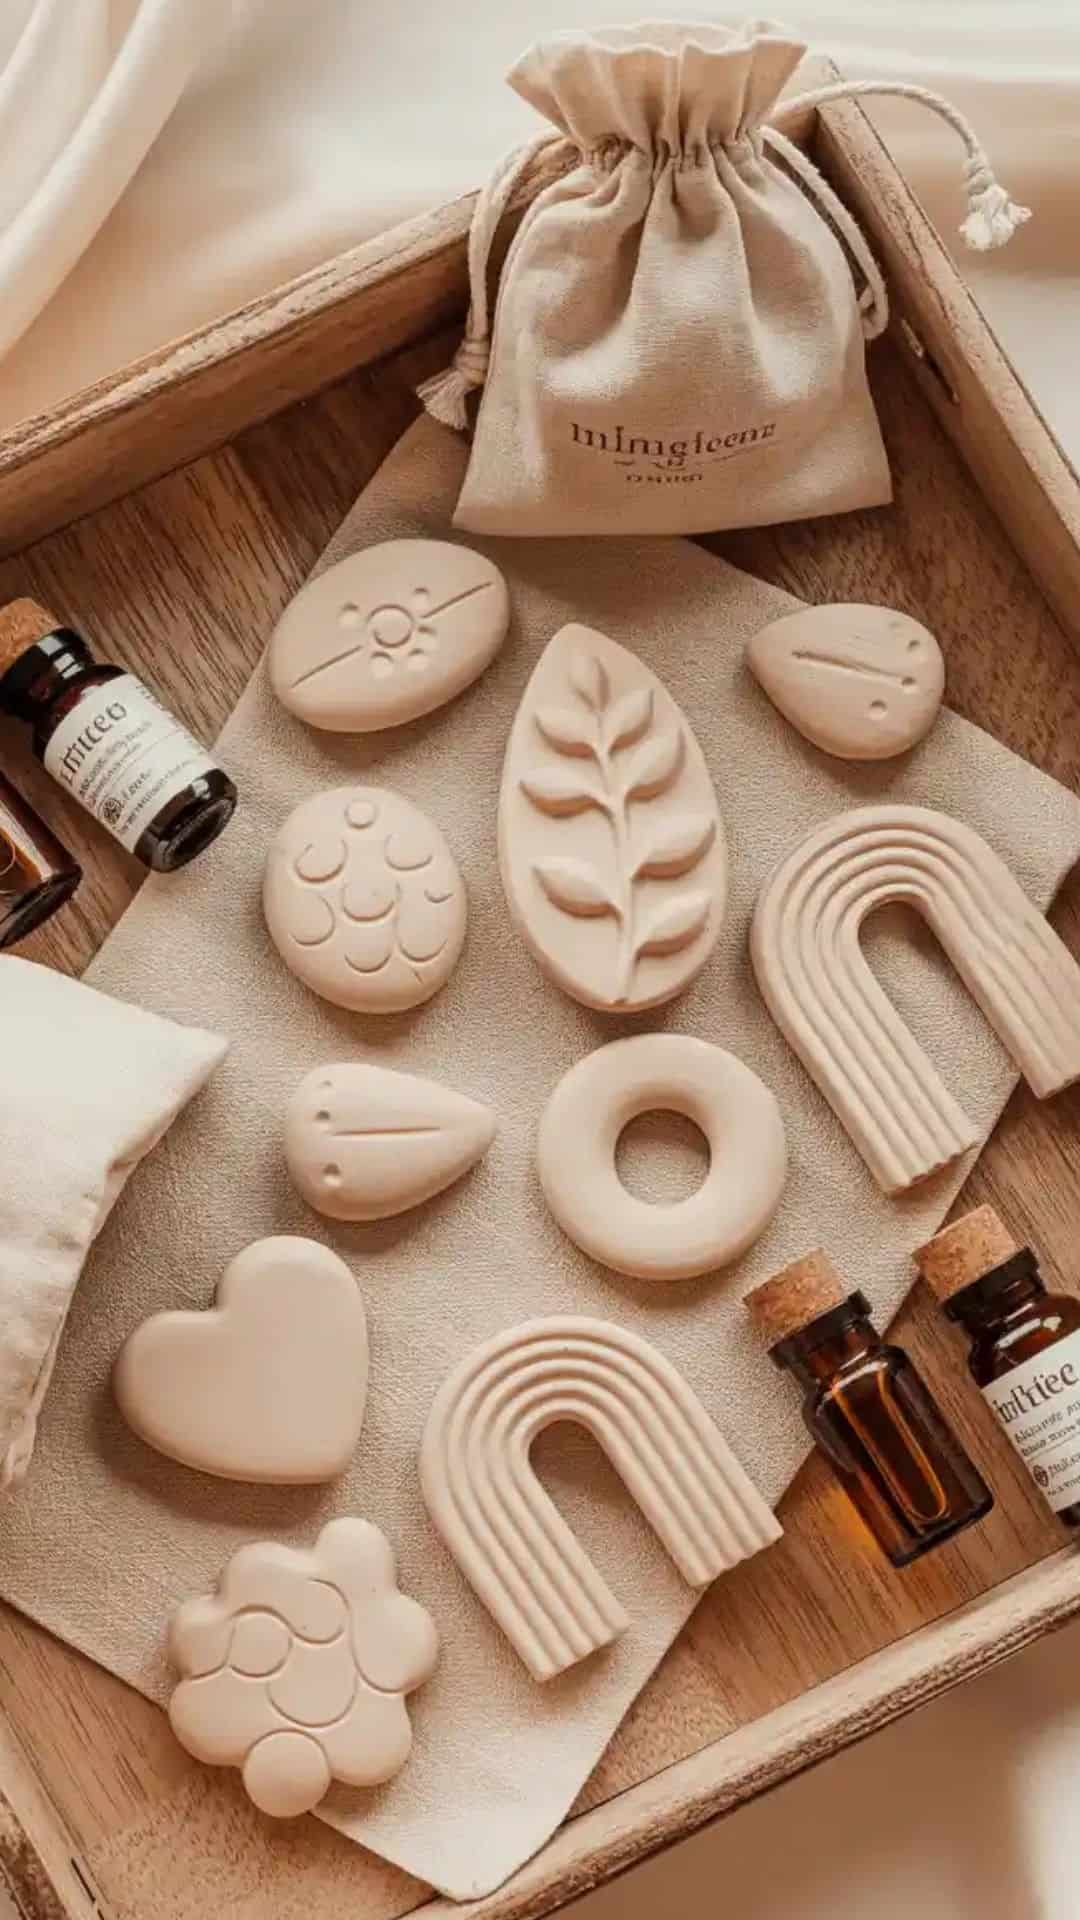
DIY clay diffuser stones are small, porous clay pieces designed to absorb essential oils and gently release fragrance over time. They sell exceptionally well because they combine home fragrance, decor, and wellness three categories shoppers already love. Unlike candles or plug-in diffusers, these require no heat or electricity, making them an attractive option for gift buyers, renters, parents, and pet owners.
Use this step-by-step DIY clay diffuser stones!