How to Create Beautiful Pressed Flower Art: A Complete Guide
Pressed flower art transforms nature’s fleeting beauty into lasting keepsakes. This timeless craft preserves delicate blooms and foliage in stunning displays that bring a touch of nature indoors. Whether you’re a seasoned crafter or complete beginner, this guide will walk you through creating your own pressed flower masterpieces with simple techniques and materials.
From selecting the perfect blooms to arranging and preserving your finished pieces, you’ll discover how easy it is to capture nature’s ephemeral beauty in artwork that can last for years. Let’s explore this rewarding hobby that connects us to nature while creating something truly unique.
This website contains affiliate links. As an Amazon Associate, I earn from qualifying purchases. Please read our disclaimer.
Essential Materials for Pressed Flower Art
Before starting your pressed flower art project, gather these essential supplies. Most items you likely already have at home, making this an accessible and affordable craft.
For Collecting and Pressing Flowers
- Fresh flowers and foliage (from your garden or purchased)
- Scissors or garden shears for harvesting
- Flower press OR heavy books
- Absorbent paper (blotting paper, parchment paper, or coffee filters)
- Cardboard sheets (if using books for pressing)
For Creating Your Artwork
- Tweezers for handling delicate pressed flowers
- White craft glue, PVA glue, or Mod Podge
- Small paintbrush for applying adhesive
- Cardstock, watercolor paper, or other acid-free paper
- Picture frames with glass (preferably with mat board)
- Optional: decorative paper, labels, or herbarium cards
Ready to Start Your Pressed Flower Journey?
A quality flower press makes preserving blooms easier and more effective. This wooden press includes everything you need to get started.
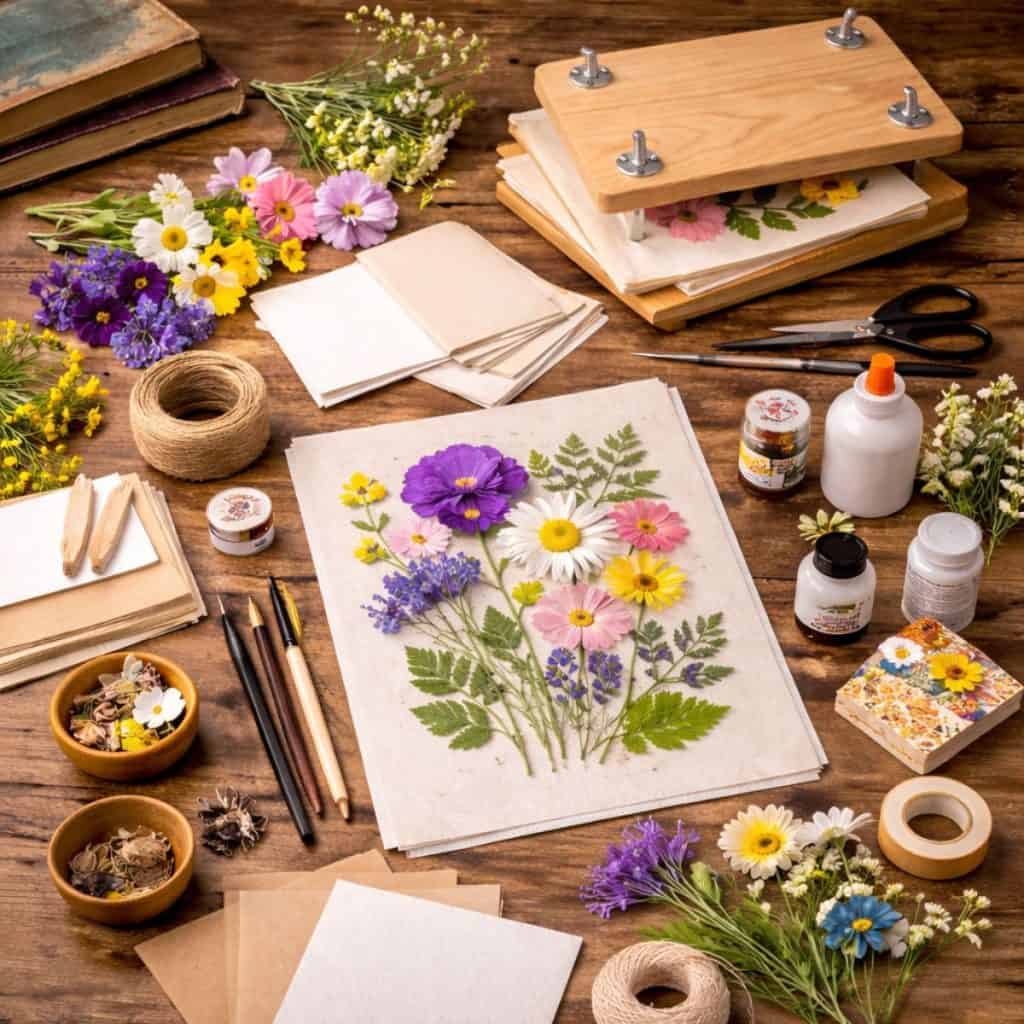
Step 1: Selecting and Preparing Flowers
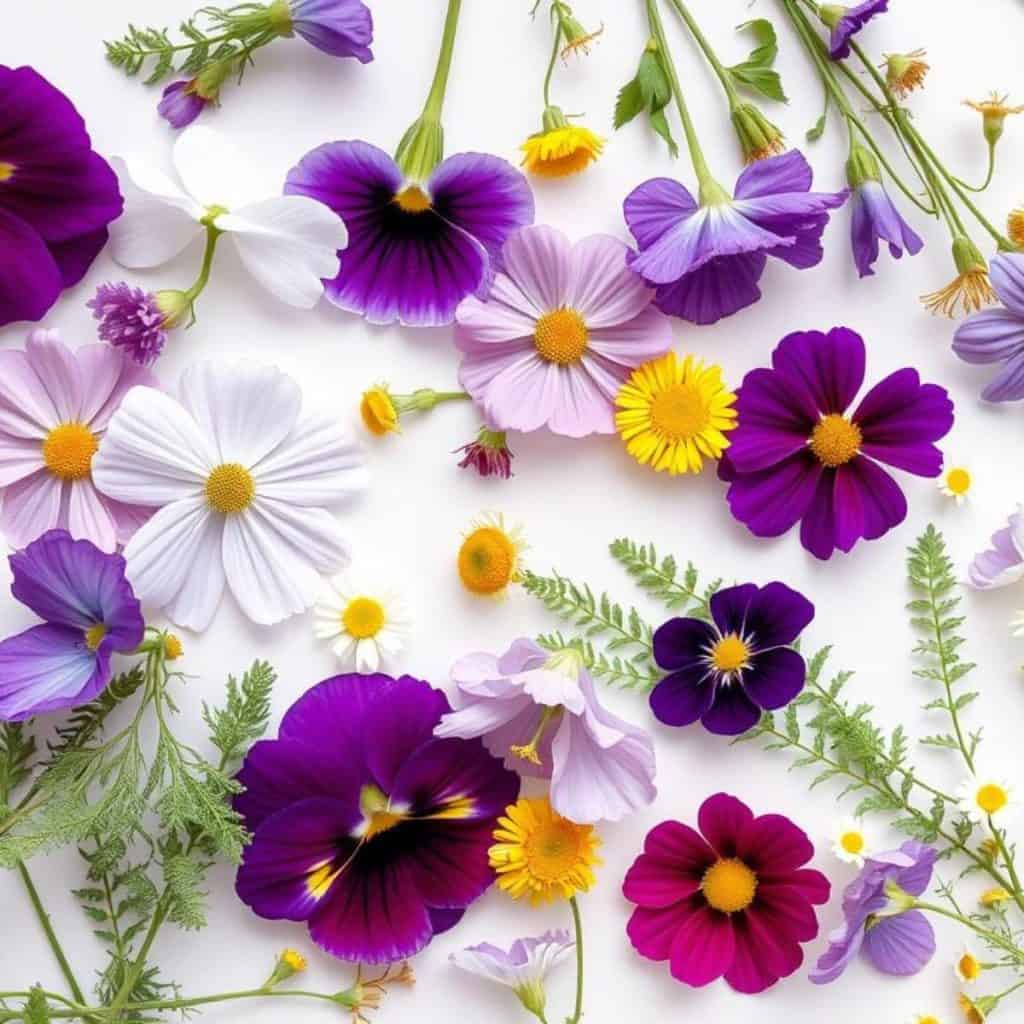
image – various types of flowers suitable for pressing, including pansies, daisies, and ferns
The first step in creating beautiful pressed flower art is selecting the right blooms. Not all flowers press equally well, so choosing the right varieties will significantly impact your results.
Best Flowers for Pressing
Flowers with naturally flat faces and thin petals typically press best. These include:
- Pansies and violas
- Daisies and cosmos
- Queen Anne’s lace
- Larkspur and delphinium
- Forget-me-nots
- Ferns and small leaves
- Baby’s breath
- Hydrangea florets
- Lavender sprigs
- Small wildflowers
When to Collect Flowers
Timing is crucial for successful flower pressing. For best results:
- Collect flowers in the morning after the dew has dried but before the heat of the day
- Choose flowers that are freshly opened, not fully mature or beginning to wilt
- Select blooms free from blemishes, insect damage, or disease
- Avoid picking flowers after rain when they contain excess moisture
Preparing Flowers for Pressing
Proper preparation ensures the best pressing results:
- Gently brush off any dirt or insects from petals and stems
- For thicker flowers like roses, consider cutting them in half vertically to reduce bulk
- Remove excess foliage from stems unless you want to include it in your design
- Arrange flowers face-down to preserve their natural shape during pressing
- Separate very moist flowers with extra absorbent paper to prevent molding
Step 2: Pressing Methods and Techniques
There are several effective methods for pressing flowers, each with its own advantages. Choose the technique that works best for your timeline and available materials.
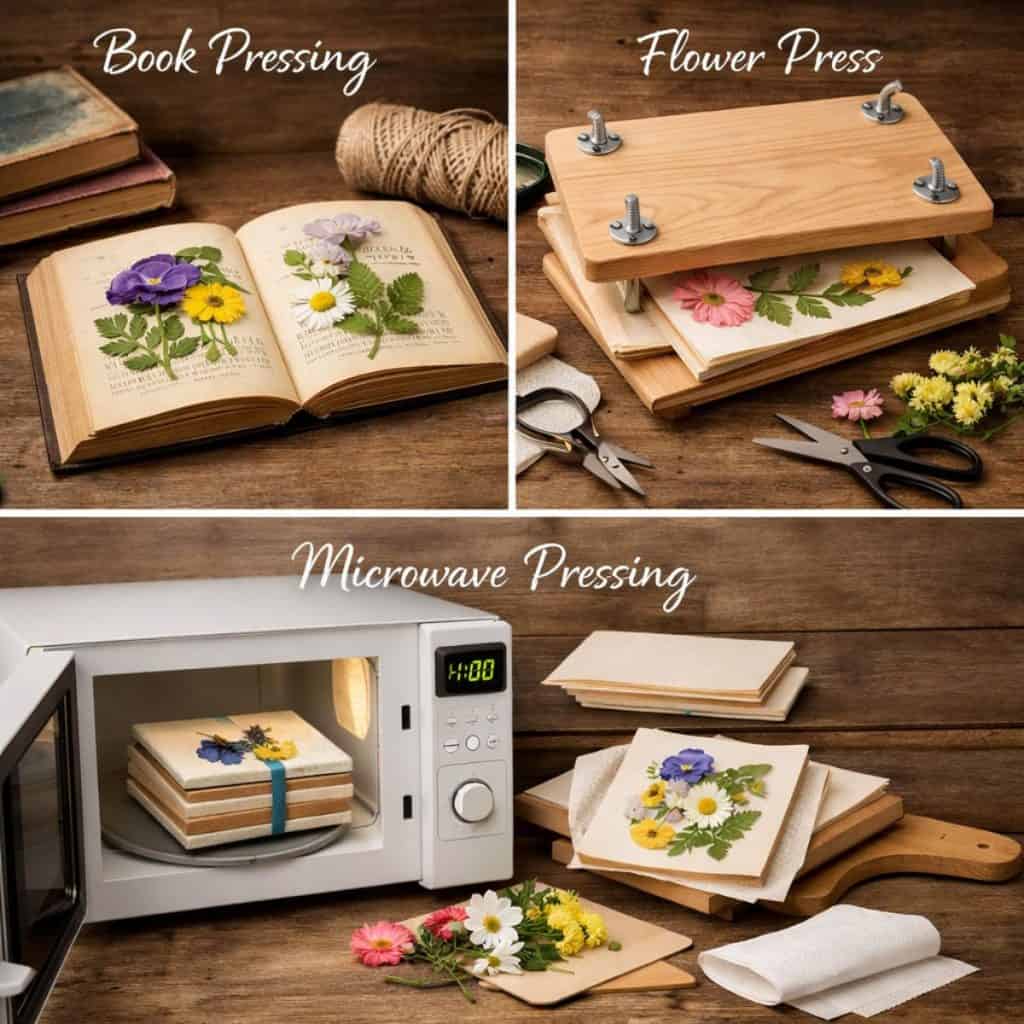
Traditional Book Pressing Method
The simplest method using materials you likely already have at home:
- Open a heavy book and place a sheet of absorbent paper on the page
- Arrange flowers face down, ensuring petals are flat and in desired position
- Cover with another sheet of absorbent paper
- Close the book carefully and place additional heavy books on top
- Leave undisturbed for 2-4 weeks in a dry location
Wooden Flower Press Method
A dedicated flower press provides more consistent pressure and better results:
- Open the press and place a sheet of cardboard on the bottom board
- Add a sheet of absorbent paper on top of the cardboard
- Arrange flowers with space between each bloom
- Cover with another sheet of absorbent paper and cardboard
- Continue layering for multiple flowers (cardboard, paper, flowers, paper, cardboard)
- Close the press and tighten the screws or straps evenly
- Leave for 2-3 weeks, checking occasionally
Microwave Pressing Method (Quick Results)
For those who need pressed flowers quickly:
- Place flowers between two sheets of absorbent paper
- Sandwich between two microwave-safe ceramic tiles or special microwave press
- Microwave on low power (30%) for 30-60 seconds
- Check and repeat in 30-second intervals until flowers are dry but not brittle
- Allow to cool completely before handling
Caution: Never leave the microwave unattended during this process. Some flowers may scorch or burn if microwaved too long. This method may cause more color loss than traditional pressing.
Need Pressing Supplies?
Get professional results with quality pressing materials. Absorbent blotting paper ensures your flowers dry properly without mold or discoloration.
Step 3: Drying Time and Proper Storage
Patience is key to successful flower pressing. Rushing the process can lead to mold or incomplete drying that ruins your specimens.
How Long to Press Flowers
Drying times vary based on several factors:
- Flower thickness: Thin flowers like pansies may dry in 1-2 weeks, while thicker flowers like roses can take 3-4 weeks
- Humidity levels: Drying takes longer in humid environments
- Pressing method: Microwave pressing takes minutes, while traditional methods take weeks
- Moisture content: Succulent or watery flowers require more drying time
Checking for Completeness
To determine if your flowers are completely pressed and dried:
- Flowers should feel papery and completely dry to the touch
- No moisture should be visible on the absorbent paper
- Petals should be flat with no raised areas
- Colors will be slightly faded but should still be visible
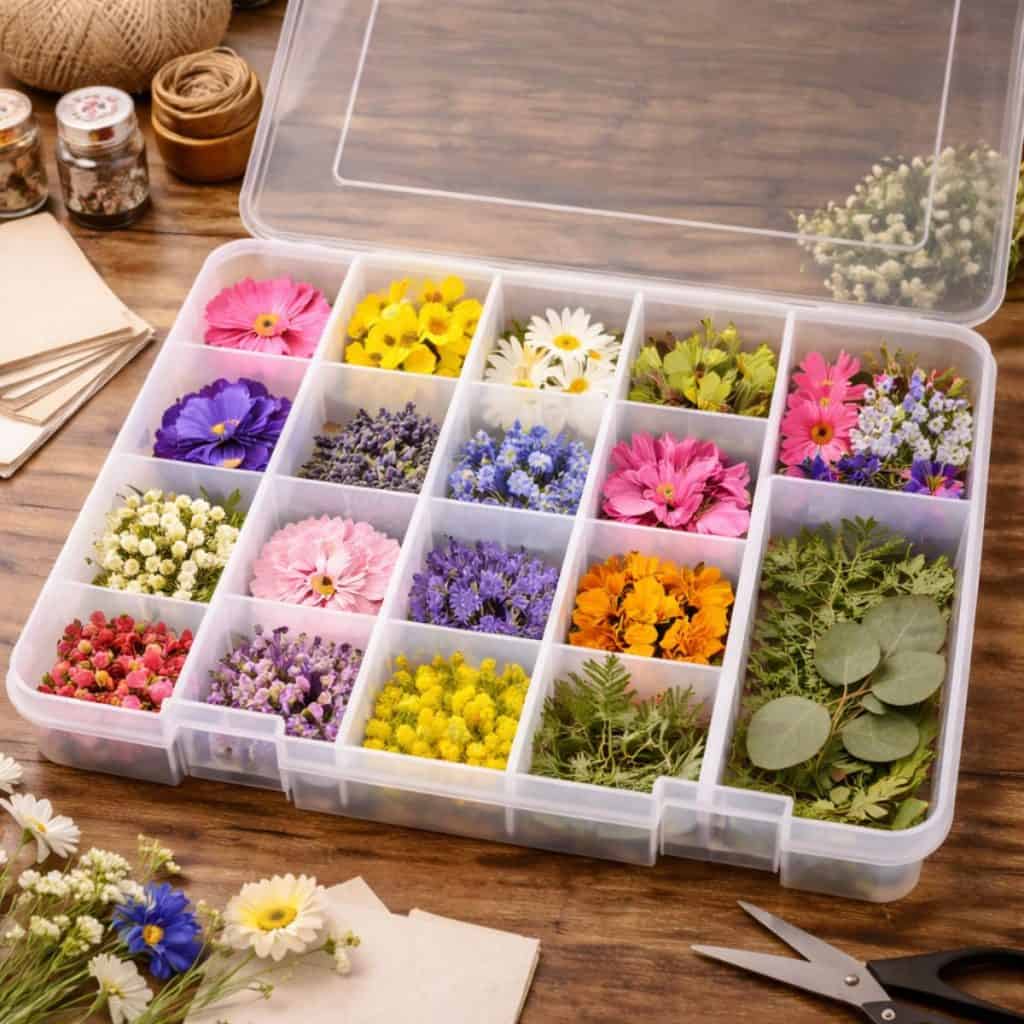
Storing Pressed Flowers
Proper storage preserves your pressed flowers until you’re ready to use them:
- Store in acid-free paper envelopes or between sheets of acid-free tissue paper
- Organize by color, size, or flower type in a divided container
- Keep in a cool, dry place away from direct sunlight
- Add silica gel packets to storage containers in humid environments
- Handle minimally and use tweezers when necessary to prevent oils from your fingers damaging the delicate petals
Step 4: Designing Your Pressed Flower Artwork
Now comes the creative part designing your pressed flower artwork. This is where you can let your artistic vision shine through various arrangements and compositions.
Planning Your Design
Before gluing anything down, experiment with different layouts:
- Choose a background color that complements your flowers (white, cream, navy, or black work well)
- Decide on a composition style: symmetrical, random, botanical specimen, or bouquet-inspired
- Consider the frame size and shape when planning your design
- Take a photo of your arrangement before gluing to reference your design
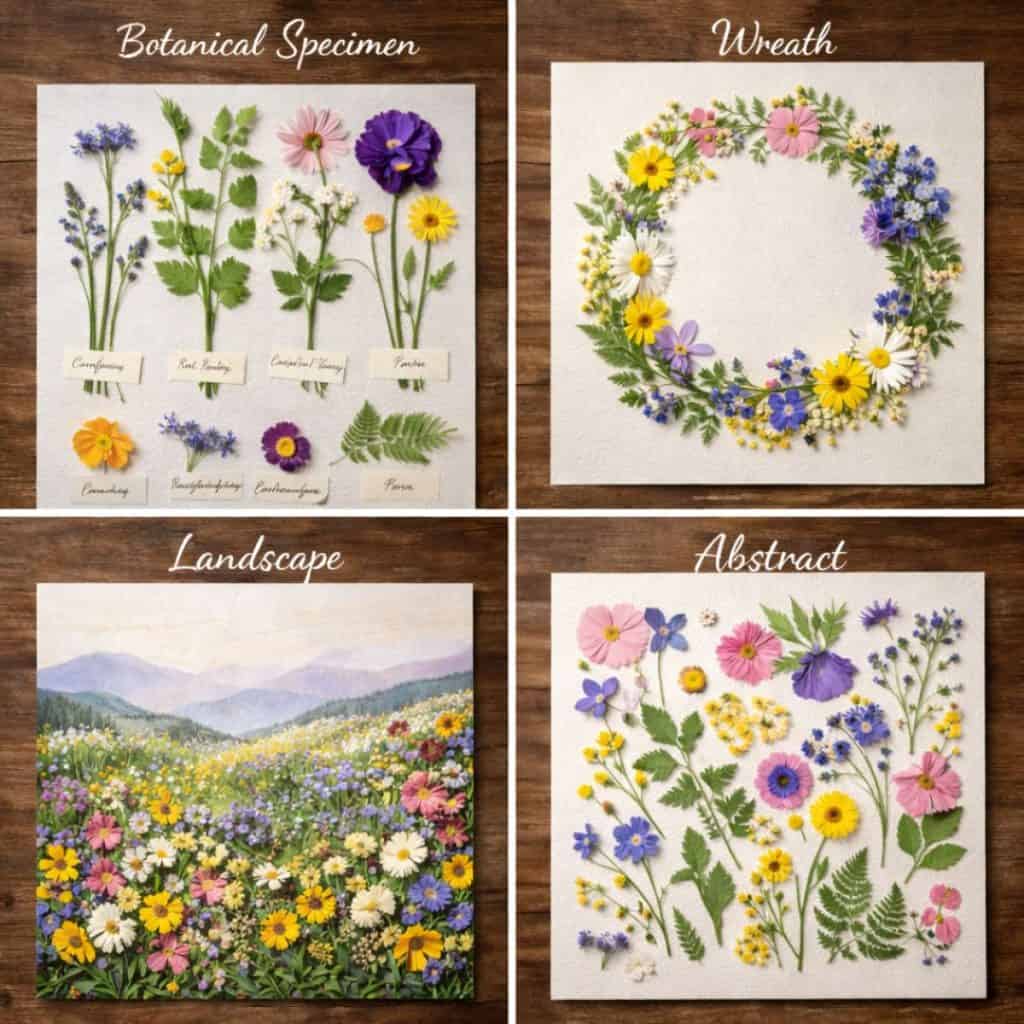
Composition Ideas
Botanical Specimen Style
Arrange flowers in an organized, scientific manner with labels for a vintage herbarium look.
Wreath or Circle Design
Create a circular arrangement of flowers and leaves for an elegant, balanced composition.
Landscape Scene
Use flowers and foliage to create a nature scene with foreground and background elements.
Abstract Pattern
Arrange flowers in geometric patterns or free-form designs for a modern look.
Design Tips for Beginners
- Start with a focal point using larger or more colorful flowers
- Create visual interest by varying flower sizes, colors, and textures
- Use negative space effectively not every area needs to be filled
- Consider the natural flow of stems and leaves to guide the viewer’s eye
- Layer elements with smaller flowers or petals on top of larger ones
- Try both the front and back sides of flowers sometimes the underside has interesting textures and colors
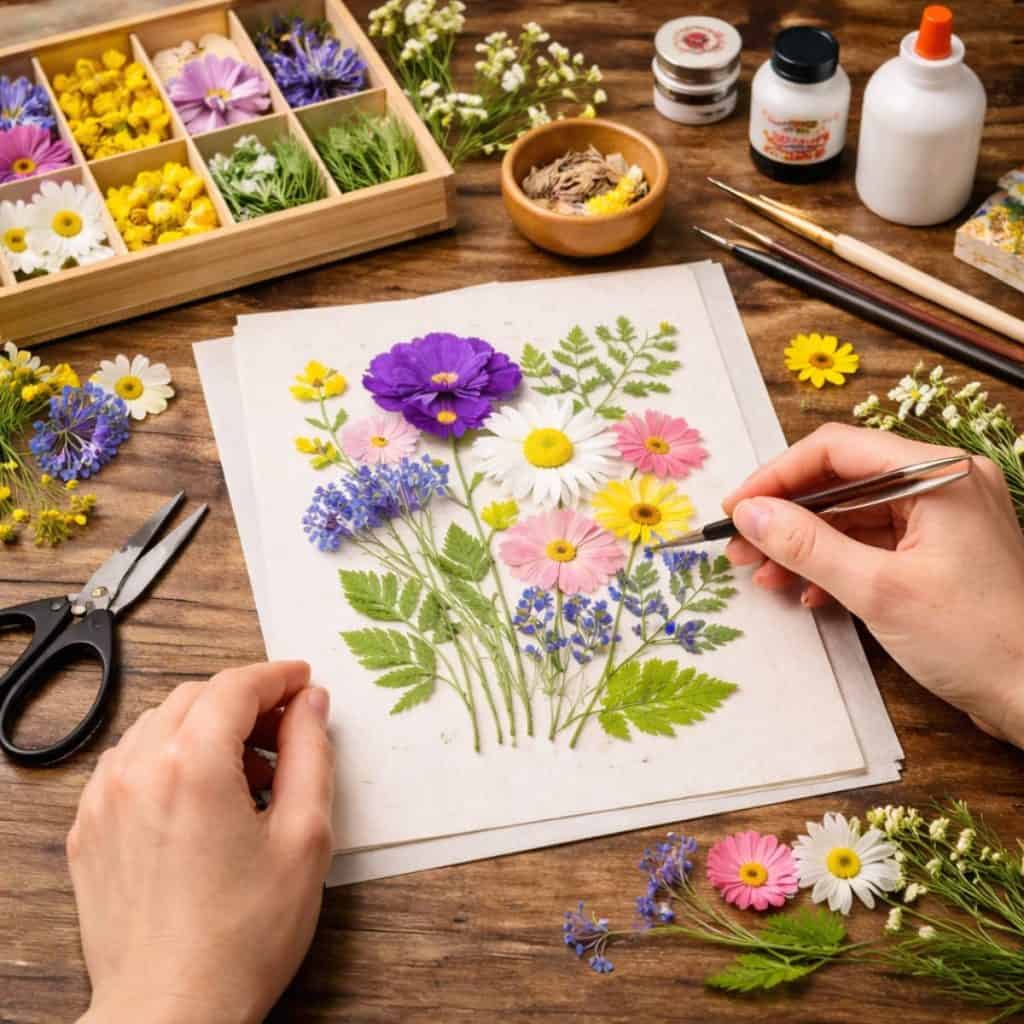
Step 5: Mounting and Preserving Your Artwork
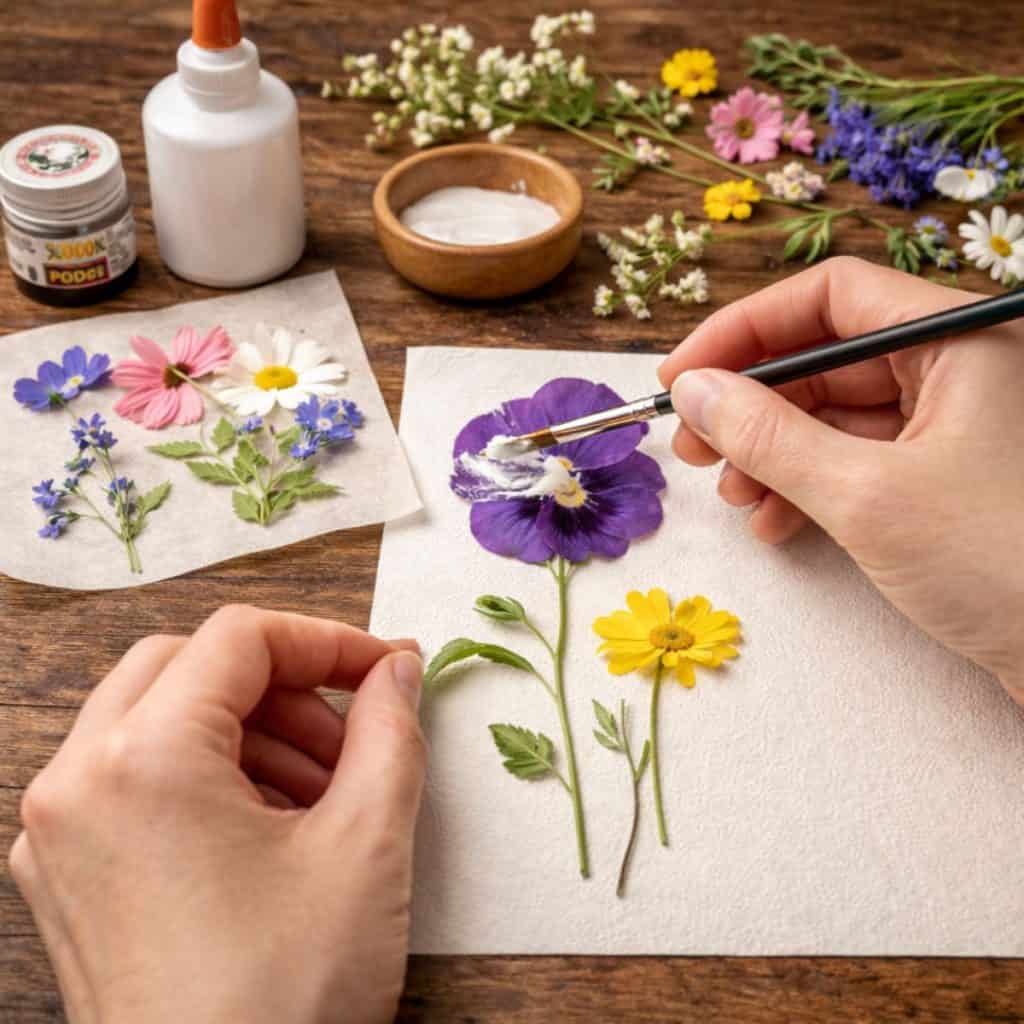
Once you’ve finalized your design, it’s time to permanently mount your pressed flowers. This step requires patience and a gentle touch to preserve the delicate specimens.
Choosing the Right Adhesive
The proper adhesive makes a significant difference in the longevity of your artwork:
- PVA glue (white craft glue) diluted with a small amount of water works well for most projects
- Acid-free glue is essential for archival-quality artwork
- Mod Podge can be used both as an adhesive and a protective coating
- Avoid spray adhesives as they can be too strong and damage delicate petals
Mounting Process
- Place your background paper on a clean, flat surface
- Arrange your pressed flowers according to your design plan
- Using tweezers, carefully lift one flower at a time
- Apply a small amount of diluted glue to the back using a fine paintbrush
- Gently place the flower back in position on your background
- Use the paintbrush tip to carefully adjust petals if needed
- Continue until all elements are glued in place
- Allow to dry completely (at least 24 hours) before framing
Preserving Your Artwork
To ensure your pressed flower art lasts for years:
- Frame under glass to protect from dust and moisture
- Use acid-free mat board to prevent discoloration
- Consider UV-protective glass if displaying in sunny areas
- Keep framed artwork away from direct sunlight and high humidity
- For unframed pieces, apply a final coat of diluted PVA glue or Mod Podge as a sealant
Protect Your Pressed Flower Creations
Quality frames with UV-protective glass help preserve your pressed flower art for years to come.
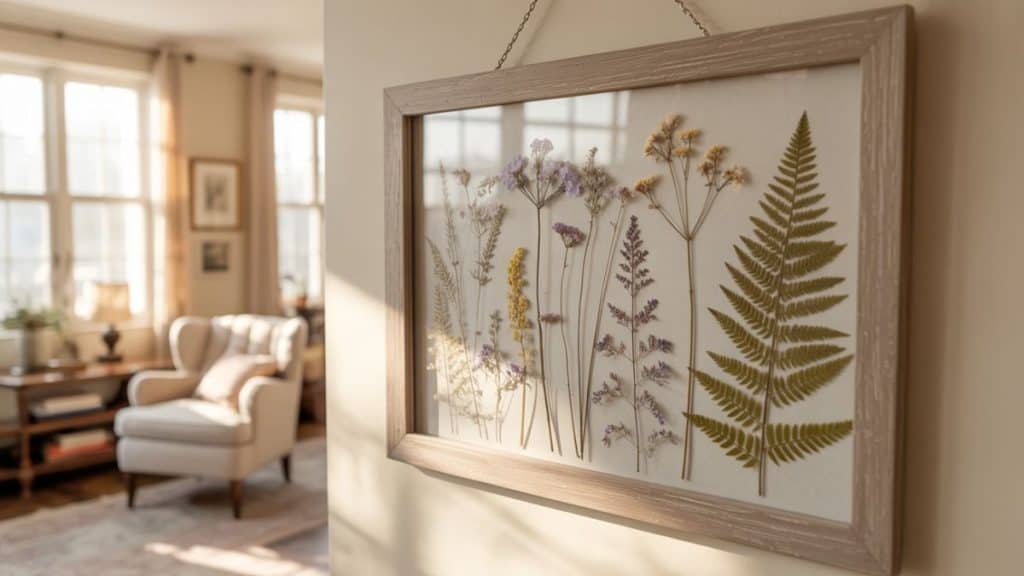
Step 6: Framing and Display Options
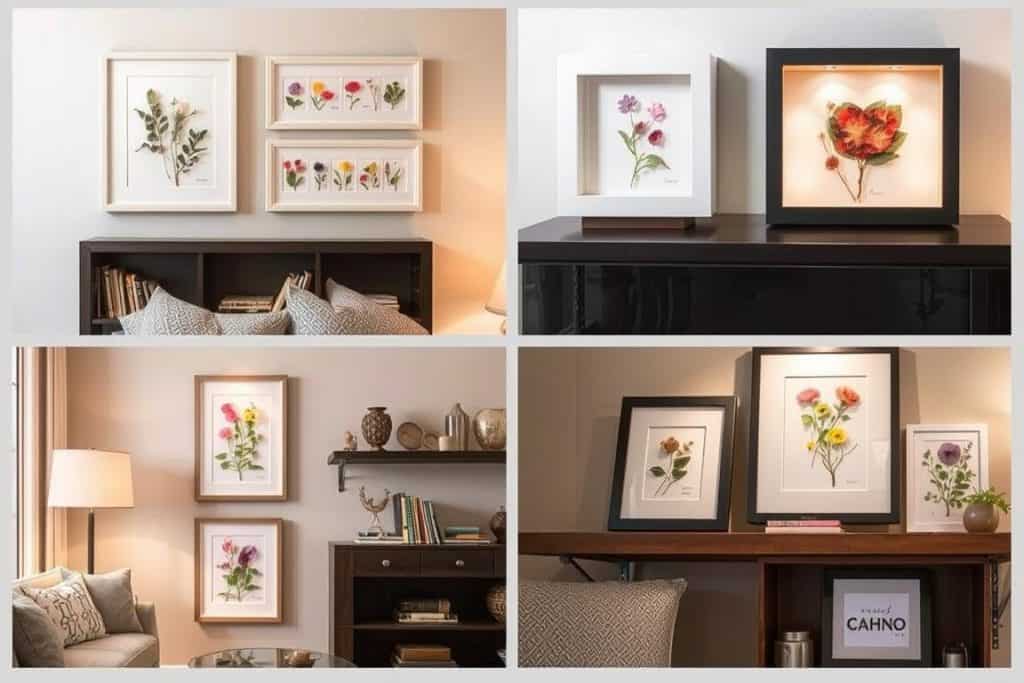
The right framing and display choices enhance your pressed flower art and protect it from damage. Here are the best options for showcasing your botanical creations.
Framing Considerations
- Choose frames with sufficient depth to accommodate pressed flowers without crushing them
- Use spacers between the glass and artwork if flowers are not completely flat
- Consider double-matting to add dimension and increase visual impact
- Select frame colors that complement rather than compete with your flowers
- For a floating effect, sandwich pressed flowers between two glass panes
Display Options
Traditional Frames
Classic frames with glass and backing work well for most pressed flower art. Choose acid-free matting to prevent discoloration over time.
Shadow Boxes
Ideal for thicker specimens or three-dimensional arrangements, shadow boxes provide depth and protection for more elaborate designs.
Floating Frames
These frameless designs sandwich artwork between two glass panes, creating a modern, minimalist look that allows light to pass through the flowers.
Glass Ornaments
Small pressed flowers can be displayed in glass ornaments, pendants, or sun catchers for a different decorative approach.
Display Placement Tips
- Avoid hanging pressed flower art in direct sunlight, which can cause fading
- Keep away from high humidity areas like bathrooms, which can promote mold growth
- Consider grouping multiple pressed flower pieces for greater visual impact
- Rotate artwork seasonally to prevent prolonged light exposure
- Use proper hanging hardware rated for the weight of your framed piece
Troubleshooting Common Issues
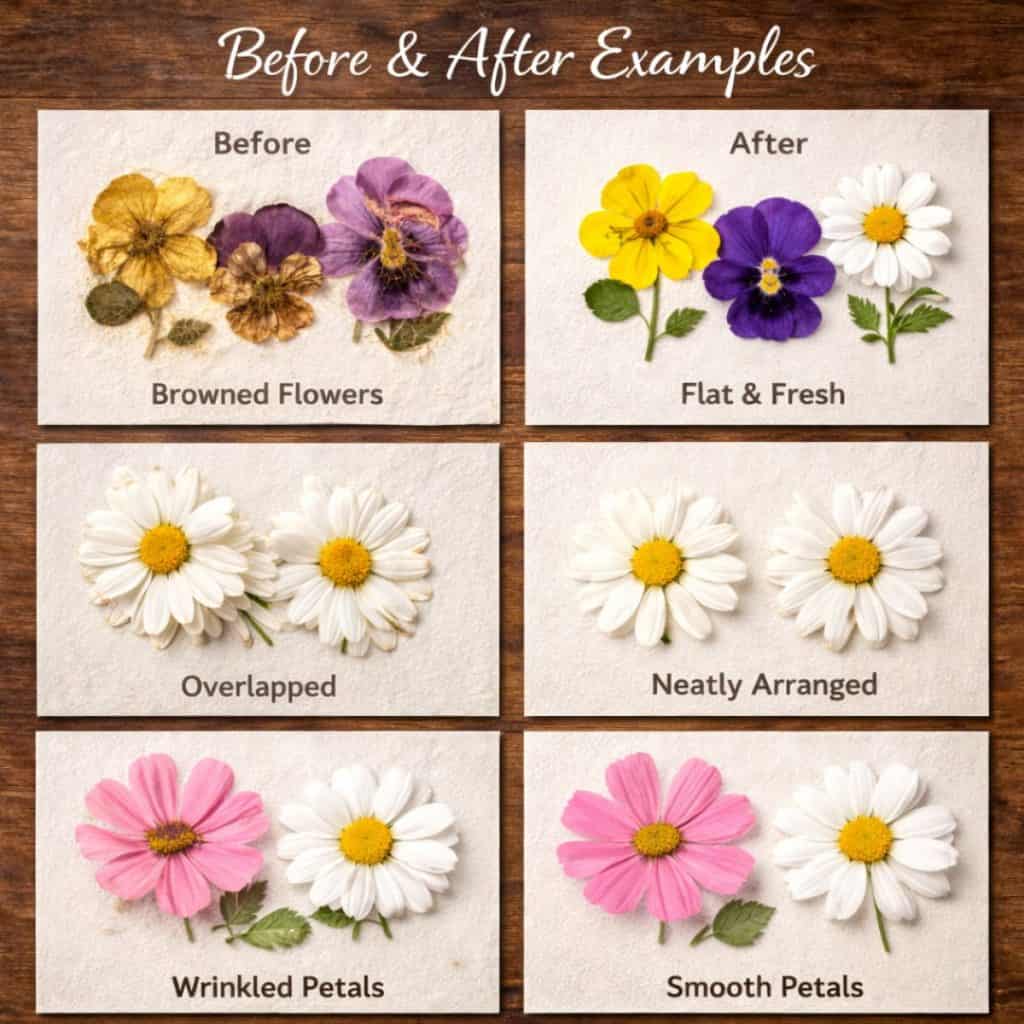
Even experienced crafters encounter challenges with pressed flower art. Here are solutions to common problems you might face.
Mold or Discoloration
Problem: Flowers develop mold spots or turn brown during pressing.
Solution: Ensure flowers are completely dry before pressing. Change the absorbent paper every few days during the first week of pressing. Press in a dry environment and consider using silica gel packets near your press.
Color Fading
Problem: Flowers lose their vibrant colors after pressing.
Solution: Some color loss is normal, but minimize it by pressing flowers quickly after picking. Certain flowers hold color better than others blues and purples often fade more than yellows and reds. Press away from direct sunlight.
Broken or Crumbling Petals
Problem: Dried flowers (affiliate) break when handled.
Solution: Use tweezers for handling. If flowers are too brittle, they may have been over-dried. Work in a humidity-controlled environment and consider applying a very light coat of diluted PVA glue as a strengthening agent.
Flowers Sticking to Paper
Problem: Pressed flowers stick to the absorbent paper and tear when removed.
Solution: Use non-stick papers like parchment paper or wax paper as the layer touching the flowers. Remove pressed flowers very slowly and carefully, using tweezers to gently lift from one edge.
Creative Project Ideas for Pressed Flowers
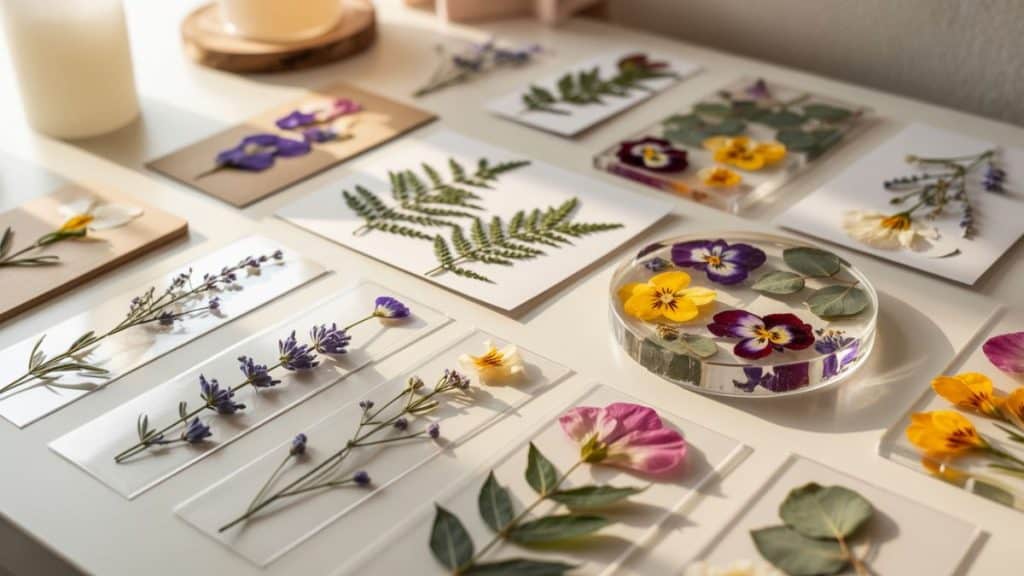
Once you’ve mastered the basic techniques of pressing and mounting flowers, explore these creative projects to showcase your botanical treasures.
Greeting Cards
Create personalized cards by mounting pressed flowers on cardstock. Add a simple message for birthdays, thank you notes, or special occasions. These unique handmade cards make thoughtful gifts themselves.
Botanical Bookmarks
Press small flowers and leaves, mount them on heavy paper, punch a hole at the top, and add a tassel or ribbon. Laminate or coat with clear adhesive to protect the flowers for long-term use.
Pressed Flower Candles
Adhere pressed flowers to the outside of pillar candles using a small amount of melted wax as adhesive. These make beautiful centerpieces or gifts for flower lovers.
Resin Coasters
Embed pressed flowers in clear epoxy resin to create functional coasters that preserve flowers in a waterproof medium. Add gold leaf or colored pigments for extra visual interest.
Pressed Flower Journal
Decorate journal or notebook (affiliate) covers with pressed flowers sealed under a layer of Mod Podge or clear contact paper. Perfect for nature journals or garden planning notebooks.
Botanical Wall Calendar
Create a year-round reminder of your garden by making a calendar with different pressed flowers representing each month. Mount on cardstock and bind the pages together.
Want More Creative Pressed Flower Ideas?
Join our crafting community to receive monthly project ideas, seasonal crafting tips, and exclusive tutorials.Email AddressSubscribe to Newsletter
Preserving Nature’s Beauty Through Pressed Flower Art
Creating pressed flower art connects us to nature’s beauty in a meaningful and lasting way. This timeless craft allows you to preserve special blooms from your garden, memorable bouquets, or flowers discovered on woodland walks.
As you develop your skills, you’ll discover your own unique style and preferences for working with these delicate natural materials. The possibilities are endless from simple framed specimens to elaborate botanical compositions that tell a story or capture a season.
Remember that patience is key to successful pressed flower art. Take your time with each step, from carefully selecting and pressing your flowers to thoughtfully arranging and preserving them. The results are well worth the wait beautiful, one-of-a-kind creations that bring nature’s ephemeral beauty into your home for years to come.
We hope this guide has inspired you to try your hand at pressed flower art. Share your creations with friends and family, or keep them as personal keepsakes that remind you of special moments and places. However you choose to enjoy this craft, you’re participating in a tradition that has celebrated nature’s beauty for generations.
More Craft Ideas
If you love floral art check out more craft ideas right here on Insightful Lines!